Closing & Framing in the 4th Wall pt. 1
Once a collapsed and leaking roof, now fixed with new rafters, tin and strapping; this is a strong and useful structure again. Now, time to do some cleaning up.

(Can you see the color difference between the new wood & old?)


We removed the rotten logs that were somewhat filling the gaps under the Northwest and SE walls, and then moved the giant cubic doghouse. We also removed the chewed boards on the sidewalls. Now, it looks so much better.

Now, for what we've all been waiting for; the building!


 🕊
🕊
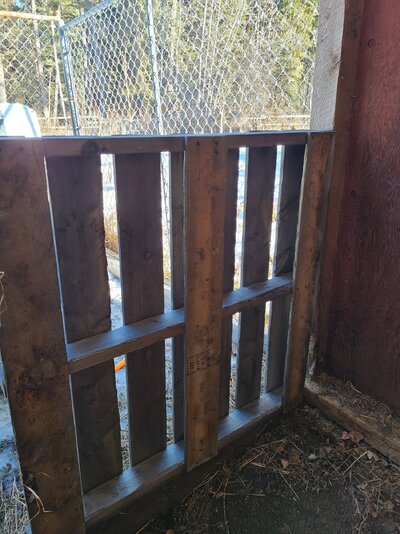
The first pallet was secured with ease. We then installed our first 2x6 and screwed it into the pallet.
Next, we installed the 2nd pallet. It was much harder than the first, because we wanted them to be somewhat the same height, and it needed to fit between the 2x6 and center 6x6. We made it fit by cutting off a few inches on the end with the chainsaw. It's all coming together!
As you may see in the photo above (right), there is now a 2x4 screwed to the 6x6 middle beam (right side), it is there to frame the door.
We added another 2x6 and 2x4 both parallel to the one on the 6x6, about 3½ ft to the right. Then secured a scrap 2x4 atop the previous 2x4s. Now we have a door frame.
2x4 cut offs were then placed above the door frame, creating a small frame to attach strapping to in the near future.
Like clockwork we installed the 3rd pallet, but instead on the right (Northwest).
As you can see above, there is a gap between the 2x4 and the 3rd pallet. We installed a cut-off of another pallet and filled the gap.
Do you see the dog ?
?
After, we just closed the small gap between the 3rd pallet & the Northwest wall with a scrap 2x4.
Here's the wide view of the progress so far. This was a whole days work, so the next page will be "Closing in the wall prt. 2".
Here's what it looked like that morning for comparison:
Continue the journey on pg. 3.
Have any questions? Please ask them in the comments.

 🌬
🌬 🏔
🏔

(Can you see the color difference between the new wood & old?)
We removed the rotten logs that were somewhat filling the gaps under the Northwest and SE walls, and then moved the giant cubic doghouse. We also removed the chewed boards on the sidewalls. Now, it looks so much better.
Now, for what we've all been waiting for; the building!
🕊The first pallet was secured with ease. We then installed our first 2x6 and screwed it into the pallet.
Next, we installed the 2nd pallet. It was much harder than the first, because we wanted them to be somewhat the same height, and it needed to fit between the 2x6 and center 6x6. We made it fit by cutting off a few inches on the end with the chainsaw. It's all coming together!
As you may see in the photo above (right), there is now a 2x4 screwed to the 6x6 middle beam (right side), it is there to frame the door.
We added another 2x6 and 2x4 both parallel to the one on the 6x6, about 3½ ft to the right. Then secured a scrap 2x4 atop the previous 2x4s. Now we have a door frame.
2x4 cut offs were then placed above the door frame, creating a small frame to attach strapping to in the near future.
Like clockwork we installed the 3rd pallet, but instead on the right (Northwest).
As you can see above, there is a gap between the 2x4 and the 3rd pallet. We installed a cut-off of another pallet and filled the gap.
Do you see the dog
?After, we just closed the small gap between the 3rd pallet & the Northwest wall with a scrap 2x4.
Here's the wide view of the progress so far. This was a whole days work, so the next page will be "Closing in the wall prt. 2".
Here's what it looked like that morning for comparison:
Continue the journey on pg. 3.
Have any questions? Please ask them in the comments.
🌬🏔


G'day.