My Extreme Heat Coop (in progress)
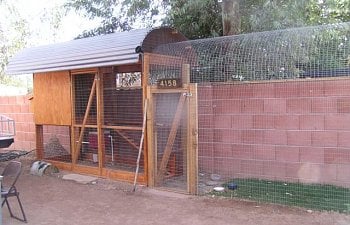
I live in the Sonoran Desert, where it gets very hot and my chicken coop and run have to provide a cool and safe refuge for my birds. I also live in the city and have limited space. In fact, there was only one place for me to put them, a 4’ X 50’ strip. Fortunately, the coop could be positioned directly under a large eucalyptus tree. The coop and run I built were designed to provide as much shade and ventilation as possible. Our plan was hatched three years earlier when we planted the three grapevines that would cover the run.
Framing and covering the run

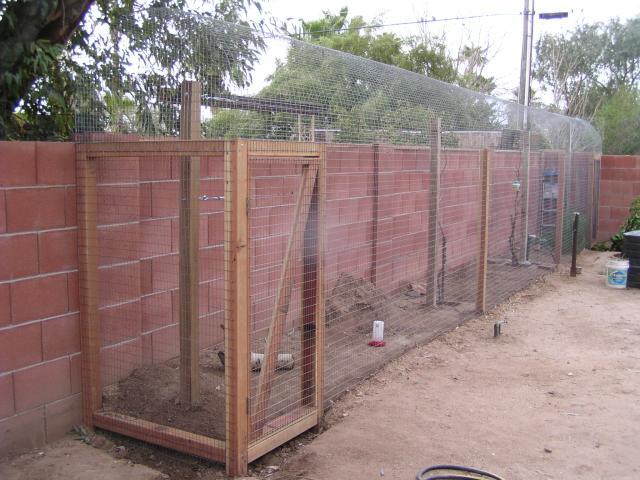
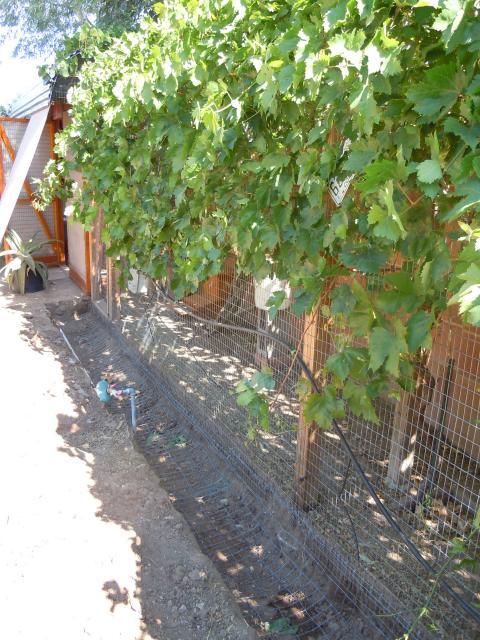
I started by making the chicken run structured around the grapevines so that they would grow up through it. My plan was to have the vines completely cover the run by the time the heat of the summer arrived and provide shade until the first frost when the leaves drop. The run was 4’ X 40’ and first framed in 4” X 4”s, cemented into the ground. I made gates at each end for access to the run and grapes. I used 1” X 2” 14 gauge wire (6’ high) to cover the sides of the run. Most of the wire wall was buried about 8-10 inches in the ground. I then bolted 2” X 4”s to the wall to which I could connect the cover. Finally, I cut 7’ sections of the same wire and hooped them across, working the length of the run, 6’ at a time. The structural integrity of the run improved with each section I added. When it was finished it was quite strong.

Completed run:

Building the coop
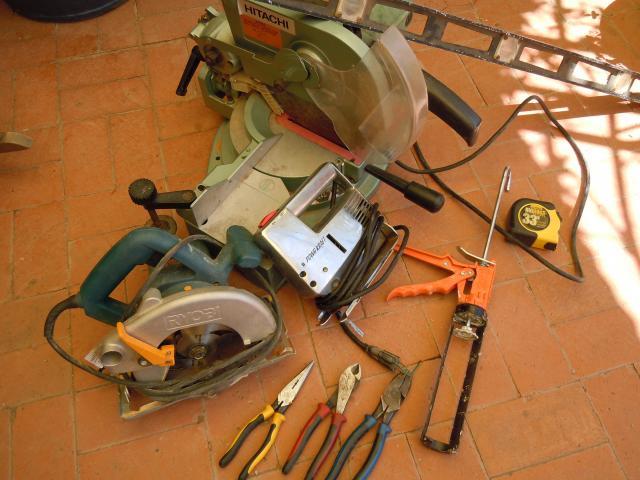
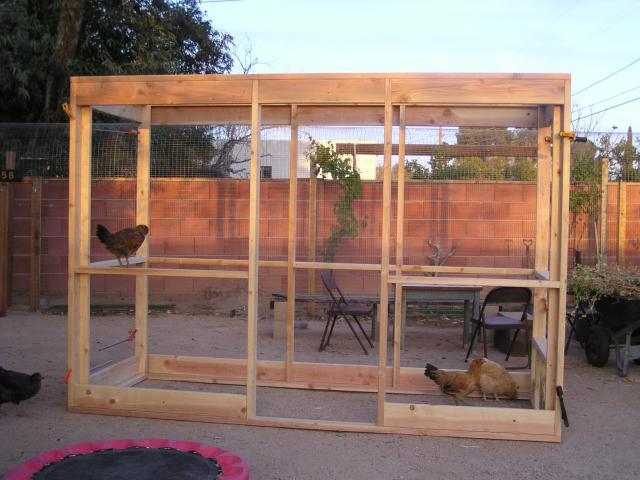
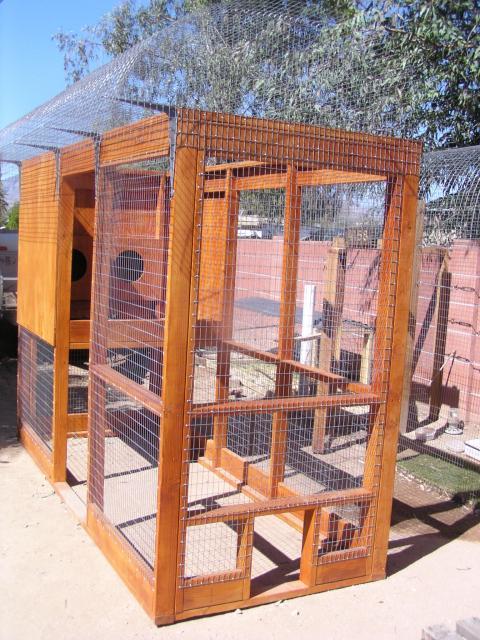
My coop would have a footprint of 4’ X 10’ with walls about 7’ high. Most of the coop would be open, with a small elevated 4’ X 4’ section, which would have walls on 3 sides to provide shelter and also hold the nest boxes. The entire coop was built using the tools pictured here (clamps, screwdriver, hammer, drill, drill bit, Philip's head bit, square, circular saw, chop-saw, jigsaw, level, tape measure, caulking gun, needle-nose pliers, wire cutting pliers, and lineman's pliers):


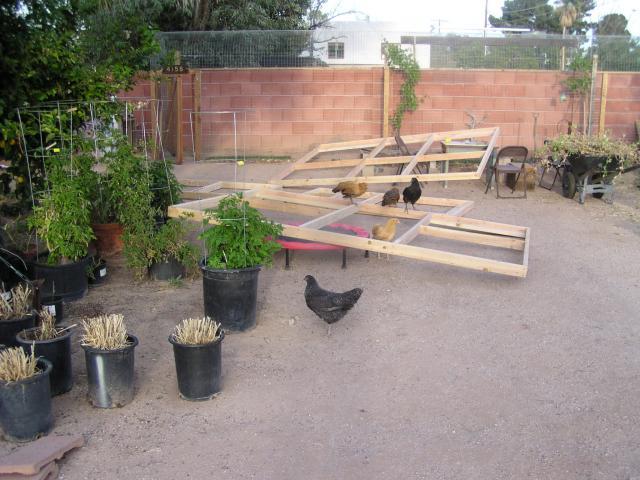
I built the walls of my coop in the shade of my covered patio. I used a drill to pre-drill holes and connect everything with 2”-3” screws. I find that clamps securing each connection make it easier to tap the boards into position so that they are square prior to screwing together. Once the walls were constructed, I carried them closer to the coop location. The birds loved it right away. Again, I used clamps to secure the four walls together, getting them square, plumb, and secure before screwing them together.


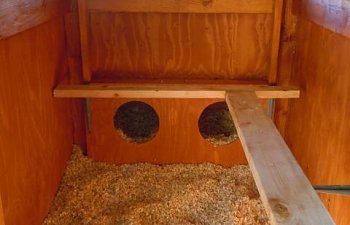
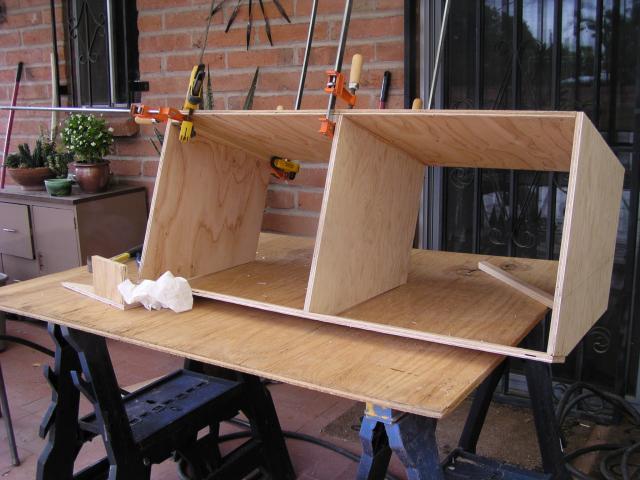
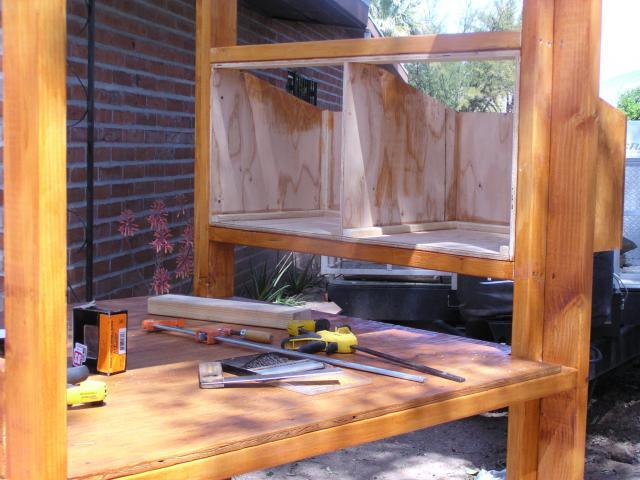
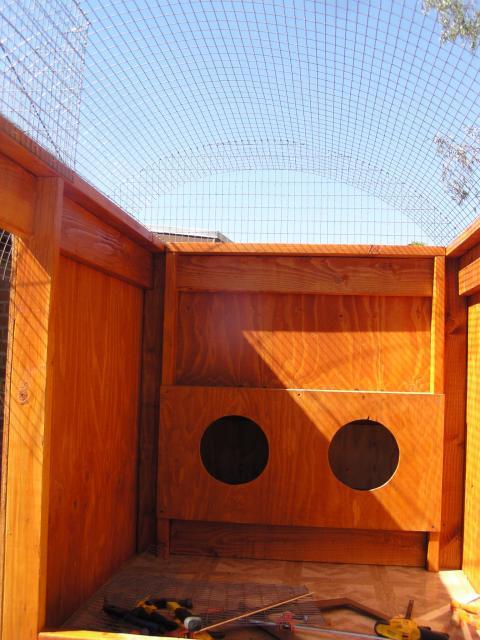
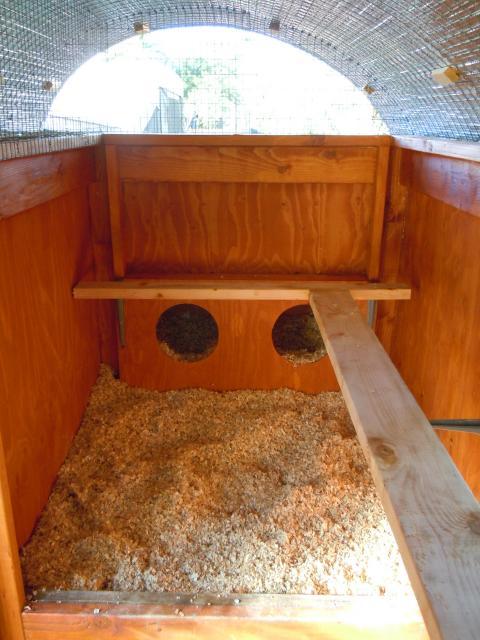
It was time for the nest boxes. Since I only have six birds and won't ever have more than 8, I made two nest boxes. With just two boxes, I was able to make them larger (18' wide X 16" deep), which afforded more air circulation around the laying hens. I used 1/2” plywood, glued and nailed together with a nail gun. That box unit was then inserted into its position within the frame and screwed in. The front cover of the nest boxes was made of plywood with two holes cut out (I used a jigsaw for that).
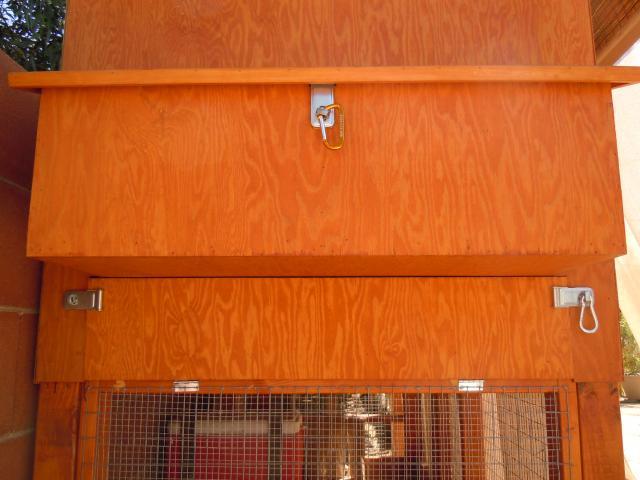
I clad the nest box end of the coop in 1/2" plywood, making an elevated shelter area. I then made a lid and connected that to the back wall of the coop over the nest boxes. Below the nest boxes is a door that opens so that I can push the litter into a wheelbarrow. I also added latches to the openings and secure them all now with carabiners.


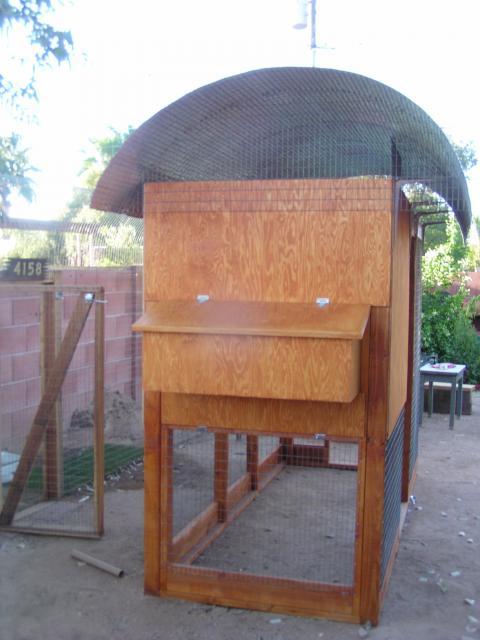
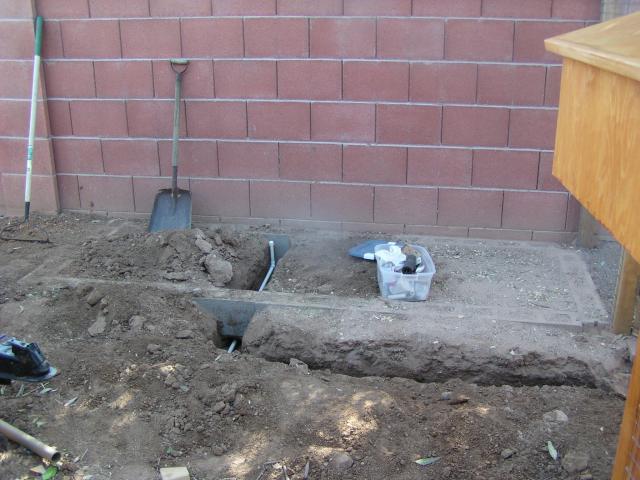
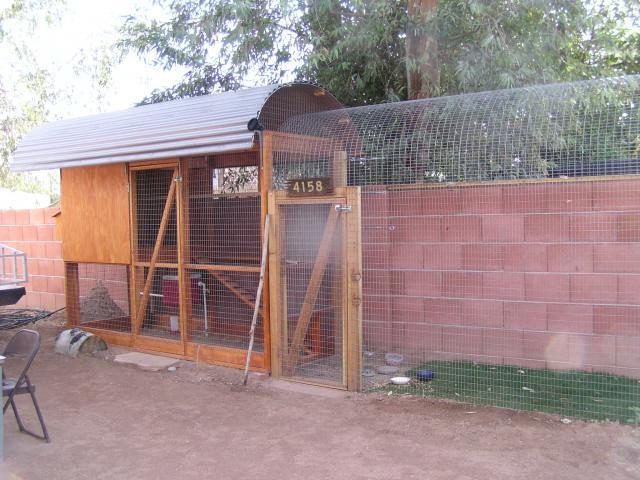
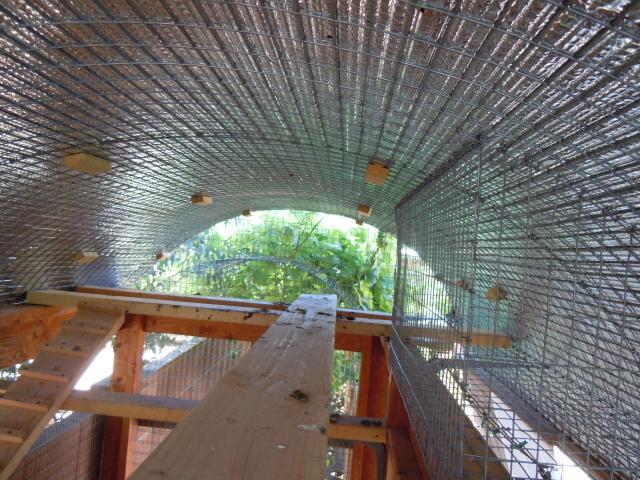
Once everything but the roof was constructed, I painted the wood with sealant and clad the coop in the same wire as the run. The structure of the roof was constructed primarily of wire to allow as much free movement of air as possible. I put 1’ brackets along the front with wire extending out along them and made a hoop-shaped roof to cover the whole thing. With two 6’ sections of wire 8’ long, I ended up having a roof with a foot print of about 6’ X 12’. Overall, the coop is about 9' tall at the peak. I boxed in one section of the overhang so that the birds didn’t get up above the doorway and put wire on the ends of the coop. I then laid insulation down on top of the wire over the roof. Finally, I put polycarbonate corrugated roofing material on top of that. At this point, the coop was mostly built and I moved it over onto the foundation I had made months earlier, constructed of buried concrete blocks and plumbed for water.


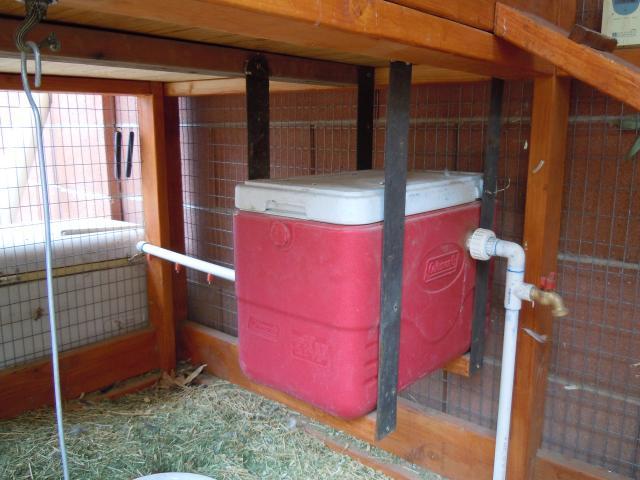
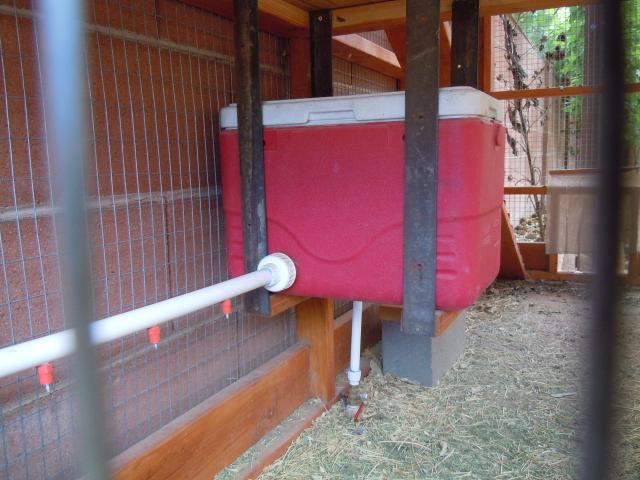
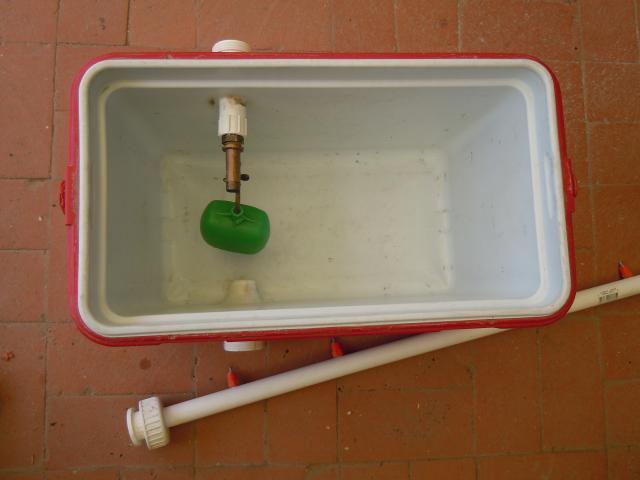
Once the coop was in place I made the roosts and the ladders to get up there. I put my feeder and automatic waterer under the sheltered area of the coop. I made the automatic waterer with an old cooler, some PVC and fittings, silicone, a float valve, and some chicken watering nipples. The holder to the cooler was made with some old metal I found. The bracket towards the center of the coop swings out of the way and I can easily slide out and remove the cooler for cleaning. The cooler is plumbed into my water system and filled as needed by the float valve inside the cooler. I also have a shut-off valve below all that and a faucet too.


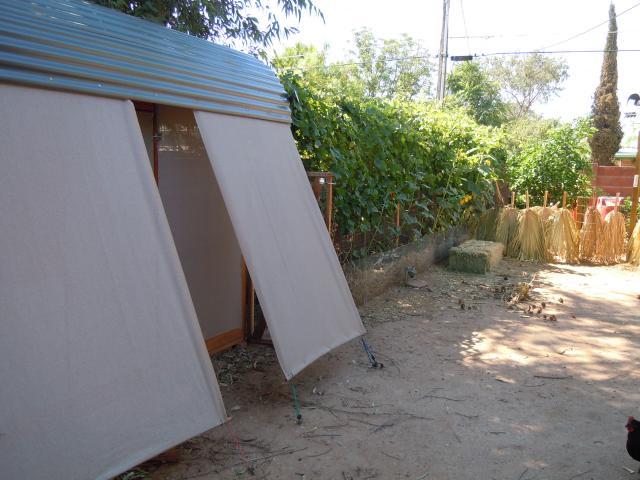
I set about making the coop cooler by attaching shade cloth to the western (exposed) side. I then made shade cloth panels and connected them from the eave of the roof to the ground, leaving space to access the door. The grapes grew quickly as spring commenced and before the real heat arrived the run was completely covered.


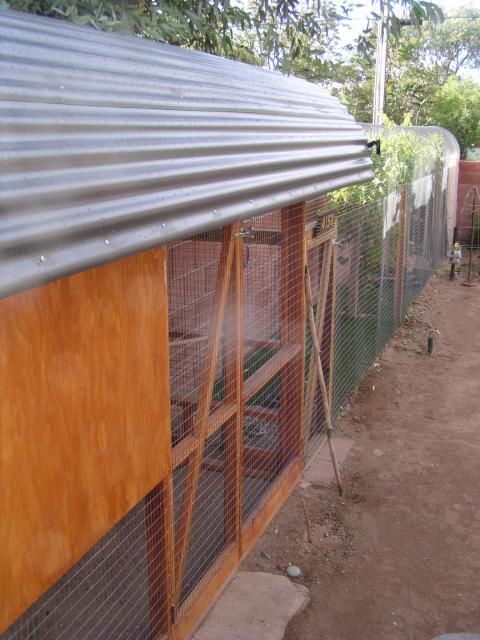
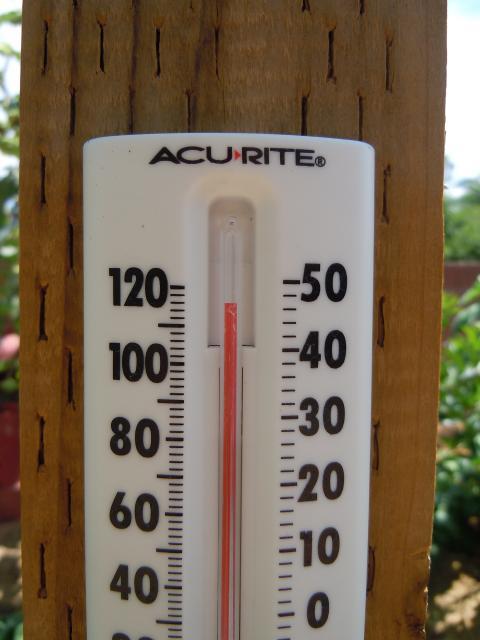
I'm very pleased with the coop roof. It is very strong, yet light and the materials reflect back heat from the sun well; you can't feel the heat emanating through the roof from the inside. The shape, with the overhang in the front, funnels air into the top of the coop where it flows out the ends. During the hottest time of day, the temperature inside the coop tends to be between 5 and 10 degrees F lower than that just outside of the coop. The effect of the grapevines on temperature is even greater. If I spray water into the run, flood one of the vines, or turn on the misters, the temperature can be as much as 20 degrees lower than that right outside the run, although 10 degrees lower is about average. Ten degrees is a lot to a bird when it's 115 outside. During the heat of the summer, my girls like to free-range from early morning to about 8 am, when they go into the run and spend most of the day in there until late afternoon. The run is their favorite place to be in the heat. I also rotate irrigation of the vines so that a different spot gets wet every day and the birds can wade in the tree well around the grape and cool themselves in the damp soil. I also added a mister system that follows the length of the run. They really hate it when it's turned on, but it quickly drops the temperature in there.
The roosts
For the first 6 months of the coop, I played musical roosts. I initially made a roost positioned at a height about even with the top of the back block wall and extending the length of the coop. My plan was that they could go into the sheltered area when the weather was bad and out onto the other end when it was warmer. That was great for about a week and then suddenly, they all decided that the overhang of the roof above the front of the coop was the best roosting position. I suspected this would happen when I made the roof and blocked out the area above the door. The problem with their new roosting location was that it was tough for all of them to squeeze in there and a difficult location for the BOs and the CM to fly. So, I made a new ramp leading up to the new roosting area and a wire section across the end so that all of the birds could hang out on the wire. I ended up moving the roosts several times before settling on that location. All the birds preferred to sit on the wire, rather than the boards. It made sense, more air could circulate around their feet. The problem with that roosting situation became apparent when I discovered that my coop had been invaded by poultry ticks.
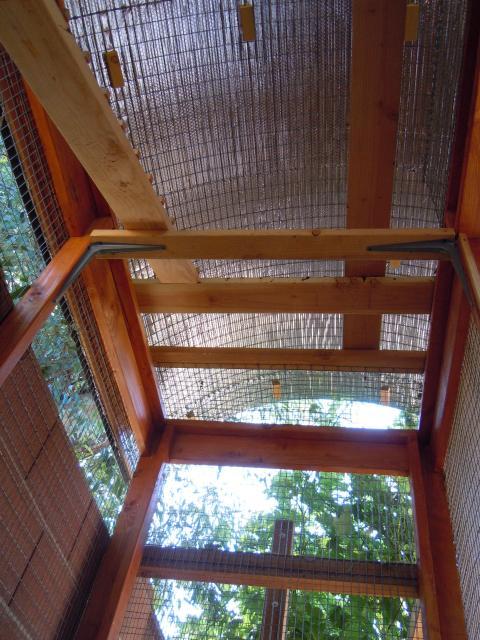
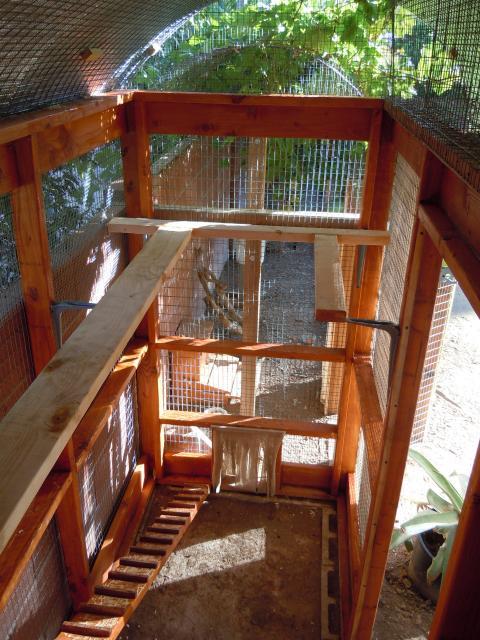
Here is a view of the roost from below and a view from the North end at the roost level. Note that in every location where roosting boards overlapped, masses of ticks had congregated.


In the course of treating the coop for ticks, I completely dismantled the upper roosts and sealed off the overhang so that the chickens could no longer fly up and roost there. I reverted to an expanded version of my original roost layout, making sure there were no cracks or crevices in which ticks could hide. The chickens were very upset about the changes and especially by not being able to fly up to the roof section, but they are quickly adjusting to their new sleeping quarters. To learn more than you ever wanted to about poultry ticks, how to treat them and how to limit or prevent outright infestation, check out my tick page.


Keeping wild birds out of the coop
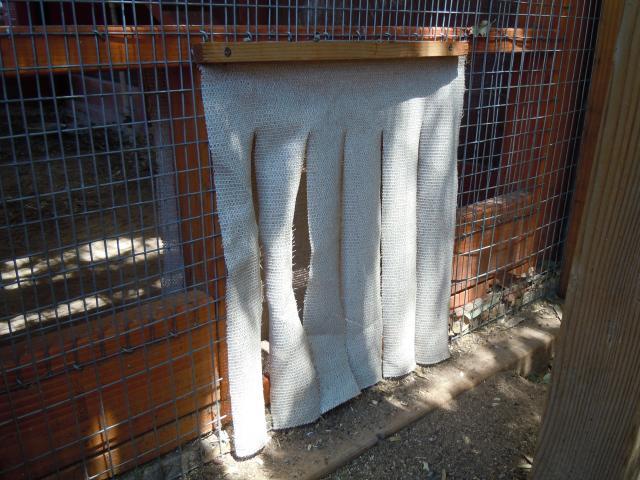
I let my birds out to roam the yard through the gate in the run. I then leave this open so they can come and go to the nest boxes and food and water. The problem was wild birds came in by the hundreds to feast on the chicken feed. The worst offenders were doves and sparrows. So, I read about someone here on BYC who used some mesh netting to hang down and let the chickens through but kept the wild birds out. I did the same with a square of shade cloth but cut strips into the fabric. I then hung this above the door between the coop and run on the outside (not obstructing the pop door at all to begin). I waited a couple of days and moved it down about an inch. I did this until the bottoms of the strips were resting on the ground. By doing this the chickens got used to the fabric being there and gradually learned to push their way through. After the outside curtain was complete, I repeated the steps for the inside with a second curtain. It has been completely effective at keeping doves out of the coop--but not the sparrows. The sparrows would worm their way straight through the curtains. I kept sparrows out of the coop by first removing the food. The sparrows were going right through the 1" X 2" welded wire so I put 1/2" hardware cloth on all the wire of the coop that is exposed to the outside. Those two modifications eliminated the sparrows from the coop. I still had tremendous numbers of birds visiting the feeder outside the coop, so I built two treadle feeders, one for the run and one for the yard (see plans to build the treadle feeder). After constructing the treadle feeders, the numbers of wild birds visiting my back yard reached a level lower than it was before I got chickens (since I don't feed the wild birds at all). I still have wild birds visiting the yard, but at least I have reduced the frequency of contact between wild birds and my chickens. Consequently, the risk of wild bird transmitted disease should be lower.

Pictured below was my other wild bird deterrent. It also deterred small rodents. It was super effective when deployed but wandered off at will. It occasionally scared the heck out of the chickens. RIP Mr. Cooper.

The brute pictured below on the right replaced Mr. Cooper; here it is eating him. He's a giant compared to Mr. Cooper and is really scary to the chickens. He doesn't fear me in the slightest. Fortunately, he only infrequently visits the yard.

Predator proofing
I realize that nothing is 100% predator-proof. However, I think that by considering the types of predators likely to encounter your coop and run and planning accordingly, you can effectively reduce the likelihood of a predator getting into something close to zero. We have bears and mountain lions here in southern AZ and they even occasionally venture into the edges of town. However, it is extremely unlikely either of those things will ever encounter my coop here in the center of town. The greatest risk to my birds comes from dogs, cats, bobcats, coyotes, foxes, raccoons, skunks, hawks, and owls. It is a virtual certainty that each one of those predators will test the coop's defenses (many already have). The strong welded wire covering my coop and run effectively eliminates direct entry from all but digging predators. However, the 1" X 2" openings in the welded wire are plenty large enough for something to reach in and grab one of the birds on the roost where they are sleeping at night. To prevent this, I covered the top 2' of the wire around the inside of the coop walls with an additional layer of 1/2" hardware cloth. Now, when they are sleeping and most vulnerable, nothing can get at them by reaching in through the wire.
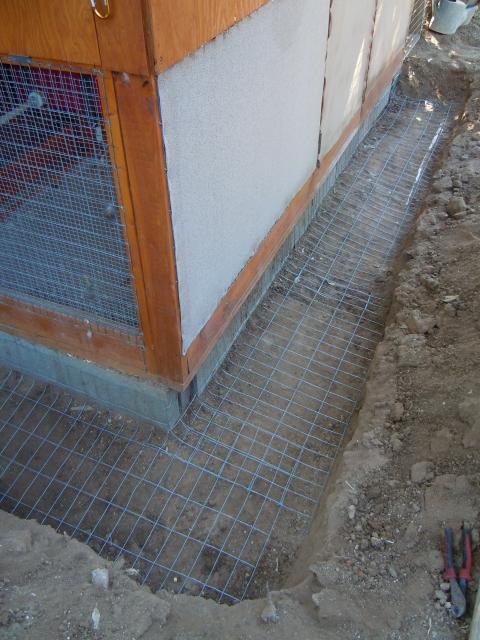
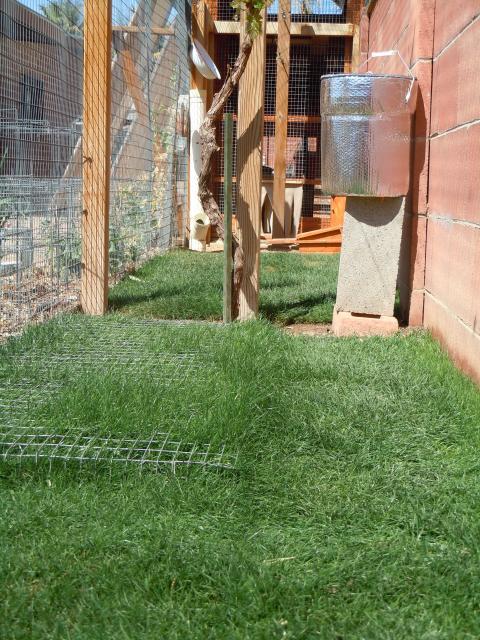
Preventing diggers from getting in required more work. I first dug a trench from the edge of the coop and run and extending out about 20". I sloped the outer edge so that was about 12" deep. I then constructed an apron of 2" X 4" welded wire to surround the exposed sides of the coop and run. I connected the wire to the bottom of the run, overlapping about 4" and using the tag ends of the wire to secure it. I overlapped the entire brick foundation on the coop. Once covered with dirt, any predator would attempt to dig near the bottom edge of the fence or the coop and encounter the buried wire. I would like to have made it wider, but I think that what I've done has greatly reduced the likelihood of any of our potential predators digging through. I chose to bury my apron because having it on the surface of the ground would have been hazardous. We regularly drive vehicles over top of the apron and it is also in a very high foot-traffic area of the yard. I also plant things around the edge of the run. Over the years the apron has been very successful at keeping out diggers. We regularly find spots where animals have attempted to dig under the run but were unsuccessful.


Finally, to prevent dogs and coyotes from pulling the wire and staples out and getting in that way, I put 1" X 2" trim boards everywhere on the edge of wire met wood. I screwed these trim boards in over the top of the staples and wire, making it much more difficult to pull out. I also added an extra gate latch to the bottoms of each of the two gates to the run, making it less likely they could gain access by pulling at the bottom of the gate.


I would point out that all the predator proofing in the world won't matter much at all if the door to the coop or run is left open. Fortunately, this Cooper's hawk was working on reducing the wild bird population in the chicken run, rather than dining on the chickens. The Cooper's hawks have figured out that it is easy to catch doves inside the run and they take advantage of it.


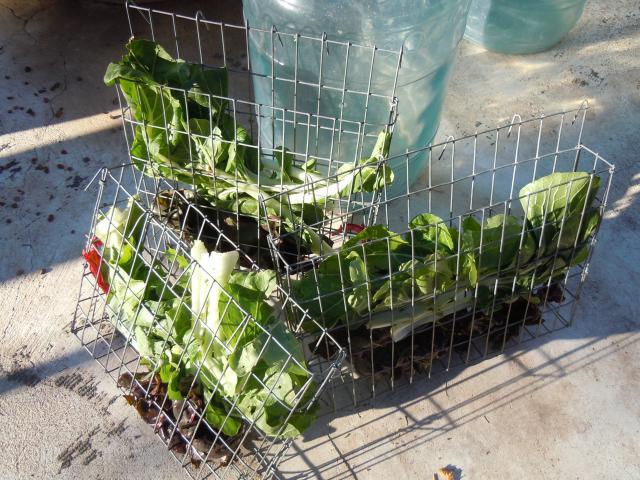
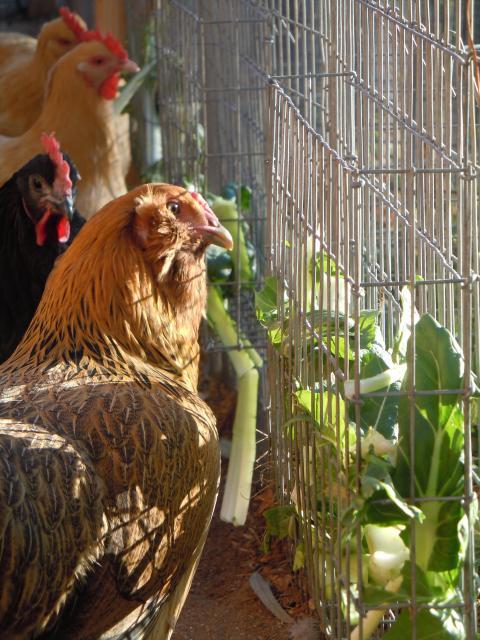
Greens feeders and more nipple waterers
With our mild AZ winters, we're able to garden all year long here in the southern end of the state. My chickens love the fresh greens I'm able to provide for them, but when I put them into a bowl, much of the greens went uneaten. I noticed that when I hung larger plants for them to eat, they wasted much less. So, using the model of a suet feeder, I took old scraps of wire left-over from making the coop to make feeders for greens. I like them because I can carry the feeders in the garden and pluck leaves from plants and hang the feeders on the wall of the run or on my garden fence. They still waste a bit as the 1" X 2" holes are big enough to pull material through. Ideally, the feeders should be made with 1" X 1" welded wire. The chickens get very excited when they see me carrying the feeders.


If you have any questions or comments post them in the comment box below.
I live in the Sonoran Desert, where it gets very hot and my chicken coop and run have to provide a cool and safe refuge for my birds. I also live in the city and have limited space. In fact, there was only one place for me to put them, a 4’ X 50’ strip. Fortunately, the coop could be positioned directly under a large eucalyptus tree. The coop and run I built were designed to provide as much shade and ventilation as possible. Our plan was hatched three years earlier when we planted the three grapevines that would cover the run.
Framing and covering the run
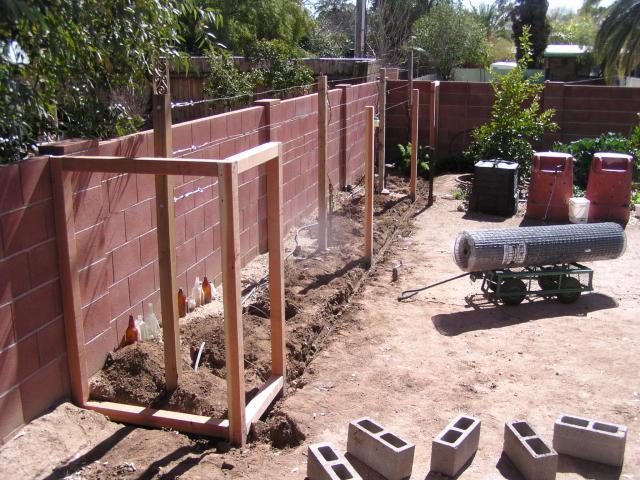
I started by making the chicken run structured around the grapevines so that they would grow up through it. My plan was to have the vines completely cover the run by the time the heat of the summer arrived and provide shade until the first frost when the leaves drop. The run was 4’ X 40’ and first framed in 4” X 4”s, cemented into the ground. I made gates at each end for access to the run and grapes. I used 1” X 2” 14 gauge wire (6’ high) to cover the sides of the run. Most of the wire wall was buried about 8-10 inches in the ground. I then bolted 2” X 4”s to the wall to which I could connect the cover. Finally, I cut 7’ sections of the same wire and hooped them across, working the length of the run, 6’ at a time. The structural integrity of the run improved with each section I added. When it was finished it was quite strong.
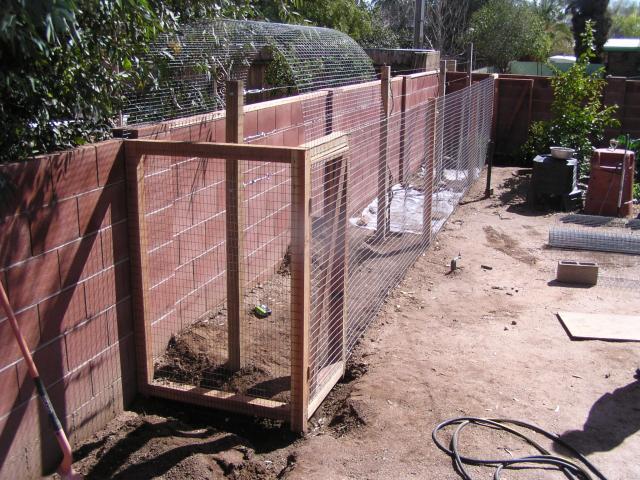
Completed run:
Building the coop
My coop would have a footprint of 4’ X 10’ with walls about 7’ high. Most of the coop would be open, with a small elevated 4’ X 4’ section, which would have walls on 3 sides to provide shelter and also hold the nest boxes. The entire coop was built using the tools pictured here (clamps, screwdriver, hammer, drill, drill bit, Philip's head bit, square, circular saw, chop-saw, jigsaw, level, tape measure, caulking gun, needle-nose pliers, wire cutting pliers, and lineman's pliers):
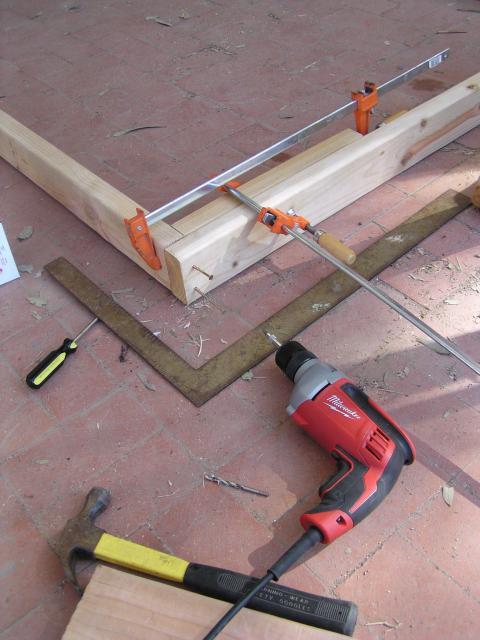
I built the walls of my coop in the shade of my covered patio. I used a drill to pre-drill holes and connect everything with 2”-3” screws. I find that clamps securing each connection make it easier to tap the boards into position so that they are square prior to screwing together. Once the walls were constructed, I carried them closer to the coop location. The birds loved it right away. Again, I used clamps to secure the four walls together, getting them square, plumb, and secure before screwing them together.
It was time for the nest boxes. Since I only have six birds and won't ever have more than 8, I made two nest boxes. With just two boxes, I was able to make them larger (18' wide X 16" deep), which afforded more air circulation around the laying hens. I used 1/2” plywood, glued and nailed together with a nail gun. That box unit was then inserted into its position within the frame and screwed in. The front cover of the nest boxes was made of plywood with two holes cut out (I used a jigsaw for that).
I clad the nest box end of the coop in 1/2" plywood, making an elevated shelter area. I then made a lid and connected that to the back wall of the coop over the nest boxes. Below the nest boxes is a door that opens so that I can push the litter into a wheelbarrow. I also added latches to the openings and secure them all now with carabiners.
Once everything but the roof was constructed, I painted the wood with sealant and clad the coop in the same wire as the run. The structure of the roof was constructed primarily of wire to allow as much free movement of air as possible. I put 1’ brackets along the front with wire extending out along them and made a hoop-shaped roof to cover the whole thing. With two 6’ sections of wire 8’ long, I ended up having a roof with a foot print of about 6’ X 12’. Overall, the coop is about 9' tall at the peak. I boxed in one section of the overhang so that the birds didn’t get up above the doorway and put wire on the ends of the coop. I then laid insulation down on top of the wire over the roof. Finally, I put polycarbonate corrugated roofing material on top of that. At this point, the coop was mostly built and I moved it over onto the foundation I had made months earlier, constructed of buried concrete blocks and plumbed for water.
Once the coop was in place I made the roosts and the ladders to get up there. I put my feeder and automatic waterer under the sheltered area of the coop. I made the automatic waterer with an old cooler, some PVC and fittings, silicone, a float valve, and some chicken watering nipples. The holder to the cooler was made with some old metal I found. The bracket towards the center of the coop swings out of the way and I can easily slide out and remove the cooler for cleaning. The cooler is plumbed into my water system and filled as needed by the float valve inside the cooler. I also have a shut-off valve below all that and a faucet too.
I set about making the coop cooler by attaching shade cloth to the western (exposed) side. I then made shade cloth panels and connected them from the eave of the roof to the ground, leaving space to access the door. The grapes grew quickly as spring commenced and before the real heat arrived the run was completely covered.
I'm very pleased with the coop roof. It is very strong, yet light and the materials reflect back heat from the sun well; you can't feel the heat emanating through the roof from the inside. The shape, with the overhang in the front, funnels air into the top of the coop where it flows out the ends. During the hottest time of day, the temperature inside the coop tends to be between 5 and 10 degrees F lower than that just outside of the coop. The effect of the grapevines on temperature is even greater. If I spray water into the run, flood one of the vines, or turn on the misters, the temperature can be as much as 20 degrees lower than that right outside the run, although 10 degrees lower is about average. Ten degrees is a lot to a bird when it's 115 outside. During the heat of the summer, my girls like to free-range from early morning to about 8 am, when they go into the run and spend most of the day in there until late afternoon. The run is their favorite place to be in the heat. I also rotate irrigation of the vines so that a different spot gets wet every day and the birds can wade in the tree well around the grape and cool themselves in the damp soil. I also added a mister system that follows the length of the run. They really hate it when it's turned on, but it quickly drops the temperature in there.
The roosts
For the first 6 months of the coop, I played musical roosts. I initially made a roost positioned at a height about even with the top of the back block wall and extending the length of the coop. My plan was that they could go into the sheltered area when the weather was bad and out onto the other end when it was warmer. That was great for about a week and then suddenly, they all decided that the overhang of the roof above the front of the coop was the best roosting position. I suspected this would happen when I made the roof and blocked out the area above the door. The problem with their new roosting location was that it was tough for all of them to squeeze in there and a difficult location for the BOs and the CM to fly. So, I made a new ramp leading up to the new roosting area and a wire section across the end so that all of the birds could hang out on the wire. I ended up moving the roosts several times before settling on that location. All the birds preferred to sit on the wire, rather than the boards. It made sense, more air could circulate around their feet. The problem with that roosting situation became apparent when I discovered that my coop had been invaded by poultry ticks.
Here is a view of the roost from below and a view from the North end at the roost level. Note that in every location where roosting boards overlapped, masses of ticks had congregated.
In the course of treating the coop for ticks, I completely dismantled the upper roosts and sealed off the overhang so that the chickens could no longer fly up and roost there. I reverted to an expanded version of my original roost layout, making sure there were no cracks or crevices in which ticks could hide. The chickens were very upset about the changes and especially by not being able to fly up to the roof section, but they are quickly adjusting to their new sleeping quarters. To learn more than you ever wanted to about poultry ticks, how to treat them and how to limit or prevent outright infestation, check out my tick page.
Keeping wild birds out of the coop
I let my birds out to roam the yard through the gate in the run. I then leave this open so they can come and go to the nest boxes and food and water. The problem was wild birds came in by the hundreds to feast on the chicken feed. The worst offenders were doves and sparrows. So, I read about someone here on BYC who used some mesh netting to hang down and let the chickens through but kept the wild birds out. I did the same with a square of shade cloth but cut strips into the fabric. I then hung this above the door between the coop and run on the outside (not obstructing the pop door at all to begin). I waited a couple of days and moved it down about an inch. I did this until the bottoms of the strips were resting on the ground. By doing this the chickens got used to the fabric being there and gradually learned to push their way through. After the outside curtain was complete, I repeated the steps for the inside with a second curtain. It has been completely effective at keeping doves out of the coop--but not the sparrows. The sparrows would worm their way straight through the curtains. I kept sparrows out of the coop by first removing the food. The sparrows were going right through the 1" X 2" welded wire so I put 1/2" hardware cloth on all the wire of the coop that is exposed to the outside. Those two modifications eliminated the sparrows from the coop. I still had tremendous numbers of birds visiting the feeder outside the coop, so I built two treadle feeders, one for the run and one for the yard (see plans to build the treadle feeder). After constructing the treadle feeders, the numbers of wild birds visiting my back yard reached a level lower than it was before I got chickens (since I don't feed the wild birds at all). I still have wild birds visiting the yard, but at least I have reduced the frequency of contact between wild birds and my chickens. Consequently, the risk of wild bird transmitted disease should be lower.
Pictured below was my other wild bird deterrent. It also deterred small rodents. It was super effective when deployed but wandered off at will. It occasionally scared the heck out of the chickens. RIP Mr. Cooper.

The brute pictured below on the right replaced Mr. Cooper; here it is eating him. He's a giant compared to Mr. Cooper and is really scary to the chickens. He doesn't fear me in the slightest. Fortunately, he only infrequently visits the yard.

Predator proofing
I realize that nothing is 100% predator-proof. However, I think that by considering the types of predators likely to encounter your coop and run and planning accordingly, you can effectively reduce the likelihood of a predator getting into something close to zero. We have bears and mountain lions here in southern AZ and they even occasionally venture into the edges of town. However, it is extremely unlikely either of those things will ever encounter my coop here in the center of town. The greatest risk to my birds comes from dogs, cats, bobcats, coyotes, foxes, raccoons, skunks, hawks, and owls. It is a virtual certainty that each one of those predators will test the coop's defenses (many already have). The strong welded wire covering my coop and run effectively eliminates direct entry from all but digging predators. However, the 1" X 2" openings in the welded wire are plenty large enough for something to reach in and grab one of the birds on the roost where they are sleeping at night. To prevent this, I covered the top 2' of the wire around the inside of the coop walls with an additional layer of 1/2" hardware cloth. Now, when they are sleeping and most vulnerable, nothing can get at them by reaching in through the wire.
Preventing diggers from getting in required more work. I first dug a trench from the edge of the coop and run and extending out about 20". I sloped the outer edge so that was about 12" deep. I then constructed an apron of 2" X 4" welded wire to surround the exposed sides of the coop and run. I connected the wire to the bottom of the run, overlapping about 4" and using the tag ends of the wire to secure it. I overlapped the entire brick foundation on the coop. Once covered with dirt, any predator would attempt to dig near the bottom edge of the fence or the coop and encounter the buried wire. I would like to have made it wider, but I think that what I've done has greatly reduced the likelihood of any of our potential predators digging through. I chose to bury my apron because having it on the surface of the ground would have been hazardous. We regularly drive vehicles over top of the apron and it is also in a very high foot-traffic area of the yard. I also plant things around the edge of the run. Over the years the apron has been very successful at keeping out diggers. We regularly find spots where animals have attempted to dig under the run but were unsuccessful.
Finally, to prevent dogs and coyotes from pulling the wire and staples out and getting in that way, I put 1" X 2" trim boards everywhere on the edge of wire met wood. I screwed these trim boards in over the top of the staples and wire, making it much more difficult to pull out. I also added an extra gate latch to the bottoms of each of the two gates to the run, making it less likely they could gain access by pulling at the bottom of the gate.
I would point out that all the predator proofing in the world won't matter much at all if the door to the coop or run is left open. Fortunately, this Cooper's hawk was working on reducing the wild bird population in the chicken run, rather than dining on the chickens. The Cooper's hawks have figured out that it is easy to catch doves inside the run and they take advantage of it.


Greens feeders and more nipple waterers
With our mild AZ winters, we're able to garden all year long here in the southern end of the state. My chickens love the fresh greens I'm able to provide for them, but when I put them into a bowl, much of the greens went uneaten. I noticed that when I hung larger plants for them to eat, they wasted much less. So, using the model of a suet feeder, I took old scraps of wire left-over from making the coop to make feeders for greens. I like them because I can carry the feeders in the garden and pluck leaves from plants and hang the feeders on the wall of the run or on my garden fence. They still waste a bit as the 1" X 2" holes are big enough to pull material through. Ideally, the feeders should be made with 1" X 1" welded wire. The chickens get very excited when they see me carrying the feeders.
If you have any questions or comments post them in the comment box below.

