We live out in the country, in a country style subdivision, in Central Texas near Ft Hood. We have houses around us, but they are all on an acre and a quarter or more sized lots. Lots of small livestock out here, like chickens, goats, and horses. My wife had a pet chicken when she was growing up, and has always wanted to get more. We already have two horses, four dogs, and a cockatiel, so why not? Still, I stalled for a year or two, because I didn't want to spend the money on the cheap looking pre-made coops that I saw for sale on Amazon or at Tractor Supply or the local lumber yard. So last year I told my wife and daughter that we would do the chicken thing this year, and then I promptly forgot all about the issue. Fast forward till March of 2020, and the Corona virus quarantine begins and we are at home, and all of our scheduled activities that keeps our lives all hectic are suddenly cancelled. Then the stores all run out of eggs. We found other sources of eggs, but this reminded my wife and daughter about the chicken promise. Soooo we go by the local feed store to see when they are getting their baby chicks in. There is some delay, but we get some great advice, including a heads up about byc.com. We find some chicks at Tractor Supply in Belton, Tx, and become the proud owners of three Buff Orpington pullets and three straight-run Lavender Orpingtons. (We think possibly only one may be a rooster... maybe). Anyhow, so now we have six chicks in a horse trough in our garage with a heat lamp, pine shavings food and water. we are handling them daily... multiple times a day. Gosh they are cute.... did they just grow? IthoughttheguyatTractorSupplysaidwehadfourMONTHS!!! We may not have four weeks even to finish the coop!! So I start reading and looking over the plans here on BYC. I have kind of a unique situation in that we have a horse property. I don't want the chicks too close to the house, so we are going to put it close to the barn. So my challenge is how to keep the chicks safe night and day. We decided to do an enclosed run and a secure coop. My main inspiration came from the Chichen Paradise Small Coop. So, I start sketching up ideas.

Because we are building next to the side of the barn, I have to have the roof slope towards the door in my original design. So now I need to make sure my roof drains and I get a rise over run of 1 1/2 inches rise per foot of run. I've decided that my coop and run is going to be 12 feet by five feet. Then while I'm thinking about the roof slope, I start thinking about the overhang. Will it interfere with the door?
This was my attempt to make sure the overhang wouldn't block the screen door opening.
Finally, I decide to put the door to the run on the far end from the coop, that solved a lot of problems.
and here is my materials list. I did have some things already laying around that I could reuse, some 2x4s, nails of various types, screws, and a heavy rubber floor mat for a horse's stall (more about that in a bit.) Here is my materials list, except it doesn't have the four asphalt corrugated roofing panels that I ended up buying. The metal corrugated sheet metal panels I was going to use started to seem like they might be too dangerous for my horses.
This was turning into a bigger project that I thought I wanted to tackle, but I was committed. And for a few hundred dollars more than the pre fab cheap looking coops, I would have something more solid. Turns out I spent double what I meant to, but I'm really happy with the result.
For tools, I had a circular saw, a jigsaw, a drill, a hammer, a t-square, a level, tin snips, and an assortment of bits, screwdrivers, and a measuring tape.
So, now that I have a plan, I need to get started. The chicks are already looking like T-Rex Mini-me's. Daylight's burning. Here is an overview of my barn, we have the coop on the lefthand side of the picture.

Added bonus, as a part of this project, I'm going to finish painting the trim on the barn.
Here is my last sketch, I'm making the run 12 ft by 5 ft, and the coop 4 ft by 5 ft. And I'm raising the coop up 2 ft off the ground.
Here is a key point to remember, don't forget to include the actual width of your boards in your measurements. A 2x4 is not 2 in by 4 in, rather it is 1 1/2 in by 3 1/2 inches. So my 5 ft wide coop/run is really 5 ft 7 inches when measured from the outside. But still 60 sq ft of usable space inside for the chickens.
The wall closest to the barn is going to be 88 inches, while the other wall is just over 80 1/4 inches.
I start to clear and level the ground some on the side of the barn. If I had spent more time doing this, I might have saved myself some headaches. Nothing bad, its just I kept having to adjust my cuts by 1/4 to 1/2 inch here and there throughout the project.
This is my spot, so I start leveling up with a shovel and a rake.
Now I'm in Central Texas.. out in the country. We have hawks, owls, eagles, dogs, foxes, racoons, and opossums that all think chickens make a great snack. So I need to make this run secure from the sides, above, and below. So, starting with the below, I start trenching down to the Ciliche (a hard rock/clay matrix that is like digging in concrete) that is native to our area.
Then I insert paving stones to form an underground "wall" down to the Ciliche. I put the other paving stones on top of these to form a "T" that a predator would have to get through.
Once I have the foundation stones down. I used these old boards to check if my foundation was "level". It pretty much was after about 20 more minutes of work.
Then I put down my pressure treated 4x4 posts for the base.
So, I have the barn, which has a concrete slab on one side of my coop. Nothing coming from that direction. But I have a new problem. The wall of my coop on the barn side needs to be full framed up from the beginning. So I put that together. Any mistakes in measuring, I'll just have to adapt. Even though I measured three times before each cut, there were plenty of minor mistakes here and there. They all average out in the end.
So the frame is going up, I've got the first wall of the coop in place.
My plan is to have the floor of the coop 2 ft off the ground to protect against snakes and to have more room in the run under the coop. I had also decided that instead of hardware cloth on the bottom 2 ft of the coop on the side facing the road in front of my house and barn, I would just have a solid wall. I also placed the nesting box inside the run, so from the road, this new addition looks like a tack room or tool room added to my barn, rather than a chicken coop.
Here I've framed in my outside window, and I've starting hanging the joists for my floor. I have the latches to lock the window to the outside of the coop since I'm going to hang hardware cloth on the inside of the window to keep predators from coming in that way if I leave the windows open.
We've got the door into the run hung! We reinforced the door with metal plates where the joining work looked weak, and added 1/4 inch hardware cloth to the inside. We have three hinges and three latches.
once I had the floor joists done, I cut a piece of plywood with the jigsaw to fit for the floor. I cut too big and was unhappy with the gaps. That's when my wife pointed out that we also had a big piece of rubber floor matting for the horse stalls in the barn that was laying around extra. I trimmed that up tight and put it in. That was half a day by itself. That stuff was hard to cut, and heavy. I had to hammer it into place. But then the rubber expanded to fill in all the gaps that I didn't like in my plywood floor. Nice and snug. Nothing coming in from below. This piece of mat must weigh at least 60 lbs. Heavy and awkward. But it was on hand and paid for long ago.
Started painting to match the barn. The trim and run would be black and the coop red.
My wife and I went to Texas Tech University, so we love our school colors!!
I'm going to put the nesting box below the window and the pop door to the right. In my plans I had it to the left, but then I decided that the ramp would be in the way coming into the run from the screen door.
I've framed up the pop door with some 2x4 scraps because I've decided to add an automatic popdoor from chickenguard.com
You can also see on the right where my access door to clean the coop is going to be.
when I added those diagonal braces, this whole construct became solid as a rock.
Making progress closing up the framework with plywood. I'm going to cover the plywood with cedar slats like those used to build a privacy fence.
This is how i anchored my nesting box.
So this is the skeleton frame of my nesting box. I covered this with plywood, built the door for it, and covered with more of the cedar slats.
I got up into the coop and discovered I had more gaps than I wanted. Seeing this, I started to fill the gaps with the leftover cut ends of my 2x4s to fill the holes. The cedar slats finished closing everything up and made sure it look nice. I covered the inside of both windows with hardware cloth. I didn't use fence staples, instead I used screws and washers. This was a LOT easier. I learned to fit the hardware cloth by watching 3-4 videos on youtube. It's amazing what you can learn online nowadays.
Shaping up nicely I think. Got to keep moving though. There may be a vaccine to COVID before I finish this thing.
Here is my new access door, I framed the plywood piece with 1x2's to keep key screws for the hinges in place and to block gaps for drafts when the door is closed. This fit worked out right the first time. I considered that a miracle.
Door fitted great, just have to hang the gate latch. I flipped the arm backwards and it worked well.
Yep, the floor is strong.
Here I've got the hardware cloth hung up. The screws and washers worked well. I made the ramp with 1x2's screwed onto a 1x8. I hung it with two cup hooks latching into two eyebolts under the popdoor.
Now that the coop is completed, I added these stones for additional standoff from digging predators, and to keep the horses from stepping on the foundation paving stones. The horses also provide a roving security patrol outside of the coop. Doesn't get better than that.
.
We made this as secure as we could. Having been stationed at Ft Knox once upon a time, my wife and I joked that these chickens were like the gold at Ft Knox... somehow that became Fort Clucks.
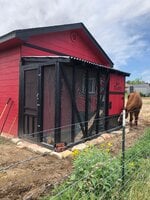
Some final views from different angles.
We are using a hanging feeder under the coop, and a five gallon double walled fount for water. I'm loving that automatic chickenguard popdoor.
And I finished painting and trimming up the barn as well.

I didn't leave the sign there in the end. Not too many racoons will obey signs, dang it.
Because we are building next to the side of the barn, I have to have the roof slope towards the door in my original design. So now I need to make sure my roof drains and I get a rise over run of 1 1/2 inches rise per foot of run. I've decided that my coop and run is going to be 12 feet by five feet. Then while I'm thinking about the roof slope, I start thinking about the overhang. Will it interfere with the door?
This was my attempt to make sure the overhang wouldn't block the screen door opening.
Finally, I decide to put the door to the run on the far end from the coop, that solved a lot of problems.
and here is my materials list. I did have some things already laying around that I could reuse, some 2x4s, nails of various types, screws, and a heavy rubber floor mat for a horse's stall (more about that in a bit.) Here is my materials list, except it doesn't have the four asphalt corrugated roofing panels that I ended up buying. The metal corrugated sheet metal panels I was going to use started to seem like they might be too dangerous for my horses.
This was turning into a bigger project that I thought I wanted to tackle, but I was committed. And for a few hundred dollars more than the pre fab cheap looking coops, I would have something more solid. Turns out I spent double what I meant to, but I'm really happy with the result.
For tools, I had a circular saw, a jigsaw, a drill, a hammer, a t-square, a level, tin snips, and an assortment of bits, screwdrivers, and a measuring tape.
So, now that I have a plan, I need to get started. The chicks are already looking like T-Rex Mini-me's. Daylight's burning. Here is an overview of my barn, we have the coop on the lefthand side of the picture.
Added bonus, as a part of this project, I'm going to finish painting the trim on the barn.
Here is my last sketch, I'm making the run 12 ft by 5 ft, and the coop 4 ft by 5 ft. And I'm raising the coop up 2 ft off the ground.
Here is a key point to remember, don't forget to include the actual width of your boards in your measurements. A 2x4 is not 2 in by 4 in, rather it is 1 1/2 in by 3 1/2 inches. So my 5 ft wide coop/run is really 5 ft 7 inches when measured from the outside. But still 60 sq ft of usable space inside for the chickens.
The wall closest to the barn is going to be 88 inches, while the other wall is just over 80 1/4 inches.
I start to clear and level the ground some on the side of the barn. If I had spent more time doing this, I might have saved myself some headaches. Nothing bad, its just I kept having to adjust my cuts by 1/4 to 1/2 inch here and there throughout the project.
This is my spot, so I start leveling up with a shovel and a rake.
Now I'm in Central Texas.. out in the country. We have hawks, owls, eagles, dogs, foxes, racoons, and opossums that all think chickens make a great snack. So I need to make this run secure from the sides, above, and below. So, starting with the below, I start trenching down to the Ciliche (a hard rock/clay matrix that is like digging in concrete) that is native to our area.
Then I insert paving stones to form an underground "wall" down to the Ciliche. I put the other paving stones on top of these to form a "T" that a predator would have to get through.
Once I have the foundation stones down. I used these old boards to check if my foundation was "level". It pretty much was after about 20 more minutes of work.
Then I put down my pressure treated 4x4 posts for the base.
So, I have the barn, which has a concrete slab on one side of my coop. Nothing coming from that direction. But I have a new problem. The wall of my coop on the barn side needs to be full framed up from the beginning. So I put that together. Any mistakes in measuring, I'll just have to adapt. Even though I measured three times before each cut, there were plenty of minor mistakes here and there. They all average out in the end.
So the frame is going up, I've got the first wall of the coop in place.
My plan is to have the floor of the coop 2 ft off the ground to protect against snakes and to have more room in the run under the coop. I had also decided that instead of hardware cloth on the bottom 2 ft of the coop on the side facing the road in front of my house and barn, I would just have a solid wall. I also placed the nesting box inside the run, so from the road, this new addition looks like a tack room or tool room added to my barn, rather than a chicken coop.
Here I've framed in my outside window, and I've starting hanging the joists for my floor. I have the latches to lock the window to the outside of the coop since I'm going to hang hardware cloth on the inside of the window to keep predators from coming in that way if I leave the windows open.
We've got the door into the run hung! We reinforced the door with metal plates where the joining work looked weak, and added 1/4 inch hardware cloth to the inside. We have three hinges and three latches.
once I had the floor joists done, I cut a piece of plywood with the jigsaw to fit for the floor. I cut too big and was unhappy with the gaps. That's when my wife pointed out that we also had a big piece of rubber floor matting for the horse stalls in the barn that was laying around extra. I trimmed that up tight and put it in. That was half a day by itself. That stuff was hard to cut, and heavy. I had to hammer it into place. But then the rubber expanded to fill in all the gaps that I didn't like in my plywood floor. Nice and snug. Nothing coming in from below. This piece of mat must weigh at least 60 lbs. Heavy and awkward. But it was on hand and paid for long ago.
Started painting to match the barn. The trim and run would be black and the coop red.
My wife and I went to Texas Tech University, so we love our school colors!!
I'm going to put the nesting box below the window and the pop door to the right. In my plans I had it to the left, but then I decided that the ramp would be in the way coming into the run from the screen door.
I've framed up the pop door with some 2x4 scraps because I've decided to add an automatic popdoor from chickenguard.com
You can also see on the right where my access door to clean the coop is going to be.
when I added those diagonal braces, this whole construct became solid as a rock.
Making progress closing up the framework with plywood. I'm going to cover the plywood with cedar slats like those used to build a privacy fence.
This is how i anchored my nesting box.
So this is the skeleton frame of my nesting box. I covered this with plywood, built the door for it, and covered with more of the cedar slats.
I got up into the coop and discovered I had more gaps than I wanted. Seeing this, I started to fill the gaps with the leftover cut ends of my 2x4s to fill the holes. The cedar slats finished closing everything up and made sure it look nice. I covered the inside of both windows with hardware cloth. I didn't use fence staples, instead I used screws and washers. This was a LOT easier. I learned to fit the hardware cloth by watching 3-4 videos on youtube. It's amazing what you can learn online nowadays.
Shaping up nicely I think. Got to keep moving though. There may be a vaccine to COVID before I finish this thing.
Here is my new access door, I framed the plywood piece with 1x2's to keep key screws for the hinges in place and to block gaps for drafts when the door is closed. This fit worked out right the first time. I considered that a miracle.
Door fitted great, just have to hang the gate latch. I flipped the arm backwards and it worked well.
Yep, the floor is strong.
Here I've got the hardware cloth hung up. The screws and washers worked well. I made the ramp with 1x2's screwed onto a 1x8. I hung it with two cup hooks latching into two eyebolts under the popdoor.
Now that the coop is completed, I added these stones for additional standoff from digging predators, and to keep the horses from stepping on the foundation paving stones. The horses also provide a roving security patrol outside of the coop. Doesn't get better than that.
We made this as secure as we could. Having been stationed at Ft Knox once upon a time, my wife and I joked that these chickens were like the gold at Ft Knox... somehow that became Fort Clucks.
Some final views from different angles.
We are using a hanging feeder under the coop, and a five gallon double walled fount for water. I'm loving that automatic chickenguard popdoor.
And I finished painting and trimming up the barn as well.
I didn't leave the sign there in the end. Not too many racoons will obey signs, dang it.