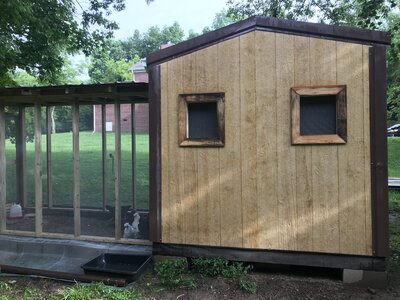
Our "cover" image is our finished coop/run picture:
Summary:
It has taken about a month of Saturday's and Sunday's for us to finish our coop/run. What was key was we first took inventory of what was usable to save money.. Then we set our goals and requirements. For us when we start a big project Michael likes to cut corners or save money and setting the requirements is something Laura makes sure are agreed to before construction starts. We discussed lessons learned from our previous coops. One that we purchased and added a run onto. The other was a DIY from pallet wood.
The primary goal for the new one is to build Laura's dream she shed coop and run") . We re-used foundation blocks and 2x6 treated lumber. In addition we also had 36" wide metal roofing from the house that was re-used. Then we made our Lowe's order needs each weekend. One key here is order online and then do a pick-up. It will save you lots of time walking around the store. With COVID-19 we found that some items were out of stock so we had to change on the fly and doing that online is much easier. For example the hardwire cloth we used we could only find in 2' wide sheets. But I think that particularly ended up very well for us. The other biggie is "screw" things together or purchase a "nailer". I am glad I had a framing and brad nailer to use. I think that is a big decision for a larger shed/run. We could not insert our video's into the post so we link them below from our YouTube channel. They do the best job on "how we did it" on each construction day. I put a summary below each video link to help if you have a "specific" interest. We have attached our plans and lots of other pictures.
. We re-used foundation blocks and 2x6 treated lumber. In addition we also had 36" wide metal roofing from the house that was re-used. Then we made our Lowe's order needs each weekend. One key here is order online and then do a pick-up. It will save you lots of time walking around the store. With COVID-19 we found that some items were out of stock so we had to change on the fly and doing that online is much easier. For example the hardwire cloth we used we could only find in 2' wide sheets. But I think that particularly ended up very well for us. The other biggie is "screw" things together or purchase a "nailer". I am glad I had a framing and brad nailer to use. I think that is a big decision for a larger shed/run. We could not insert our video's into the post so we link them below from our YouTube channel. They do the best job on "how we did it" on each construction day. I put a summary below each video link to help if you have a "specific" interest. We have attached our plans and lots of other pictures.
What will we change/finish:
- Automatic door opener will be added from the coop to run. This is a must when you want to vacation.
- Paint will be added by Laura. Last I heard it is going to have a pink door.
- Inside the coop we will adding roosting bars. We are researching options here so if you have a suggestion please let us know.
- Feed and water options that will allow for removal of the "rookie" equipment. No harm intended to you rookies, but this must be changed for us.
- We have growth capabilities for another nesting box that will be accessible from the outside. I am sure it will come at some point with 14 chickens. Because chicken math is a real thing
What we learned from the past that worked out well for us on this construction was "patience, patience, patience". Don't get in a hurry and be intentional and have a picture in your mind when you start each step. We looked at other designs and then wrote it down on paper and then it changed over the weeks as we worked on Saturday's and Sunday's. I would have left off the gutter over top of the run - it is a waste, but vinyl gutters are not that expensive.
Our construction videos:
- Coop Day 1;
Made sure the foundation was level and solid. We then installed the sub-floor and started on the walls.
- Coop Day 2;
Installed the siding, roof framing and metal roof.
- Coop Day 3;
Built and installed the interior wall which will support the nesting box. Also finished out the steel metal door and metal trim work around the roof and sides.
- Run Day 1;
Again we made sure the foundation was level and solid. We then built the walls and connected the hardwire cloth and then installed them.
- Run Day 2;
Framed in for the metal roof and then cut and installed it.
- Final Wrap-Up Day;
Cut out the windows and sliding door and installed them. Then we put in that most important nesting box for those precious eggs.
Our plans thumbnails:

Other finished picture thumbnails:

Summary:
It has taken about a month of Saturday's and Sunday's for us to finish our coop/run. What was key was we first took inventory of what was usable to save money.. Then we set our goals and requirements. For us when we start a big project Michael likes to cut corners or save money and setting the requirements is something Laura makes sure are agreed to before construction starts. We discussed lessons learned from our previous coops. One that we purchased and added a run onto. The other was a DIY from pallet wood.
The primary goal for the new one is to build Laura's dream she shed coop and run
. We re-used foundation blocks and 2x6 treated lumber. In addition we also had 36" wide metal roofing from the house that was re-used. Then we made our Lowe's order needs each weekend. One key here is order online and then do a pick-up. It will save you lots of time walking around the store. With COVID-19 we found that some items were out of stock so we had to change on the fly and doing that online is much easier. For example the hardwire cloth we used we could only find in 2' wide sheets. But I think that particularly ended up very well for us. The other biggie is "screw" things together or purchase a "nailer". I am glad I had a framing and brad nailer to use. I think that is a big decision for a larger shed/run. We could not insert our video's into the post so we link them below from our YouTube channel. They do the best job on "how we did it" on each construction day. I put a summary below each video link to help if you have a "specific" interest. We have attached our plans and lots of other pictures.What will we change/finish:
- Automatic door opener will be added from the coop to run. This is a must when you want to vacation.
- Paint will be added by Laura. Last I heard it is going to have a pink door.
- Inside the coop we will adding roosting bars. We are researching options here so if you have a suggestion please let us know.
- Feed and water options that will allow for removal of the "rookie" equipment. No harm intended to you rookies, but this must be changed for us.
- We have growth capabilities for another nesting box that will be accessible from the outside. I am sure it will come at some point with 14 chickens. Because chicken math is a real thing
What we learned from the past that worked out well for us on this construction was "patience, patience, patience". Don't get in a hurry and be intentional and have a picture in your mind when you start each step. We looked at other designs and then wrote it down on paper and then it changed over the weeks as we worked on Saturday's and Sunday's. I would have left off the gutter over top of the run - it is a waste, but vinyl gutters are not that expensive.
Our construction videos:
- Coop Day 1;
- Coop Day 2;
- Coop Day 3;
- Run Day 1;
- Run Day 2;
- Final Wrap-Up Day;
Our plans thumbnails:


Other finished picture thumbnails: