This is a 'brain dump' of all my thoughts and actions of our first incubating and hatching journey - from receiving the eggs to popping the chicks into the brooder. It's purpose is for me to be able to look back on it for future hatches, and for others to be encouraged and hopefully learn something if they are considering hatching eggs as a complete rookie, like me.
Motives for Getting Hatching eggs
I have always wanted chickens.... and ever since I saw the amazing film 'Fly Away Home' as a child, I have wanted to hatch eggs! It has been a lifelong ambition of mine. Thank goodness I have a wonderful, understanding and obliging husband! Deciding to incubate was not purely to fulfill a lifelong dream - it also made sense for what we want out of our chickens. As our chickens would be egg laying, compost making, pampered pets, it made sense to me to incubate them so we could get them as tame as could be. Even though it creates a headache of problems along the way - let alone an increase in cost - it also brings with it a lot of blessings and rewards. As a home educator, I am always looking for lovely ways to learn with my two girls, aged 12 and 10 - and to me, learning about one of the complete miracles of life through experiencing it, observing it, feeling it (as opposed to reading about it in a book or watching YouTube videos) is priceless.
When we chose to incubate eggs, we felt it was important to have a strategy in place for how we were going to deal with certain aspects along the way. Such as...(list not exhaustive!):
Choosing breeds
We really found choosing breeds hard; there were too many we liked! But in the end we decided to go for rarer, heritage breeds as opposed to hybrids or more easily obtainable (but equally loveable) breeds. We also read so many contrasting opinions on different breeds and their flightiness / friendliness that it all just became a great, big headache. The bottom line seemed to be that whilst some breeds have friendlier tendencies, it depends upon the particular strain and individual chicken personalities... which seemed like a polite way of saying, 'it's a bit of a gamble!'
In the end, we opted for three different breeds, of which we would hatch four eggs, making a clutch of 12. These were Cream Legbar, Araucana and Cuckoo Maran. I am hoping that they will be well adjusted, friendly birds as a result of their being incubated / reared in the home (for the first few weeks anyway!). Home rearing will also give our pet dog a better chance of getting to know the birds, and accept them. She has a natural high prey drive and definitely can't be trusted with birds or rodents in the garden. However, she has learnt that our parakeet is part of the pack (or flock!) and she ignores him, or follows him around the kitchen, sniffing his tail, when he forgets he has wings and goes for one of his leisurely walks! She is always supervised in these excursions, but she has proved herself with him for 3 years now. I am hoping the chicks, who will be raised for the first however many weeks in our kitchen-diner, will be seen in the same way by our pooch. In anycase, she will never be fully trustworthy in my eyes, and will always be supervised and never out of arms reach near the chickens.
Receipt of Eggs
Before we received our eggs, I set-up the incubator and played around with it with some shop-bought eggs to get a feel for the automatic egg turner, temperature and humidity. I noticed that the longer, pointier eggs didn't always turn so well as the shorter, rounder eggs. I also had an extra thermometer/hygrometer in the bottom, after reading so many helpful people say to get a calibrated one. I am glad I did.. It always read a similar reading to the incubator's data, and the two readings always correlated which gave me peace of mind and confidence. For example, the separate thermometer gave readings slightly lower than the built in ones - which could be accounted for in the lower position of the sensor.
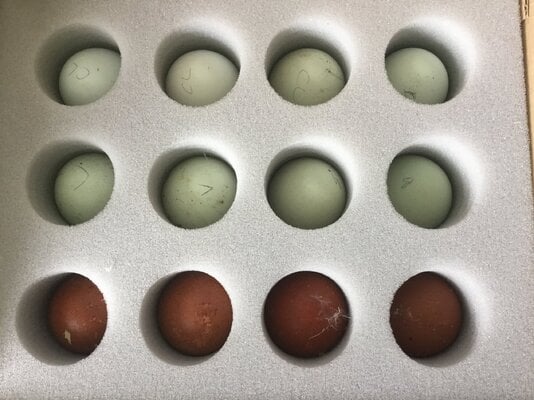
After receiving our eggs through a next-day postal service, we let them sit at room temperature for 24 hours, and numbered them before we put them in the incubator. The farm we bought them from had already labelled them - L for Lavender Araucana, B for Black Araucana and CL for Cream Legbar; the Cuckoo Marans only needed labelling 1 through 4 as they were the only dark eggs.

Ready, set, incubate...!
After their 24-hours rest, we loaded them, unwashed, into the incubator, and wished them all the best. After lots of research and months of reading, I had opted to do a 'dry' hatch, aiming to have the humidity between 20-30% for the first 18 days. The natural humidity of the room stayed within this range within the day, but usually fell between 15-20% overnight. I usually compensated for this by either closing the vent overnight, or adding a tiny drop of distilled water into the water channel in the evening. If I added water, I always left the vent open - but I usually opted to just close the vent.
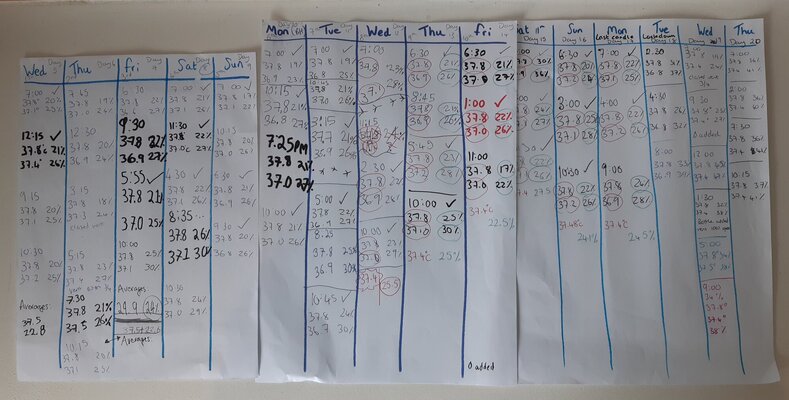
We wrote down readings from both of the thermometers/hygrometers several times a day, and then the girls averaged them and recorded them in their incubation journals to give us a good indication of what was going on over the course of the incubation timeline. We didn't get as far as doing line or bar graphs to show the data.... maybe next time - I missed a trick there ...!!
...!!


As we were partly incubating for educational purposes, we chose to candle the eggs every three days, starting on day 5. We made sure we had everything ready before we began, and were as quick and efficient as possible each time. We tried to take photos of each egg in the same order each time we candled, so we could see their development and growth throughout their incubation. The Marans eggs were next to impossible to candle, however!
Here are some photos of candling one egg from start to finish. This is Cream Legbar egg #2:
Day 5

Day 11 - now with a torch at the top, and our home-rigged candler at the bottom. Much clearer!

Day 14 - Lots of wriggling seen today - even with my dumb moment of having the top torch turned off...!!

Day 17 - last candle

Day 21 - pipped, popped and peeping!


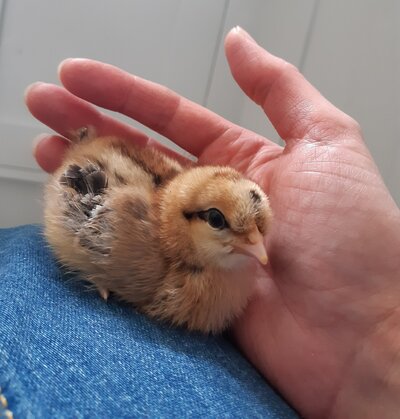
And here she is now, 5 days old, in all her fluffy cuteness.

Results - 12 eggs in, how many chick out?
Well, we didn't have an amazing hatch rate. I haven't actually done the maths, probably because I don't want to know! Here are the results...:
Cream Legbars


Araucana's
Cuckoo Marans
Pictures of some of the eggs opened on day 23 (I couldn't bring myself to photograph the perfect, dead Marans chick).
 L#1
L#1
 L#2
L#2
Lessons Learned Through Incubation
The main things I have learnt is that it is not easy. There will be losses, but you will learn a heck of a lot along the way. And the real learning and the experience of the journey, is priceless. The memories my girls are making now are wonderful, and they are so glad we chose this route instead of getting POL's. They will remember these little fuzz balls forever, and they will always have the place of first chicks in our hearts. I just hope a good number of them are girls!!
Other lessons I have learned - or at least, what I believe to be correct from my experience:


Motives for Getting Hatching eggs
I have always wanted chickens.... and ever since I saw the amazing film 'Fly Away Home' as a child, I have wanted to hatch eggs! It has been a lifelong ambition of mine. Thank goodness I have a wonderful, understanding and obliging husband! Deciding to incubate was not purely to fulfill a lifelong dream - it also made sense for what we want out of our chickens. As our chickens would be egg laying, compost making, pampered pets, it made sense to me to incubate them so we could get them as tame as could be. Even though it creates a headache of problems along the way - let alone an increase in cost - it also brings with it a lot of blessings and rewards. As a home educator, I am always looking for lovely ways to learn with my two girls, aged 12 and 10 - and to me, learning about one of the complete miracles of life through experiencing it, observing it, feeling it (as opposed to reading about it in a book or watching YouTube videos) is priceless.
When we chose to incubate eggs, we felt it was important to have a strategy in place for how we were going to deal with certain aspects along the way. Such as...(list not exhaustive!):
- Incubation method. Wet or dry?
- Timing. We wanted the chicks to be hatched and big enough to be transferred into the coop and run before our forthcoming summer holiday.
- Brooder. I wanted something that would keep the chicks safe, but fold away again when not in use. I also wanted something that could double-up as an isolation or broody hen jail if needs be.
- Vaccinations. What a headache... And so many mixed opinions. It is worth researching your approach and deciding on a route you are happy with.
- Predators. Both inside and outside.
Choosing breeds
We really found choosing breeds hard; there were too many we liked! But in the end we decided to go for rarer, heritage breeds as opposed to hybrids or more easily obtainable (but equally loveable) breeds. We also read so many contrasting opinions on different breeds and their flightiness / friendliness that it all just became a great, big headache. The bottom line seemed to be that whilst some breeds have friendlier tendencies, it depends upon the particular strain and individual chicken personalities... which seemed like a polite way of saying, 'it's a bit of a gamble!'
In the end, we opted for three different breeds, of which we would hatch four eggs, making a clutch of 12. These were Cream Legbar, Araucana and Cuckoo Maran. I am hoping that they will be well adjusted, friendly birds as a result of their being incubated / reared in the home (for the first few weeks anyway!). Home rearing will also give our pet dog a better chance of getting to know the birds, and accept them. She has a natural high prey drive and definitely can't be trusted with birds or rodents in the garden. However, she has learnt that our parakeet is part of the pack (or flock!) and she ignores him, or follows him around the kitchen, sniffing his tail, when he forgets he has wings and goes for one of his leisurely walks! She is always supervised in these excursions, but she has proved herself with him for 3 years now. I am hoping the chicks, who will be raised for the first however many weeks in our kitchen-diner, will be seen in the same way by our pooch. In anycase, she will never be fully trustworthy in my eyes, and will always be supervised and never out of arms reach near the chickens.
Receipt of Eggs
Before we received our eggs, I set-up the incubator and played around with it with some shop-bought eggs to get a feel for the automatic egg turner, temperature and humidity. I noticed that the longer, pointier eggs didn't always turn so well as the shorter, rounder eggs. I also had an extra thermometer/hygrometer in the bottom, after reading so many helpful people say to get a calibrated one. I am glad I did.. It always read a similar reading to the incubator's data, and the two readings always correlated which gave me peace of mind and confidence. For example, the separate thermometer gave readings slightly lower than the built in ones - which could be accounted for in the lower position of the sensor.
After receiving our eggs through a next-day postal service, we let them sit at room temperature for 24 hours, and numbered them before we put them in the incubator. The farm we bought them from had already labelled them - L for Lavender Araucana, B for Black Araucana and CL for Cream Legbar; the Cuckoo Marans only needed labelling 1 through 4 as they were the only dark eggs.
Ready, set, incubate...!
After their 24-hours rest, we loaded them, unwashed, into the incubator, and wished them all the best. After lots of research and months of reading, I had opted to do a 'dry' hatch, aiming to have the humidity between 20-30% for the first 18 days. The natural humidity of the room stayed within this range within the day, but usually fell between 15-20% overnight. I usually compensated for this by either closing the vent overnight, or adding a tiny drop of distilled water into the water channel in the evening. If I added water, I always left the vent open - but I usually opted to just close the vent.
We wrote down readings from both of the thermometers/hygrometers several times a day, and then the girls averaged them and recorded them in their incubation journals to give us a good indication of what was going on over the course of the incubation timeline. We didn't get as far as doing line or bar graphs to show the data.... maybe next time - I missed a trick there
 ...!!
...!!

As we were partly incubating for educational purposes, we chose to candle the eggs every three days, starting on day 5. We made sure we had everything ready before we began, and were as quick and efficient as possible each time. We tried to take photos of each egg in the same order each time we candled, so we could see their development and growth throughout their incubation. The Marans eggs were next to impossible to candle, however!
Here are some photos of candling one egg from start to finish. This is Cream Legbar egg #2:
Day 5
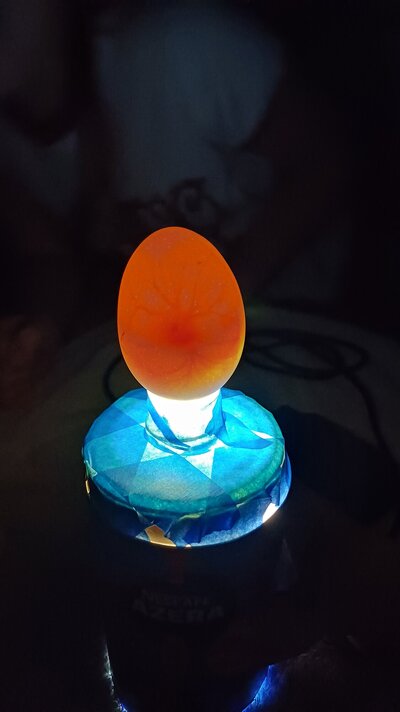
Day 11 - now with a torch at the top, and our home-rigged candler at the bottom. Much clearer!
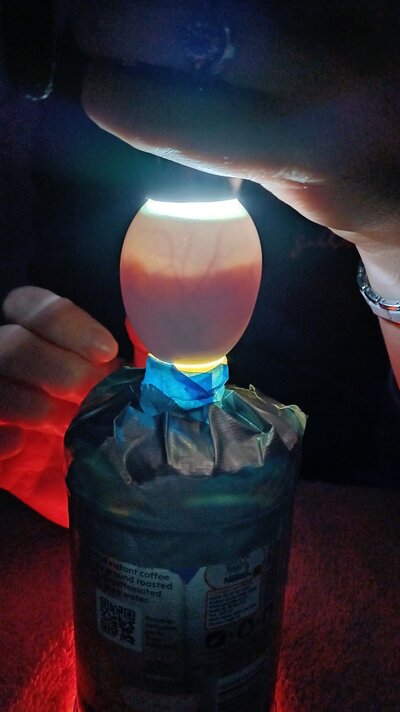
Day 14 - Lots of wriggling seen today - even with my dumb moment of having the top torch turned off...!!

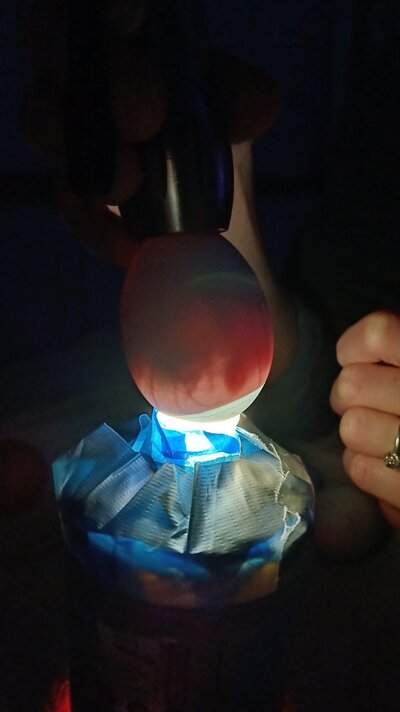
Day 17 - last candle
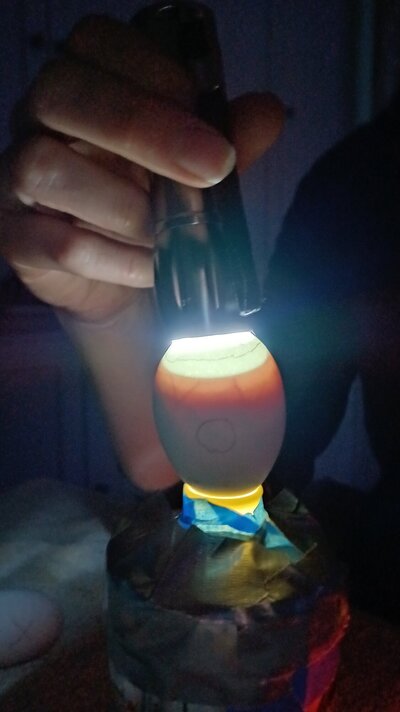
Day 21 - pipped, popped and peeping!
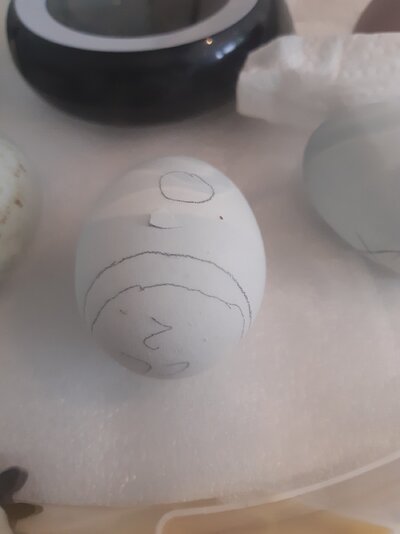
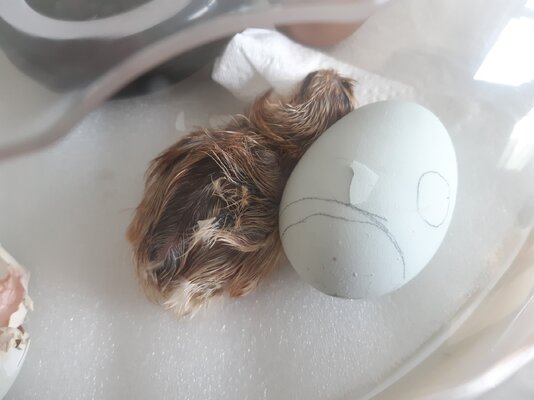
And here she is now, 5 days old, in all her fluffy cuteness.
Results - 12 eggs in, how many chick out?
Well, we didn't have an amazing hatch rate. I haven't actually done the maths, probably because I don't want to know! Here are the results...:
Cream Legbars
- CL#2 - pipped in the 'wrong place' (outside the air cell) on day 20, then nothing for over 18 hours. I candled the egg, and found that the air cell had moved, and the pip was in fact okay. I did a tiny assisted zip on day 21 as I could hear she was pecking but no cracks were forming. After this, the chick then completed the rest of hatch unaided - healthy, spunky pullet!
- CL#4 - pipped day 20, hatched with assistance day 21 (inner membrane was completely shrink wrapped), cockerel
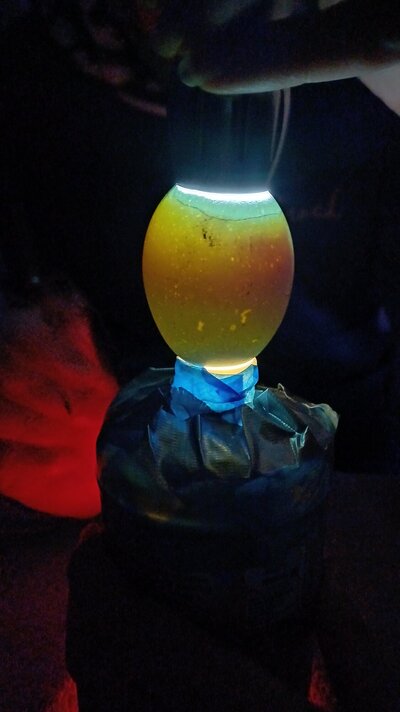
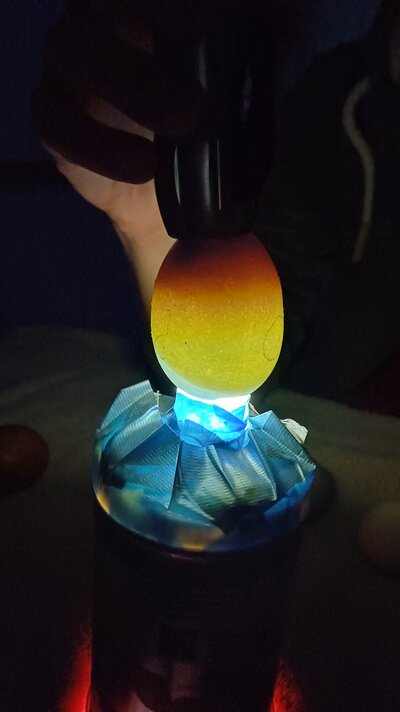
- CL#1 & CL#3 - marked as question mark on day 10, discarded on day 14 (early quitter; just glowing kinda green, with a small, dark sloshing mass). Pictures for reference, first is day 10, second is day 14.
Araucana's
- B#1 - pipped late on day 21 - hatched perfectly overnight, no assistance - Black chick
- B#2 - pipped late on day 21 - hatched perfectly, no assistance - lavender chick (labelled as black!!)
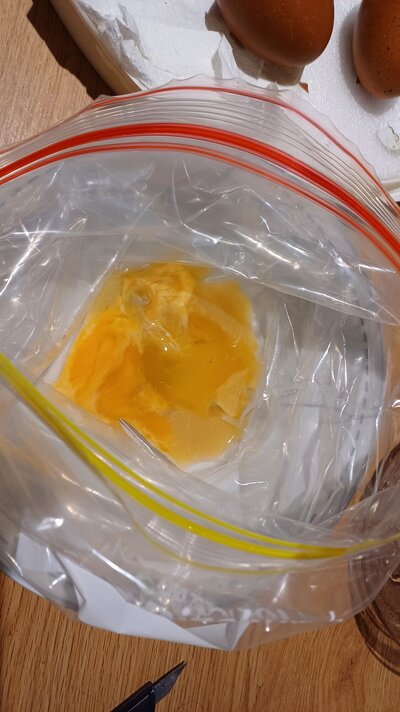
- L#1 & L#2 - opened up at end of day 23 - no development, early quitters (had seen movement in L#2 on day 10)
Cuckoo Marans
- CM#1 - Discarded day 17 - glowing light bulb, not fertile
- CM#2 - hatched, healthy chick
- CM#3 - mixed candling results, marked as a question mark. Opened up on day 23 - no development
- CM#4 - no pip or noises heard when checked on day 22 and day 23. Opened up at the end of day 23 - fully formed chick inside, with fully absorbed yolk, no internal pip; had been unable to hatch. See my theory as to why in the lessons learned below. Sad, sad day. I cried. A lot, and felt immensely guilty. I wish I had intervened and trusted my intuition, but not being able to candle the eggs was a big hinderance.
Pictures of some of the eggs opened on day 23 (I couldn't bring myself to photograph the perfect, dead Marans chick).
 L#1
L#1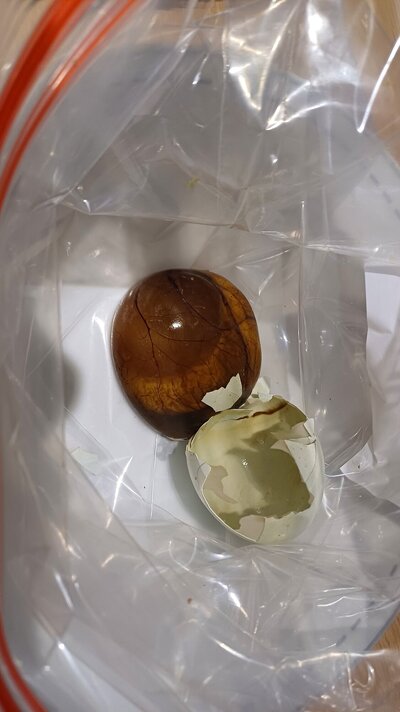 L#2
L#2Lessons Learned Through Incubation
The main things I have learnt is that it is not easy. There will be losses, but you will learn a heck of a lot along the way. And the real learning and the experience of the journey, is priceless. The memories my girls are making now are wonderful, and they are so glad we chose this route instead of getting POL's. They will remember these little fuzz balls forever, and they will always have the place of first chicks in our hearts. I just hope a good number of them are girls!!
Other lessons I have learned - or at least, what I believe to be correct from my experience:
- It is much harder if you incubate eggs of mixed breeds together. Marans eggs are known for being difficult to incubate and hatch, and I definitely found this to be true.
- Don't choose dark shelled eggs for your first time incubating.
- Research, research, research. And research some more. I am SO glad I did a huge amount of reading and watching information on the incubation, candling and hatching and assisted hatching processes before I started, and also whilst we went along too, to keep my knowledge fresh. My book, Storey's Guide to Raising Chickens helped, as did experts on here. YouTube videos I found particularly helpful were 'Chicken Hues' and 'A Chick Called Albert'. Sometimes, watching is better than reading.
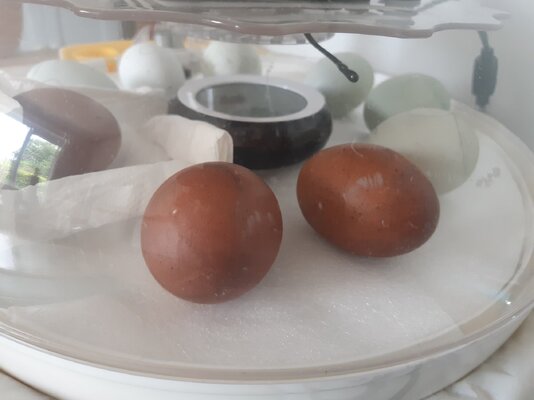
- Choose rounder, shorter eggs for better turning. And, I believe this is why we lost the other Marans chick. The egg was particularly long and thin, and the chick was completely wedged at the bottom. It was positioned correctly, with its head under its right wing, but really squashed with a LOT of space above its head. I could not see how it would have ever reached the inner air cell in order to pip it. This is the egg... the brown one on the right. It's hard to tell on this photo, but it was long and thin, and almost pointed at both ends. It had a slight 'crack' or crease mark right in the middle, but I think this was just superficial as Marans egg shells are so thick. The Marans egg centre photo was the one that hatched successfully; it was our biggest egg. The one in the tissue cradle was the one that we were not sure of during candling, but we gave the benefit of the doubt.
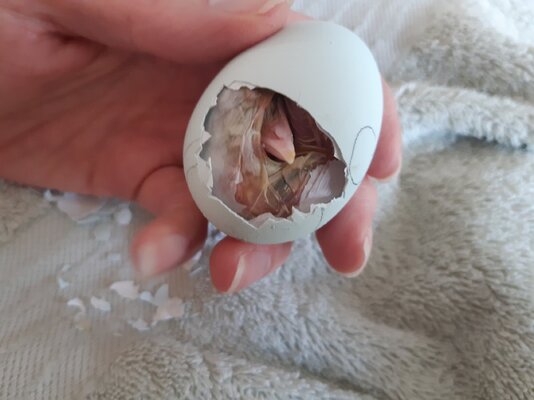
- From my experience, assisting hatches can be a good thing, but I know it is a controversial topic. Incubating is not a natural environment, and it is never going to be as good as a mother hen - so I am personally on the side of the fence that is pro assisting. Like I said, when incubating different breeds together, I think it can make things trickier. Marans eggs need a drier lockdown, from what I have read and researched. But other eggs less so. I did raise the humidity for the lockdown period to 50-60%, but this was not high enough for my Cream Legbars. These chicks pipped early, and then waited ages before unzipping, which gave them lots of time to run into potential trouble! The first chick, as detailed previously, seemed to struggle to unzip. I was patient, I waited over 18 hours before candling. I know it can sometimes take 24 hours, and maybe this would have been true for her, but as she was pipped in the 'wrong place' I was desperate to candle and make sure she had air (it wasn't clear if the pip had pierced the membranes or not, or whether the pip was caused by an attempted internal pip). The second Cream Legbar pipped, and then did nothing. No movement, no cheeping. I was worried. I started helping him unzip a little, and discovered that his membranes were not veiny, but there was a huge gap between his membranes and the shell, and the membranes looked odd, like dry, white, tracing paper or cake edible paper. I gently pushed on his beak, like I have seen 'A Chick Called Albert' do, and this chick was stuck - it could not move at all. So I very slowly and carefully peeled back some of the membranes, which I moistened with damp towels until they changed into a healthier, transparent colour. Then I popped him back into the incubator. He finished the hatch a few hours later, all by himself. I was very relieved! He is now a very healthy chick, and I'm sure he knew I helped him as he ran straight into my palm for a long snuggle the first time I put my hand into the brooder. Maybe just a coincidence, but who knows. He knew I was helping him as he started peeping as soon as his beak was free. Here is a photo, which my 10 year old daughter took just before he went back into the incubator. The angle doesn't show the gap between the membranes and the shell, but I could have easily fit the blunt end of a pencil in it.
- I am going to try a 'wet' hatch next time. I think the internet is a great tool, but it can also cause a lot of confusion. Next time we incubate, I am going to follow the incubator's instructions to a tee, only hatch one or two different breeds with lighter shells, and for the hatching process, trust my intuition. Having watched a swan come off her nest yesterday, and spend a good 10 minutes stood by preening and eating, I do think we can be too 'precious' about how we incubate - and I totally get this; it is not a natural environment, and is never going to out-do a broody hen. I have learnt a lot from 'A Chick Called Albert' - his methods are based on 40 years of experience, but he does not follow the strict rule book. That said, rule books are there because they are based on tried and tested methods, so I am aware balance is needed.


The extra thermometer / hygrometer was a calibrated one.
For the candler, we hitched up one of my husbands uber bright bicycle lights, inside an old coffee pot, with a drinking bottle lid taped onto the top. It looked most odd, but it worked and that is what mattered to me!