Terri E
Songster
Okay, I know that there are various ideas in the type of brooder available and DIY brooders. It's hard know what is right for the size or amount of babies you have. I have read and seen some amazing ideas created for their babies and the sizes are very creative.
I do don't know anything. In person to person conversations most recommend the galvanized stock tank. Others suggests to order a starter kit online. A sales associate stated that anything large enough for you babies, must be secured on all sides and a heat lamp over them for warmth.
All brooders I have found are all made of wood, a rectangle box, either covered with hard wire cloth or not, depending where you place the brooder. The cover is to protect from all predators including cats, like me.
When I first received my babies, since gone, I had nothing but a medium black tote. I bought the recommended heat lamp. I was searching as fast as I could for a good brooder, however my husband made the tote into a brooder. It worked out fine but I was alway uneased by the unsecured top. Always fearing my cat would suddenly know how to flip it open. So we zipped ties it to secure it.
I wanted to incubate the eggs I was getting. Bought a still air and got a 100% success rate on the first try. Again I used the same brooder tote I had. Here is the danger. The heat lamp was too close to the tote and it started melting. Even though I caught it in time, I was sure that the fumes of melting plastic is poisonous. The chicks, now fully grown, turn out fine and are very healthy. Like I said, I caught it in time. The heat lamp was clipped to the tote and wasn't tight enough. It moved downward that caused this mishap.
NEVER clip the heat lamp to your tote brooder.
Now, I'm expecting 11 babies on Valentine's Day. These are duck eggs who is mix of Peking/Rhoen and Khaki/Rhoen duck. So, I'm needing a much bigger brooder. They are slowly pipping right now, did see eggs moving- about 6 eggs. Eventually, I decided, Yes, another tote brooder. Now that I am on my own and with very limited tools decided to create a different top.
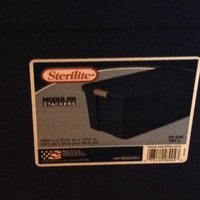
Using a Sterilite 50 Gal. Tote from Walmart that cost me about 20$.
Then I went to Lowel's and bought the wood I needed which only cost me 6.50$.
I chose three 4ft high, with 1 1/2 x 1/2 in.
I already have the heat lamp, and my wire.
Since I'm limited on tools, I have a hand saw, my handy wood stapler, pencile, utility knife, and measuring tape.
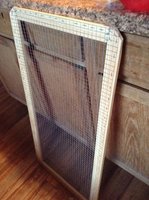
The wood was measured and cut to fit inside the edge of the lid. Not having nails, I stapled them together where they connect and on both sides. Doing this 4 times. I then measured and trimmed the wire cloth which I then stapled to the wood. It fit snugged on top of the inside border lid. I then proceeded to use the utility knife to cut the portions of the lid. This is where you will be viewing your babies and the heat lamp will be over it. The other portion of the lid remained in tact for shade and shelter. (I do have cats) . I do have a choice, if I decided to do so later, (in either with small nails/screws or with staples) in securing the top wire to the lid.
Now that it's made, I went ahead and place the three baby chicks into it. They are a little over a week old. It's cold outside, so I'm keeping them inside for now. They three was inside a smaller tote but the wire top just barely fit and is not that secure. So, they will be there until the ducklings hatch.
Now, I have tried to upload pictures to show what I have done and how it looks completed. Unfortunately, where I live, I'm just grateful of what little connection I have. I have attempted to describe on what I have done but I am assuming that I also failed on that part.
Anyway, based on imagination of my somewhat description. What are your thoughts?


View attachment 1263930 View attachment 1263931
View attachment 1263933
I do don't know anything. In person to person conversations most recommend the galvanized stock tank. Others suggests to order a starter kit online. A sales associate stated that anything large enough for you babies, must be secured on all sides and a heat lamp over them for warmth.
All brooders I have found are all made of wood, a rectangle box, either covered with hard wire cloth or not, depending where you place the brooder. The cover is to protect from all predators including cats, like me.
When I first received my babies, since gone, I had nothing but a medium black tote. I bought the recommended heat lamp. I was searching as fast as I could for a good brooder, however my husband made the tote into a brooder. It worked out fine but I was alway uneased by the unsecured top. Always fearing my cat would suddenly know how to flip it open. So we zipped ties it to secure it.
I wanted to incubate the eggs I was getting. Bought a still air and got a 100% success rate on the first try. Again I used the same brooder tote I had. Here is the danger. The heat lamp was too close to the tote and it started melting. Even though I caught it in time, I was sure that the fumes of melting plastic is poisonous. The chicks, now fully grown, turn out fine and are very healthy. Like I said, I caught it in time. The heat lamp was clipped to the tote and wasn't tight enough. It moved downward that caused this mishap.
NEVER clip the heat lamp to your tote brooder.
Now, I'm expecting 11 babies on Valentine's Day. These are duck eggs who is mix of Peking/Rhoen and Khaki/Rhoen duck. So, I'm needing a much bigger brooder. They are slowly pipping right now, did see eggs moving- about 6 eggs. Eventually, I decided, Yes, another tote brooder. Now that I am on my own and with very limited tools decided to create a different top.
Using a Sterilite 50 Gal. Tote from Walmart that cost me about 20$.
Then I went to Lowel's and bought the wood I needed which only cost me 6.50$.
I chose three 4ft high, with 1 1/2 x 1/2 in.
I already have the heat lamp, and my wire.
Since I'm limited on tools, I have a hand saw, my handy wood stapler, pencile, utility knife, and measuring tape.
The wood was measured and cut to fit inside the edge of the lid. Not having nails, I stapled them together where they connect and on both sides. Doing this 4 times. I then measured and trimmed the wire cloth which I then stapled to the wood. It fit snugged on top of the inside border lid. I then proceeded to use the utility knife to cut the portions of the lid. This is where you will be viewing your babies and the heat lamp will be over it. The other portion of the lid remained in tact for shade and shelter. (I do have cats) . I do have a choice, if I decided to do so later, (in either with small nails/screws or with staples) in securing the top wire to the lid.
Now that it's made, I went ahead and place the three baby chicks into it. They are a little over a week old. It's cold outside, so I'm keeping them inside for now. They three was inside a smaller tote but the wire top just barely fit and is not that secure. So, they will be there until the ducklings hatch.
Now, I have tried to upload pictures to show what I have done and how it looks completed. Unfortunately, where I live, I'm just grateful of what little connection I have. I have attempted to describe on what I have done but I am assuming that I also failed on that part.
Anyway, based on imagination of my somewhat description. What are your thoughts?


View attachment 1263930 View attachment 1263931
View attachment 1263933
Last edited:


