Determining the Size of Your Coop:
The first step in building a chicken coop is deciding on the appropriate size for your flock. Each chicken needs about 3 to 4 square feet of living space in the coop, and roughly 8 to 10 square feet in an outdoor run. Ensure there's enough space in the coop and outdoor run, so your chickens can move around freely without feeling too crowded. The size of your breed of chicken or the size of other kinds of poultry can cause you to need a larger coop or allow you to get a smaller coop.
like if you have a serama chicken you can get away with a smaller coop, or if you have something like a peacocks you need a much larger coop with higher and larger perches. Like this coop for example.

Choosing a Location:
When selecting a location for your coop, there are several factors to consider. Choose a spot that is well-drained and receives ample sunlight, but also ensure it has some shade for your chickens during the hottest parts of the day. In addition, make sure the spot has good drainage and is free from potential hazards like predators such as hawks or raccoons.
Size requirements for colder climates:
Although this coop works for warmer areas, it doesn't contain the needed requirements for colder climates. When you are in colder climates a larger coop is better and should have as little drafts as possible. These drafts of cold winter air can kill smaller chickens and can cause possible frost bite to the combs and waddles of your chickens.
Larger coops also allow you to create what is called a double door which can allow you to put extra food, treats, and medicine in the double door. It also allows you to do easier chicken math. You should create a double door a little something like this. This is a coop made from an old shed.

Also a V shaped roof can help in stopping snow build up and in order to keep the wood from growing mold and to keep it safe from the elements a roof the goes a little over the side helps as well. This is also important for warmer climates as well.
Size requirements for warmer climates:
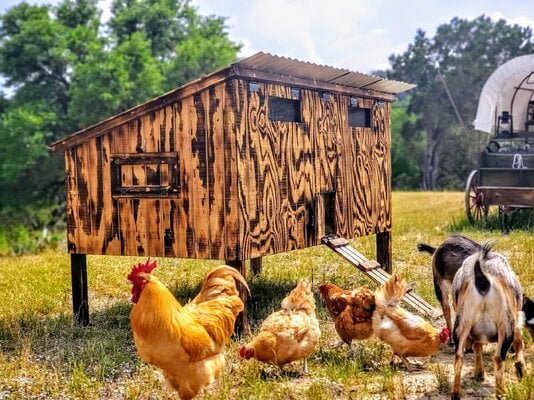
When in warmer climates a smaller coop like the one I'm showing you how to make is a better pick. Warmer climates also mean that a coop can get warm rather fast. So it's very important to make a ventilation system so warm air gets replaced with new air and keeps the overall temp down. Like seem with this coop there is a ventilation/window part with a siding door for during winter when you don't want as much ventilation.

Creating a faster and easier way to keep the coop:
It's also important to keep the coop clean to prevent any amonia or bad bacteria from growing. This can easily be done with a clean out tray. Like with most bird cages it allows you to easily take out all the mess within minutes.
Like this one on Amazon for example.

Gathering the Necessary Materials:
Now that you have determined the size and location of your coop, you can begin gathering the necessary materials. The following list provides some essential materials you will need:
- Wooden boards (2x4s, 2x3s, etc.)
- Nails, screws, and hardware cloth
- Chicken wire
- Roofing materials (such as metal or asphalt shingles)
- Plexiglass or other materials for windows
- Latches and hinges for doors
- Wood screws and power tools like a saw and drill
Building the Frame:
Construct a frame that consists of a base, two side walls, a back wall, and front wall with a door. Use solid wood for the walls and roof, and chicken wire for the front door instead of wood, to provide ventilation. Next, use 2x4s or other sturdy bars for a base, supported by four (or more) wooden legs that provide space for the droppings to fall through to the ground. This keeps the inside of the coop clean.
Finishing the Walls and Floor:
Once the frame is complete, it is time to finish the walls and floor of the coop. Add solid wood to the walls, leaving a gap on the top near the roof for ventilation. Consider placing some windows in the coop to provide light and air circulation. Lay down some flooring, such as straw or wood shavings, to keep the coop clean and comfortable for your chickens.
Adding Roosting Bars:
Chickens enjoy roosting on perches during the night, so this is an excellent addition to any coop. Add roosting bars by drilling holes in the walls of the coop and sliding wooden bars through the hole.
Building Nesting Boxes:
Chickens will need nesting boxes to lay their eggs. Each box should be about 12 to 14 inches square and about 18” to 20” off the floor. Space the boxes to allow separate areas for chickens to lay eggs. You can build nesting boxes inside the coop using plywood, or use plastic containers that can be removed for easy clean-up.
Setting Up the Outdoor Run:
Now that the indoor coop is complete, you can focus on setting up an outdoor run for your chickens. The outdoor run should be securely fenced and covered with chicken wire to protect the chickens from predators. If you live in an area with extreme weather, you may also want to provide some shelter, such as a roof or tarp, over the outdoor run.
Adding the Feeders and Waterers:
Finally, add feeders and waterers to your coop and run. Chickens need to stay hydrated and well-fed to be healthy and produce eggs. Hang a feeder and waterer from the wall of the coop or a secure location in the outdoor run. Choose containers that are easy to clean and refill.
Customizing and Decorating the Coop:
Last but not least, add some personal touches to your coop! You can paint the exterior, add some decorations, or even add some curtains to the windows. Remember, a well-decorated chicken coop not only looks great but also provides a comfortable home for your chickens.
it's also a good idea to add a double door with a timer. So you can have more time to do other chicken related things or hooman things. Ot also is a good and reliable predator proof place where chickens can go in and put of.
The first step in building a chicken coop is deciding on the appropriate size for your flock. Each chicken needs about 3 to 4 square feet of living space in the coop, and roughly 8 to 10 square feet in an outdoor run. Ensure there's enough space in the coop and outdoor run, so your chickens can move around freely without feeling too crowded. The size of your breed of chicken or the size of other kinds of poultry can cause you to need a larger coop or allow you to get a smaller coop.
like if you have a serama chicken you can get away with a smaller coop, or if you have something like a peacocks you need a much larger coop with higher and larger perches. Like this coop for example.
Choosing a Location:
When selecting a location for your coop, there are several factors to consider. Choose a spot that is well-drained and receives ample sunlight, but also ensure it has some shade for your chickens during the hottest parts of the day. In addition, make sure the spot has good drainage and is free from potential hazards like predators such as hawks or raccoons.
Size requirements for colder climates:
Although this coop works for warmer areas, it doesn't contain the needed requirements for colder climates. When you are in colder climates a larger coop is better and should have as little drafts as possible. These drafts of cold winter air can kill smaller chickens and can cause possible frost bite to the combs and waddles of your chickens.
Larger coops also allow you to create what is called a double door which can allow you to put extra food, treats, and medicine in the double door. It also allows you to do easier chicken math. You should create a double door a little something like this. This is a coop made from an old shed.
Also a V shaped roof can help in stopping snow build up and in order to keep the wood from growing mold and to keep it safe from the elements a roof the goes a little over the side helps as well. This is also important for warmer climates as well.
Size requirements for warmer climates:
When in warmer climates a smaller coop like the one I'm showing you how to make is a better pick. Warmer climates also mean that a coop can get warm rather fast. So it's very important to make a ventilation system so warm air gets replaced with new air and keeps the overall temp down. Like seem with this coop there is a ventilation/window part with a siding door for during winter when you don't want as much ventilation.
Creating a faster and easier way to keep the coop:
It's also important to keep the coop clean to prevent any amonia or bad bacteria from growing. This can easily be done with a clean out tray. Like with most bird cages it allows you to easily take out all the mess within minutes.
Like this one on Amazon for example.
Gathering the Necessary Materials:
Now that you have determined the size and location of your coop, you can begin gathering the necessary materials. The following list provides some essential materials you will need:
- Wooden boards (2x4s, 2x3s, etc.)
- Nails, screws, and hardware cloth
- Chicken wire
- Roofing materials (such as metal or asphalt shingles)
- Plexiglass or other materials for windows
- Latches and hinges for doors
- Wood screws and power tools like a saw and drill
Building the Frame:
Construct a frame that consists of a base, two side walls, a back wall, and front wall with a door. Use solid wood for the walls and roof, and chicken wire for the front door instead of wood, to provide ventilation. Next, use 2x4s or other sturdy bars for a base, supported by four (or more) wooden legs that provide space for the droppings to fall through to the ground. This keeps the inside of the coop clean.
Finishing the Walls and Floor:
Once the frame is complete, it is time to finish the walls and floor of the coop. Add solid wood to the walls, leaving a gap on the top near the roof for ventilation. Consider placing some windows in the coop to provide light and air circulation. Lay down some flooring, such as straw or wood shavings, to keep the coop clean and comfortable for your chickens.
Adding Roosting Bars:
Chickens enjoy roosting on perches during the night, so this is an excellent addition to any coop. Add roosting bars by drilling holes in the walls of the coop and sliding wooden bars through the hole.
Building Nesting Boxes:
Chickens will need nesting boxes to lay their eggs. Each box should be about 12 to 14 inches square and about 18” to 20” off the floor. Space the boxes to allow separate areas for chickens to lay eggs. You can build nesting boxes inside the coop using plywood, or use plastic containers that can be removed for easy clean-up.
Setting Up the Outdoor Run:
Now that the indoor coop is complete, you can focus on setting up an outdoor run for your chickens. The outdoor run should be securely fenced and covered with chicken wire to protect the chickens from predators. If you live in an area with extreme weather, you may also want to provide some shelter, such as a roof or tarp, over the outdoor run.
Adding the Feeders and Waterers:
Finally, add feeders and waterers to your coop and run. Chickens need to stay hydrated and well-fed to be healthy and produce eggs. Hang a feeder and waterer from the wall of the coop or a secure location in the outdoor run. Choose containers that are easy to clean and refill.
Customizing and Decorating the Coop:
Last but not least, add some personal touches to your coop! You can paint the exterior, add some decorations, or even add some curtains to the windows. Remember, a well-decorated chicken coop not only looks great but also provides a comfortable home for your chickens.
it's also a good idea to add a double door with a timer. So you can have more time to do other chicken related things or hooman things. Ot also is a good and reliable predator proof place where chickens can go in and put of.


 ️
️