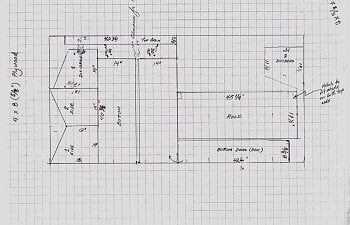
Our family has had an interest in owning chickens for quite some time. It has been difficult making the final decision because owning animals requires a lot of energy, time, and dedication. My career precluded adding more responsibilities to an already busy schedule that involved work, travel, home upkeep, and family affairs. We brought up the conversation of owning chickens, but in the end it was shelved. However, in 2015, our lifestyle had become more stable to add backyard chickens and decided to look into building a chicken coop. First off, I researched types of breeds and read as much as I could on what the internet had to offer on the subject including the BackYard Chickens website which was exceptional reading. Locating a construction site had to be in an area that would not detract from the aesthetics of our landscape and gardens. We live on Oahu, Hawaii, and land is at a premium so space on a 1/4 acre parcel over the years had been developed and although we could just plop pick a spot it had to be somewhere unobtrusive. I decided the best place to build was a lean-to off of our storage shed which already harbored some of our pet tortoises and had an appropriate perimeter enclosures with chainlink fencing and hollow tile walls. This area would make an ideal foraging/run for the flock. I also had to talk to our neighbors to ensure all was well with them. One of our neighbors objected to roosters and I had no desire to own one as we already have so many wild chickens running around our valley. We can hear roosters crowing at all hours of the day so I totally agreed with this neighbor. Having a great relationship with your neighbors is ideal and enriches our lives. We share fruits, food, and now eggs. I could envision the project and how I wanted it to look like, but needed to scratch it out on paper for the material take-off. The sketch didn't have to bear the appearance of a draftsman's workmanship. A simple way to formulate ideas on a design. I am a homeowner builder and have dabbled in all the trades so I must admit in easily modifying the design as I went along with the construction.

Our climate in Hawaii is perfect throughout the year with exception of stormy weather that carries high winds, including hurricane warnings every so often. We've had some close encounters, but they seem to move Northward as the wind sheer either downgrades them to tropical storms or move away. One of my coworkers and her husband had just completed building a beautiful home in Kauai, Hawaii and the strongest and most destructive Hurricane Iniki (09/1992) swept over their property and completely demolished their new home. What was amazing was the woman and her grandchildren hid in the bathtub while the hurricane wind forces ripped the roof completely off the house exposing the family to what would have been a terrible tragedy had they not had the foresight to take refuge in the bathroom tub. They survived without a scratch. The strangest thing was the chicken coop in the backyard. It was untouched and the chickens were unscathed surviving the forces of a category 4 hurricane with winds up to 145 mph.
I wanted a bright, airy, and sturdy coop to withstand heavy winds during storms. These ideas were the basics to build upon. Some years ago I was fortunate to repurpose 3"x4" cedar lumber from an old gazebo that required refurbishment so I was able to retrieve the lumber that was going to end up in the landfill. All I had to do is load it up and hull away. So when the tie approached to build, much of the structural lumber was this old cedar pieces that I was lucky enough to obtain. I had used much of the lumber to make trellises and fencing. In fact, after the coop was completed the flock was actively trying to fly out of the compound and had to raise the height of the hollow tile wall with a cedar fence. My neighbor who was particular about roosters, had notified me that my flock was perching on his wall deciding if the chickens really wanted to deal with this neighbor. The cost-of-living in Hawaii is high and free material helps keep expenses manageable. After having a design sketched out, I made a trip to Home Depot and Lowes to check on the types of material availability and prices. I returned to the drawing board and calculated the amount of material for the foundation. It would be attached to our storage shed as a lean-to and I had to consider the layout of the wall studs in the shed and area size to determine how large it would be. The project would require an approximate 4'x10' concrete footing with 1/2" rebar, a row of mortared 6"x8"x16" CMU with more rebar, anchor bolts for sill, and fill each hollow tile with concrete on all three sides of the foundation. The coop would have a dirt floor. Why a dirt floor? My experience with worm composting makes it ideal to introduce earthworms in the soil as worms will consume feces, organic detritus, reduce odors and flies. But wait! You may be thinking the chickens will scratch the floor and consume the worms? More on this later.
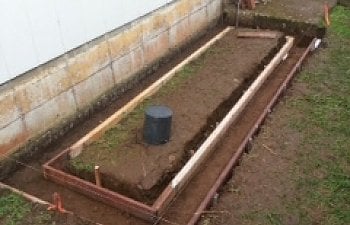

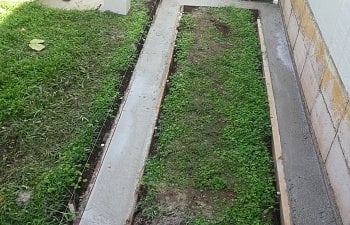

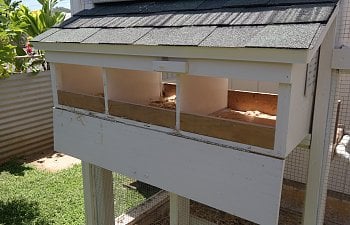
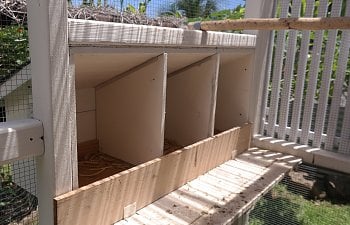
During the concrete work, my mother had become ill and eventually was admitted to the hospital. My older brother from Texas took time off from his schedule to be here in Hawaii and he stayed with us during the hospitalization period. In our spare time he willingly and enthusiastically pitched in with the construction, (even my wife, son, and daughter helped with the painting). The foundation had been poured, concrete blocks mortared and set, anchor bolts in place, block cavities filled in with concrete. It was ready for the carpentry work. Having extra help made the project move much faster. Keeping with bright and airy theme, I used 26"x8' corrugated polycarbonate roof panels that were cut according to the dimensions required. We cut these in half and therefore needed 3 sheets to complete the lean-to roof. A preference for an outside nesting box allowed more room inside the coop. I followed a design I found online. Dimensions annotated in the article were transferred on paper and onto the plywood sheet so it help facilitate the cutting. When applying the 1/2' galvanized welded-wire to the outside of the coop, a staple gun was used with rust resistant nickel staples as we live not far from the ocean. On the 31'x69' door the welded-wire was stapled and I also used pennies and stainless steel panhead screws to fasten the wire in place (see last photo). Stainless steel piano hinges were used to attach the door to the frame. A separate waterline was tapped from the garden faucet and a copper pipe extended to the corner of the coop. The new faucet provided water to the nipple watering system inside the coop. A PVC feeder was built using plans found at: http://www.prepforshtf.com/?s=DDIY+pvc+chicken+feeder. The problem encountered with the feeder is chickens are messy eaters and love to throw all the food out and on the ground. The solution was to build a box with 1/2" hardware screen covering the box loosely and placed underneath the feeder. This way all the wasted food falls into the box and can be reused with minimal spoilage.



The following is a list of materials used:
Repurposed Cedar 3"x4"
- (5) 6'
- (4) 8'
- (1) 10'
Lumber (Pressure Treated)
(2) 4"X4"8' (front corner posts) - $11.49 ea. x 2 = $15.48
(2) 2'x4"x10' (back posts screwed to shed's studs) - $5.19 ea. x 2 = $10.38
(4) 2"x2"x8' (door) - $3.87 ea. x 4 = $15.48
(11) 1"x2"x6' (weld wire finishing) - $1.65 ea x 11 = $18.15
(1) Roll of 4'x50' 1/2" galvanized welded-sire hardware cloth - $80.00
TOTAL COST: $146.99
Foundation:
(15) Quickrete 60# bags (footing) - $7.89 ea. x 15 = $118.35
(7) 10' Anchor bolts (secure sill to CMU foundation) - $4.47 ea. x 7 = $31.29
(13) 6"x8"x16" CMU (concrete bond beam) - $1.79 ea. x 13 = $23.27
(2) 6"x8"x8" CMU (half blocks) - $1.26 ea. x 2 = $2.52
(7) 1/2"x10' rebar - $6.69 ea x 7 = $46.83
(2) Simpson Strong Ties 4”x4” anchors– $10.71 ea x 2 = $21.42
TOTAL COST: $243.68
Roof:
(1) 2"x4"x8' - $4.19
(4) 1"x3"x10' (purlins) - $3.79 ea. x 4 = $15.16
(2) 2"x6"x10' - $9.39 ea. x 2 = $18.78
(3) Suntuf 26"x8' polycarbonate - $24.00 ea x 3 = $72.00
(20) horizontal plastic closure strips (attach polycarbonate) - $5.97 ea. (6 pk) x 4 = $23.88
(12) vertical strips (attach polycarbonate) - $3.17 ea (5 pk) x 3 = $9.51
(2) boxes SS 8x1" phillips panhead (welded-wire with pennies) - $3.37 ea. (25 pk) x 2 = $6.74
(1) box 10-16x2' wood screws (www.palram.com, attach polycarbonate) - 50 pieces = $6.74
TOTAL COST: $157.23
Waterline:
(2) 1/2" copper pipe - $17.98 ea x 2 = $35.96
(1) 1/2" brass 1/4 turn hose bibb valve - $12.96
(1) 1/2" 90 degree drop ear elbow - $8.26
(4) 1/2"x1/2' 90 degree fitting - $5.23 ea. (10 pk)
(1) 1/2" copper tee fitting - $1.36
TOTAL COST: $63.77
OVERALL PRICETAG (NOT INCLUDING THE NESTING BOXES AND PVC FEEDER) = $611.67
Now for the dirt floor. 1/2" rebar was measured, cut, and assembled in a rectangular shape to fit the inside dimensions of the coop dirt floor. 1/2" welded-wire was attached to the rectangular rebar piece with stainless sire and the whole thing placed over the dirt floor after the soil was enriched with compost and inoculated with hardworking earthworms. Hay is strewn over the welded-wire. The chickens are unable to dig and scratch beyond the welded-wire keeping the worm population safe from predation and doing what worms do best.

A ramp was also built so the hens can reach the nest boxes and roosting perches using 3/4" PVC pipes, 4 elbows, 4 t-joint connectors, and an appropriate length of plastic coated 1/2" hard cloth attached with cable wire zip ties. (This project did not cost me anything as I had supplies readily available on hand).

Added Features Since Construction:
I have since added partitions on the northeast side of the coop as the wind blows from that side and provides an added protection from wind and rain. The initial watering system was the typical nipple system and this was removed because they leaked and kept the area underneath constantly wet. We have a problem with ground termites and a wet ground encourages termite activity. It was replaced with a stainless steel automatic waterer which is outside the coop rather than inside. An automatic door (Chicken Guard - neatest thing ever!) has been installed so the herbs return to the coop before the door closes at 7:30 p.m. and reopens at 6:30 a.m.. Therefore waterer inside the coop is unnecessary as the chickens are fast asleep and head out for their morning drink. A gutter has been installed along with a downspout and rain barrel water collection. This keeps the run-off from flooding around the coop.


What is that strange looking house with a bee design attached to the door? That's a nesting box to attract solitary bees. I tried raising honeybees last year, but they got angry and stung my neighbors. So the honeybees are now on a bee farm. Yes, I have become a beekeeper too. It's all about the birds and the bees.
Something else that I had not considered which is by any means not a setback. Chickens love to eat grass and if you notice the pictures after completion we had grass in the 20'x20' compound. There is not a single blade of grass! Neither weedwack nor lawn mowing required. It was becoming a muddy mess, so I repurposed (there's that word again) bags of Big Red redwood chips that were given away from the filming of latest King Kong movie.
Yes, I should've started this much earlier in our lives. Better late than never.


