Show Me Your Pallet Projects!

Thanks. Somehow, I manage to do something useful every once in a while, that keeps me around. This year it was building some new pallet wood raised beds and adding a trellis system for Dear Wife to grow her bitter melons.

Each year I am adding a few more raised garden beds. I'm up to pallet wood raised garden bed version 2.0, with a few improvements over my version 1.0 from previous years. But I might be stuck on version 2.0 for a while because I have not thought of a way to improve it for my use.

If I have time before winter hits, I would like to build another 2 raised beds and get them ready for next spring.

For anyone not familiar with my pallet wood raised garden bed version 2.0, here is a picture of it...

View attachment 3663692


The advantages to this new design is that I was able to use the 2X4 stretchers without cutting them. They made the top and bottom frame. Notice how the notches in the boards are facing each other. Not only do I think that looks nice, but the real benefit is that the 16-inch high boards behind it are nailed to the top and bottom of the strectchers and provide support for the entire 16 inches.

I went with 16 inches high because I can then use the circular saw method to cut off the pallet plants between the 2X4 stretcher. That's the fastest for me to break down a pallet. That usually gives me a cut plank pieces of 17-18 inches, which I trim down to 16 inches with squared off ends.

If you look closely, you will see that I use some 16 inch high 2X4 pieces in each corner to add more strength to the framing. Then I nail in the pallet planks to the inside of the frame using my powered brad nailer. That goes really fast. I don't need really big nails or screws because the soil inside the raised bed is pushing the plank pieces against the 2X4 framing, holding the boards in place even better. No sidewall blowouts in this design with the 2X4 framing on the outside.

The pallet wood was all free. I estimated that I used less that $2 in screws and brad nails for the build of each 4X4 foot raised bed. Anyways, that's my version 2.0 of my pallet wood raised beds. If anyone has improvement suggestions, I am always listening and learning. Thanks.

⚠️ Stackable, Interlocking Compost Bins!

I found an interesting approach to hot composting bins on a thread from this past spring. After looking at the pictures and the plans, I could see where one could easily use pallet wood for this project.

First of all, giving credit to the member who posted the link...


OK, now some pictures to peak your interest. Here is the compost bin all stacked up and interlocked...

View attachment 3705862

Looks pretty nice to me. But here is where the design really shines. Each layer of that compost bin can be removed and restacked in another place. For example, if you practice hot composting and you need to turn the pile, you simply start taking off the top portion of the compost bin, set it on the ground next to the original pile, and then start moving the compost material into the new bin you are building.

Here is how they show it on their website...

View attachment 3705863

I think that's a pretty interesting way of turning and rebuilding the compost bin!

If you are interested in that design, here is a link to the Free Compost Bin Plans.

Not a difficult design to build, just look at the detailed picture of this...

View attachment 3705868

From the outside...

View attachment 3705869

View attachment 3705871

If you are into hot composting, and building stuff with wood, then maybe this design is just what you are looking for. Lots of advantages to this system.

:old I have a bunch of full-sized pallet wood bins hiding underneath some trees. They work great but cannot be easily moved. I just fill the bins and let them sit for years, cold composting. I really like the stackable, interlocking idea here because you don't have to be super strong to take apart this compost bin, one level at a time, and move it to wherever you want. If you want to practice hot composting, I can see where this stackable bin approach has many advantages when it comes to turning the pile over and rebuilding it in a new bin.
That's similar to my fencing compost method.
 
That's similar to my fencing compost method.

That was another great composting method that I know we discussed in the thread Hügelkultur Raised Beds. I'll paste it here as well so people can look at your method. Although not exactly a pallet project per se, one can compare the methods of easy hot composting bins and turning piles and see what would work better for their situation. Or, maybe, use both methods wherever most beneficial.

Edit: Please expand the following quote if it is truncated on your screen. It has some great pictures and notes you don't want to miss.

For my first compost pile I bought a section of beach/sand/snow fence 4' tall and 10' long. I set it up so the ends met, making a cylinder. I hooked the ends together loosely.
4-X-50-WOOD-SNOW-FENCE_c2c3c485-394c-4028-88fa-2211fd34089e.e67223f165e659eab323bd2407f063a1~2.jpg

Then I added alternating layers of dry/carbohydrate matter and hot/protein matter, watering if it was dry. Once the pile was about 3' tall I raked the topmost matter out to the edges so there was a slight dip in the middle of the pile to catch water. Then I watered it, wet but not flooded.

To turn the pile I would unhook the fence and reassemble the cylinder next to the pile, then fork the pile back into the fencing cylinder. That would mix the pile and add oxygen without getting too complicated.

When we made a long distance move I left the fence behind, and in our new area wound up using a section of farm fence that had been discarded. It worked fine. As long as your pile is around 3' diameter and 3'-4' tall the compost should decompose well.
Screenshot_20231207-193929-454~2.png


My compost would steam...

I put the section on how easy it is on @fuzzi method to turn the compost pile in bold. Super easy as well. Thanks for sharing, and reminding me, of your system @fuzzi. It's great info so I might as well share it here as well.
.
 
I was thinking of additional uses for the stackable, interlocking compost bins. One idea that came to mind was using maybe only a tier or two high, inside the chicken run, to make smaller grazing frames. The top tier of the stackable compost bin could be covered with hardware cloth to let your grass grow up and through the wire to provide protection for the plants and provide greens on top for the chickens. Maybe only one tier high with a shorter tier covered with hardware cloth to let the grass grow through the wire.

1702663969146.png


So, you might have one grazing frame of grass seeds, another of oats, maybe one of wheat, and of course, one for barley which is what I use all the time.

At any time, you could start stacking the tiers and make a compost bin inside the chicken run. If you want to turn the pile, then take off the tiers and restack them elsewhere, letting the chickens tear apart the original pile, and then just fork the compost into the rebuilt stack after the chickens are done scratching and pecking through the first pile.

I built a nice ~3X10 foot grazing frame out of salvaged and pallet wood inside my chicken run, and it works great, but it is super heavy and not meant for moving around. I can see where smaller grazing frames would have an advantage in smaller chicken runs, especially if you wanted to plant different seeds in different grazing frames.

1702664900768.jpeg


🤔 Well, these are the types of things I think about, especially in the wintertime when I can't really build anything outside.
 
I really like that! Think I'd use 4x4's for the corners just for ease of stacking. I've been thinking about replacing my bins...I might try that when I do.

I am sure 4x4's would work as well. Use what you have. Most of my pallets use 2X4's as the framing, but I did pick up a few pallets using 4X4's.

🤔 You could also use two 2X4's sandwiched together to make a 4X4, or close to it. Sometimes I do that if I need to use up scrap wood pieces. For something like this stackable compost bin with those legs mostly hidden, you would probably never see the difference between a true 4X4 and two 2X4's sandwiched together. And you would still get that extra surface area for ease of stacking. I have lots of 2X4's, so I always try to use them up first.
 
A grazing frame! Yes!

Right. I have always thought of a grazing frame as a larger structure that you place in the chicken run and don't move after that. Hence, I built my big ~3X10 foot grazing frame.

:old But I'm not too old to consider other options as well, such as smaller, more portable grazing frames.

Here is a picture of a very simple grazing frame you could make out of pallet wood 2X4's and paint them, if you wanted to do that...

1702696649985.png


I'm sure that would work in many chicken runs. I prefer the natural wood look, but I know many people love to decorate their chicken runs with colorful stuff. What a great way to brighten up the chicken run while at the same time providing something useful for the chickens.

Getting back to the stackable, interlocking compost bin design, I think there would be an extra advantage to having a single tier of the compost bin on the ground with another, maybe shorter, tier on top covered with hardware cloth.

Nothing says that all tiers have to be uniform in height, either. So, for a grazing frame modification, maybe you want those legs only to be an inch high so the potting soil, compost, or topsoil you use to fill the frame does not go falling out the bottom. Or you could push the legs down into the chicken run dirt up to the level of the bottom of the boards.

1702696951990.png


I am thinking of the top tier with hardware cloth could be moved from grazing frame to grazing frame as you wanted. But nothing wrong with having multiple top covers with hardware cloth either and just leaving them in place on top of the frame.

If you wanted to plant new, or different seeds in any frame, it would be super easy to lift off the top tier with the hardware cloth, work the soil in the lower frame, replant it, and put the cover back on. It's not nearly as easy as that with my 3X10 foot grazing frame.

Later, if you want, you could gather the tiers together and build a compost bin in your chicken coop with those same stackable frames. It's kind of a 2 in 1 solution, giving you more options.

🤔 And thinking while I type, why not use one of those same frames and make a dust bath for the chickens?

1702697732785.png


If you make all those frames with the stackable, interlocking concept, you would have many configurations and options to choose from. I like making stuff that can be used in many ways. The magic in the stackable design is just making those legs in the corners to stack the frames. Of course, the frames would all have to be the same size. But you could use those frames in a number of ways, not just for a compost bin.

Would love to hear about other uses for stackable frames that come to mind. Later...
 
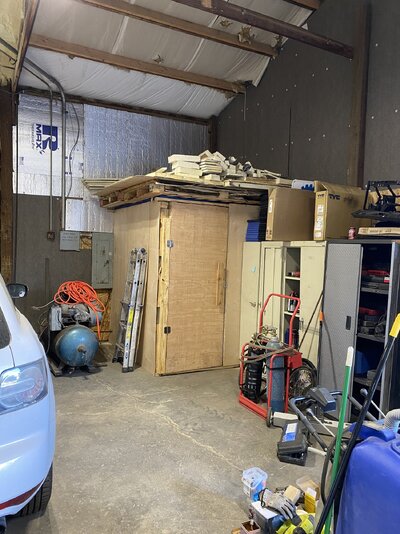
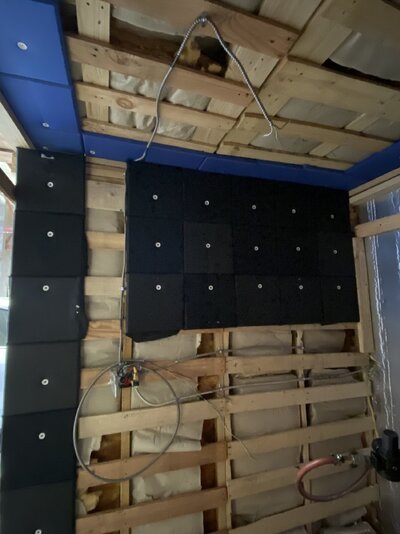
Pallet project I did a month ago for a friends shop. It’s an acoustic suppression box for a very noisy 220V “temporary air compressor.”

Once the 3 phase air compressor (blue green colored one) is tested and repaired than, it will get slid into the box and be almost totally silenced.

1) Pallets = free
2) Acoustic squares ~$50 for 168 pieces
3) 4x8 Veneer sheets, 2x4’s, 1x1’s & all that spare used wood was $40
4) reused some of the insulation from other section of the shop inside the pallets = free
5) leftover screws from 2 other projects
6) leftover LED light, wiring, box, plate, conduit for inside the box
7) had to buy hinges & simple slide latch = ~$25?

Assembled in like 3 days in little wedges of time. Mounted solidly to the walls.
The screenshot of the acoustic recording shows the level of that now very quiet red compressor with the door closed, all 3 garage doors open and no one turning wrenches. We are now able to carry on a normal voice level conversation with the compressor running.

I’m going to estimate that once the 3 phase unit is in the box it’s acoustic signature will likely be below 35db.
IMG_5434.jpeg

IMG_5388.jpeg


IMG_5435.jpeg

IMG_5437.png
 
I’m going to estimate that once the 3 phase unit is in the box it’s acoustic signature will likely be below 35db.

Wow! That would be really quiet. For those who don't know, a normal conversation with another person is about 60db. So, dropping that compressor noise down to 35db is like almost totally silent.

Thanks for sharing your acoustic suppression box pallet project.
 
Given the fact I shared the Db screenshot above …
Wow! That would be really quiet. For those who don't know, a normal conversation with another person is about 60db. So, dropping that compressor noise down to 35db is like almost totally silent.

Thanks for sharing your acoustic suppression box pallet project.
… the one freakish detail that both my friend (shop owner) & I noticed while standing In the box with ONLY 1/2 the acoustic panels installed on the ceiling & 2 of the walls (door too) it was already insanely quiet standing in there …
Once I finished the ceiling and the 2 inside walls with acoustic panels we walked back in there and really… I mean Really *felt the silence*! It actually lifted my tinnitus to about a 4.5-4.75 on 10 point pain scale with the door partially closed. When we closed the door completely it went above the 5.0 & actively started to hurt; I had to open the door and walk out.


And side note #2 is that we can actually talk in normal level in the middle of the shop with the green one running. We tested it last week.

So I’m fairly certain that 35Db is a reasonable outcome for the green one when we slide it in there after Christmas. Especially after I put an actual air filter on the compressor’s intake port. It is wide open & unfiltered for many year from the privous shop owners.
 
So I’m fairly certain that 35Db is a reasonable outcome for the green one when we slide it in there after Christmas. Especially after I put an actual air filter on the compressor’s intake port. It is wide open & unfiltered for many year from the privous shop owners.

I use a few pneumatic tools when I breakdown pallet wood. My compressor is just a small ~3-gallon unit, but when it kicks in, it is loud. Usually not a problem for me as I wear Bluetooth WorkTunes Headphones and listen to radio programs or audiobooks while I work. My other strategy is to use a long air hose and move the compressor as far away as possible.

I mean Really *felt the silence*! It actually lifted my tinnitus to about a 4.5-4.75 on 10 point pain scale with the door partially closed. When we closed the door completely it went above the 5.0 & actively started to hurt; I had to open the door and walk out.

Tinnitus is no fun. Been there, done that, when I was in the Navy. Fortunately, I have no constant tinnitus to deal with. Any treatment possible for your condition? I hope so.

All I can say is that I protect my hearing as best I can when working around loud equipment, motors, and engines. I paid a good price for my WorkTunes Headphones, but they are worth every penny. The Bluetooth feature lets me listen to radio programs or audiobooks I have loaded up on my smartphone, so I almost always wear them even when working out in the garden where it's really quiet.

1702876197070.png
 

New posts New threads Active threads

Back
Top Bottom