Hi there and thanks for checking out my coop page!
I am a newbie in the chicken world; I’ve only had chickens for about 16 months. For many years I have wanted chickens but I lived in a community with CC&R’s that did not allow them. Last year I moved to just over an acre of land in an area where everyone has chickens. Needless to say I couldn’t wait to start my brood! My house even came with a chicken coop which I thought was just awesome… Until I realized how lousy it was when I tried to actually use it. It is barely big enough for 3-4 chickens, has one small roost about 8 inches off the ground and three nest boxes with a door that opens down toward the ground outside the coop. It’s impossible to clean because you can’t reach all the corners, and shavings from the nests fall into the crack of the door each time you go to get eggs so you have to carry a hand broom with you to clean it so that you can close the door again. The doors are plywood and swell in the rain so you can’t even pry them open and no handles. Pain in the rear!
It didn’t take me long to figure out that I needed to build a better and bigger coop and I knew I only wanted to build it once! So I started researching online looking at other coops and many of the coops in this section to get ideas. I was going to convert an old shed my brother and I built when we were teenagers but the equipment we needed to move it was at another jobsite my dad was working, so my plans for the coop sat and sat until one day I got lucky. The jobsite that was hogging the equipment I needed had ordered some roof trusses and there was a change the company had to make to the pitch for some reason. Well apparently they changed the pitch on part of the order, but not the top pieces which were on a separate sheet. The company didn’t want them back since they had no use for the incorrect trusses. So the owner was stuck with all these extra trusses in his yard and he asked my dad if he had any use for him. He immediately thought of me and my chicken coop.
He told me I could have all of the trusses for lumber, all I needed to do was go get them. So one day he brought down his big trailer and we loaded them up, brought them to my house and laid them out on my nice brown lawn (thanks California drought). There were about 20 nice sized trusses, meant for the top of the other guys house, that were the perfect size for the roof of my coop and with decent pitch to shed any snow we might get. Many of the trusses were way too big to use for the roof to my coop, but they made great lumber for the walls, so started the process of dis-assembling the trusses for lumber. If you’ve ever seen a truss with the metal spiky boards just try peeling one of them off!! They’re not meant to come off and they hold on for dear life. It was several days’ work with a hammer and nail puller/pry bar to beat and pry them off. I was able to get all but 10 studs for the walls out of all the lumber, so I did have to buy 10 studs at the store. Once I had all the lumber set I started constructing the coop. I had already drawn up plans and decided on the size, windows, doors, etc.
I decided I wanted a big coop, one that I could easily walk in to clean, had space to store food and savings, had power for lights, an automatic pop door, and enough space for at least 10 chickens. I decided 8’x12’ was the size I needed. Here are the plans for the walls and floor. The side walls are identical so there is only one plan and the back wall is solid so there’s just a basic drawing to count the number of studs I needed. These plans are ¾ inch scale. They are not as square as I’d like but I didn’t have a drafting board when I drew them so they are only as square as I could get with a 12” drafting ruler and a piece of paper on a clipboard.
Floor: (Fairly basic rectangle with screened partition wall)
Front wall
Back wall and side walls to come...
I did have to buy many of the materials to finish off the coop, so I realize this cost way more than the eggs are worth, but I wasn’t in this for the eggs to begin with. Believe it or not I’m not much of an egg eater, but I’ve always wanted chickens. My parents and my brother eat most of the eggs, they love getting fresh eggs from my ladies. Though I imagine since this coop will easily last 20-30 years or more it may well pay for itself with the recent spike in egg prices.
I had some help for part of the build, but for most of it I was by myself. I stared with leveling out a pad and bought some cement post blocks for the floor joists to sit on; this keeps the coop high enough off the ground to prevent any termites from tunneling up to get into the walls. The joists are pressure treated lumber and the flooring is tongue and groove OSB (cheaper than plywood and plenty strong for a chicken coop floor).
Next came a piece of cheap linoleum from a local flooring store, they have remnants in the back you can buy at a good discount. I covered the whole floor first before I put up the walls, this way the edges can’t peel up later on.
After that I built one of the side walls, one day when my dad came by I had him help me stand it up and move it so I could build the back wall. Once I had that done I had to wait for someone else to come help me stand them up in place. My mom and I did that one Sunday when she came down. All of the walls are built to basic building codes; studs are 16” on center, double studs on the windows and doors.
Next I worked on the front wall which was the most complex because it has the people door, a window and the egg door in it. This is the long wall in the plans above. I had a helper this day so we got the wall built and stood up, and then we built the other side wall. Since it was identical to the first it was easy to duplicate. Now all four walls are tied together.
As you can see the ladies are already checking out my handy work!
Now for roof trusses, so nice of a company to make them for me for free!! LOL, saved me a ton of work and money. I started with one of course and braced it good before continuing. Once the first one was up and braced the rest went up quick. They are 2’ on center, standard for trusses.
While I had help we started sheeting the roof, we used standard 7/16 OSB (they call it ½ inch though the true dimensions are 7/16) I bought from the Lowes in town. Most of the materials were bought there because it’s about an hour closer than the Home Depot. I did however drive down there one day to buy siding for the coop because they had a product that was half the price of T1-11. It’s called Truwood siding and looks much like T1-11 but its thinner and not solid wood like T1-11. It’s basically a particle board with wood imprints on the outside and it comes pre-primed, it laps nicely at the edges and for a chicken coop it suits the purpose perfectly without as much cost. As long as I keep it painted it will last a long time. Sorry that the pictures jump along, but being a one person building crew most of the time it’s hard to stop and take pictures all the time and I only get weekends and the occasional weekday afternoon to work on it.
I put three windows in the coop, two for cross ventilation, the other more for looks and extra light. I purchased an exterior door with a threshold, though this was an expense I didn’t want to have to replace the door in a year or two due to water and rot. I live on a hilltop so when the storms come in they blow rain sideways and anything that’s not tied down good will literally go flying into the neighbor’s yard. During this build we had just such a storm, and I was in the middle of putting on the roof. The shingles I had sitting on the roof went flying into the neighbor’s yard and a large 14 foot piece of corrugated metal sheeting he had came flying into my yard. Tree branches were down everywhere and I had to make some emergency repairs to the roof of the current coop during the storm.
I had to go out during the storm and add a bunch of nails to the tar paper to hold it from being torn off; I did have to replace one piece after the winds literally shredded it. As you can see in the picture I had some nice roof jacks I borrowed from my dad that made it much easier to do the roof. I hauled the whole shingle packs up the ladder myself during the storm to help hold down the tar paper. This worked much better than the half stack I had up there that the wind got to, but they were much harder to lift up the ladder. After the storm subsided I finally had a day to finish the roof, Feb. 20, 2015 (my brothers’ birthday).
Feb 21st, I started today by wiring the coop for lights and a couple of strategically placed outlets and then insulating the walls and started putting up the soffit and peak siding.
Feb 23rd got some help today to put up some of the OSB on the inside walls and ceiling. I am adding a partition wall to separate the chickens side from my storage side, it’s just a 2x4 frame covered in chicken wire with a screen door for me to enter.
Now that the inside walls are finished it’s time to install the nest boxes my dad and I built one night after dinner at his house. He has a nice woodshop which made it much easier to rip the wood and build the boxes.
During the build I drew up plans for my nest boxes, I looked into buying metal boxes pre-made, then looked at buying the wooden frames that Tractor Supply sells before I realized that if I did it right I could build them myself much cheaper and better. With my plans I only needed one piece of ¾ pine plywood from Home Depot (they have a MUCH better plywood selection than Lowes). The plywood is actually 11/32 thick which is slightly under ¾ and it has 11 plys. Here are the plans I drew up for the nest boxes, each box is 12”x12” by 14” high. The plans are 1-1/2 scale and are drawn for 5/8 plywood. I wanted 5/8 plywood because it would be thick enough to work with but not too heavy, however around here 5/8 is very hard to come by so I had to settle for ¾.
I knew I wanted to have at least 6 boxes so that I had plenty of space for my ladies and this configuration was the most sensible for space. I also knew from experience that I didn’t want the egg door in my way while I was trying to get eggs or clean the nests so a door like my current coop has was out of the question. I also didn’t want the typical door that lifts to get the eggs, this is also a hassle when trying to get eggs or clean, you either have to hold it up or make a way to prop it up while you’re working. While this is better than a door that goes down it’s still in the way and I didn’t want to be hitting my head on it or having to fight with cleaning it off before I lift it so that leaves/twigs/snow don’t fall in the crack when I lift it. I decided that a door that swings left/right out of the way was what I wanted, this way the door is completely out of the way when I want to get eggs or clean and I won’t have to clean it off before I open it.
Plan:
Finished:
It was a very simple build. I started by ripping the plywood into three 12” strips, the fourth strip is slightly less than 12” due to blade loss. Set that one aside, it will be used for pieces later. Take one of the 12” strips and cut it in half, making two 48” pieces. Then measure down 6” on one side and draw a line from that mark to the opposite corner. This creates the angled top to prevent them from roosting on top of the nest boxes. Next take another of the 12” strips and cut it into two 38” pieces for the bottoms of the nest boxes. We used self-drilling screws to attach all of the pieces to this. I measured 13-1/2 inches up to the bottom of the first board, then ~14 inches to the second board. Once these were in we measured for the vertical partitions which I cut from the third 12” piece, screwed in the lower ones from the bottom and top, then put in the upper ones with some well-placed angled screws through the bottom (the tops are in mid-air). You could cut the top partitions to the same angle as the top, but it wasn’t worth the extra work for me. I also cut a ~40 inch piece from this for the top and added a strip from the leftover piece to finish covering it since it’s not wide enough to cover all the way. Now use the rest of the extra piece of plywood and cut it into ~40inch by 4 inch strips (four of them) for the front and back to keep the shavings/eggs inside the nests. There was a leftover strip from this board that I added to the back at the top to help with stability and it also allowed me to get a couple screws in the top of the upper partitions for strength. The whole process took my dad and I about 2-1/2 hours to complete.
Feb 27th: finally got all of the interior walls up and put a coat of primer on it, I also built the frame for the partition wall. Once I had this all painted I built the roosts, this way there is primer behind all these areas to prevent any moisture issues in the future.
Next is the roosting area opposite the nest boxes. I wanted to build a platform similar to one I saw in another coop page; this allows me to have the roosts up high where they like them and to have hanging food and water inside the coop under the roosts. This saves space and makes it so they can’t jump on or roost on the food and water. I plan on adding a water line to the coop at some point so that I can have an automatic waterer inside. This way if I’m gone for a few days I don’t have to worry about them running out of water or trying to arrange to have someone check on them constantly.
Then I primered the roost area and worked on building a ramp for them to get up to the roost area. I used a scrap of OSB and some small pieces of wood I cut and stapled on about every 4 inches. I covered the roost floor with stall dry, there are several brands that are similar, Sweet PDZ, Dry-Stall, etc. All of them are basically clay and DE and they are awesome at keeping the roosting area dry and relatively smell free. I clean it out with a kitty litter scooper about once a week. If I don't get out there for a wile I just use a shovel to scoop it all out and replace it.
And installed the automatic pop door I bought. I looked through several before I settled on this one, since it swings open to the side it’s less likely to have shavings/dirt build up and block the door from closing all the way. I also looked at the motors that just lift and lower the door, which isn’t secure enough to keep predators out since nothing holds the door down. The raccoons have had enough free chicken at my expense recently due to a lousy coop door, so even though this door was expensive it’s cheaper than having to constantly replace my flock. And if I’m not home when it gets dark it closes itself at dusk, it also opens at dawn with the built in light sensor. It came with a battery; the door runs on 12 volt power so it’s designed for a coop without power. But they also sell an A/C adapter trickle charger for the battery. So I never have to worry about the power going out, the battery will be charged and ready at all times.
As you can see the dog had to test it for them first, LOL. She just loves her chickens.
Across from the roosting area I installed the nesting boxes, put chicken wire on the divider wall and installed the screen door. I also added a spring to it so that if I forget to lock it the ladies can't just push it open. Then it was time to throw down some wood chips and get ready for the ladies!
Feb 28th: today will be my ladies first day in the coop, while I’m not totally done with the outside the inside is ready enough for them and I can’t stand the old coop any longer.
I put a final coat of paint on the inside and did some last minute caulking to fill gaps I knew would be a pain to clean later. I had all the windows and doors open to let it air out well before putting them in it.
It was so hard to convince them to go inside the first night, even though they had been checking out my work the whole time this new coop was not “home” to them. I had some help to corral them since there’s no run up yet and I put them in one by one and blocked the door so they couldn’t come back out. I left them in the coop for one day because I had to be gone that night and I didn’t want to worry about them not going in. Though it took them no time to adjust to the nest boxes, I couldn't even get a picture in before Dolly (my golden EE) was in there re-arranging the shavings to her liking.
Today I let them out with the automatic door and they just love the new digs! Most of them are roosting on the roost bars, though I still have a few that sleep in the nest boxes and on the floor. They’re laying all their eggs in the nesting boxes.
I also covered both of the windows on their side of the coop so that nothing can tear through the screen and get in.
March 3rd: I have the flu and it’s supposed to poor rain all weekend so my mom offered to come over and get a coat of paint on the outside of the coop for me. Isn’t that SO nice!
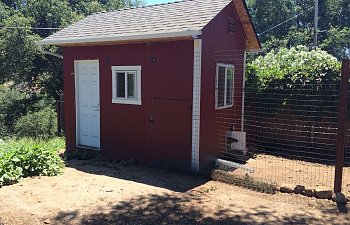
Fast forward to April 29th, we finally got the fencing on the run up and I am SO glad!! No more chicken poop on my front porch! I haven't had much time to work on the coop recently so those last few things have been getting put off. The wire is buried ~12-14 inches in the ground to prevent digging critters from tunneling under. Currently there is no roof or cover to the run, but I do plan on adding one when I get the time.
June 5th, though the coop is still a work in progress it is mostly finished. It has been so hot that I haven’t had the desire to finish the last few items, though hoping to get to it next week when it’s supposed to cool down for a few days. I still need to add the light fixtures and turn on the power, finish painting the eaves and finish the trim around the door and windows.
Future Plans: I would like to add a brooder to my side of the coop so that I can keep the baby chicks in the same area as the big ladies. I also plan to add a cover to the run and a step in front of the door. And I am going to plant some bushes/vines tat will grow up the side of the run fencing and over the cover to help provide some natural shade for the ladies. And I have some branches off a tree I removed from the back yard that I will install as outside roosts. I'm waiting to do this until I get the cover on the run so that the ladies can't use them to get high enough to fly over the fence.
There's not much I would do differently, I spent a lot of time planning and checking out other coop designs before I started so that I wouldn't have many regrets. I would probably try to get more help next time and I would make time to finish the build a bit faster so that it wouldn't take 6 months to complete!
Well that's it, thanks for visiting!!