We just finished our coop. The whole chicken ownership thing in the suburbs is a really huge debate. Here in Raleigh, backyard chickens are a hit. There is even a Tour De Coop each year that showcases coops in the city. Each month, you can find a class on keeping backyard chickens someplace in the city. We joined the meetup group to get to know others, and get information on where to get supplies like organic chicken feed and food grade diatomaceous earth. It has been helpful. When we came to Raleigh in May 2010, I looked for a house by searching on Google for the neighborhoods who allow chickens. We live in a great neighborhood, and the covenants do not currently say you cannot have chickens. We are sure at some point this will come out and the homeowner’s association will try to change it, and we will be there to fight it for sure. But, in the meantime, we asked our neighbors if they cared if we had chickens and they are ok with it.
We needed to build a small coop that was not too obtrusive in our yard. If I had my way, I would have built a walk-in style coop so that we could store feed, shavings and supplies, and a run with a 6 foot height so that I could get in and work. However, that would have been very visible, especially since we are building on a hill in our backyard. The advantage of the hill is that it doesn’t really have much growing on it and we can use the space for chickens without messing up the yard, and it is also very dry and drains well. The previous owners put in a drainage system and retaining wall that works great to keep the hill dry. Our wet yard near the house is a whole ‘nother story, though!
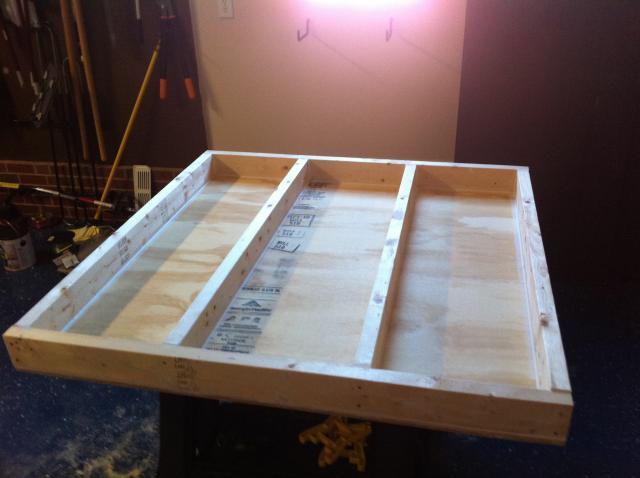
Anyway, we looked at many plans and drew up many pictures. In the end, the plans changes completely and Don decided to make the coop on the fly. Keep in mind, he’s never built a house before and we were looking at all sorts of house building issues. The coop is 4×4. At first, we thought we would insulate the walls so we built framing and attached plywood panels to one side. Then we decided that there was really no need for the extra expense and weight on the coop. We saw somewhere that someone used shower panels on the inside of their coop so they could clean it easily, but we could not find and shower paneling except in a complete wall kit.

We read that you should caulk every place you can, so we did and more! I painted the inside with 2 coats of paint over a primer. As Don built the walls, he decided to make the coop in a modular fashion so that we could move the pieces into the house and paint them. Because we got hit with cold weather pretty fast, there was no way to paint outside. So, we painted in the house.
Don, my husband and master handyman, said that a modular design was a real nightmare for fitting. It would have been simpler to build and assemble outside, but it was too cold to work with paint and caulk. We had to keep telling ourselves that this was a coop and the chickens would not care if there were mistakes.
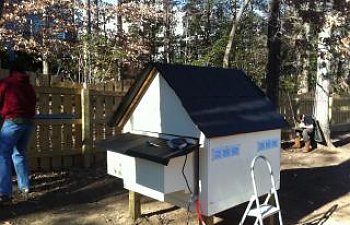
Another nightmare was the ground. There was an 8 inch or more drop in the ground from top to bottom, and it was also off from side to side. Never build on a hill, ever! We also decided to use the concrete pylons rather than sinking posts into concrete. This is because our neighborhood covenants say no permanent structures without approval. So, we made the coop as non-permanent as possible. This, too, was a real pain because the pylons are triangular and had to be sunk underground anyway to make it possible to put the run in. You can see from this picture that we live on a hill, and we built on the slope at the top.
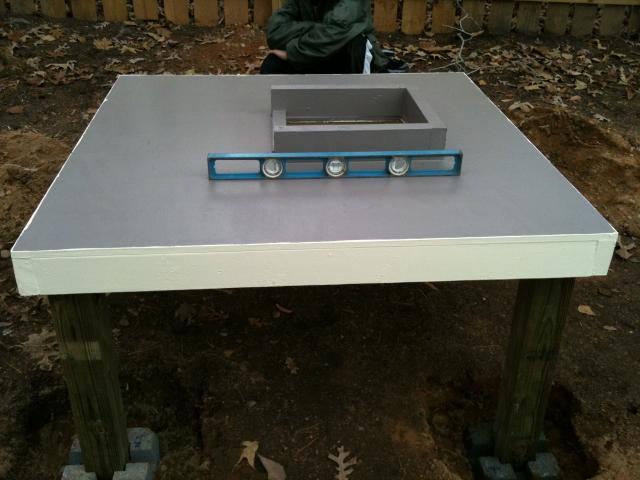
So, Don got the base in and it was perfectly level. It is very short underneath, which is a bit of a pain because we put our feed underneath. But, it works, and that’s what counts! We hadn’t planned for the concrete pylons to be buried, which is why the coop is a bit shorter underneath. This also meant we had to cut our ramp down because it was too long.
Now we start putting on walls. Of course, Don needs a pneumatic nail gun to get the job done. We found a kit at Lowe’s with several different nailers including a framing nailer and a stapler. On this wall, we cut a hole for ventilation. It also works well that it is a place we can peek in to see our ladies on the roosts. I found a cast iron trivet at World Marketplace, and Don attached it with screws and wire to the inside of the coop.
Here is a side wall shot. We found venting at Lowe’s and put in 2 vents on each side for ventilation. Everything we read said that this is the major cause of problems in the coop. Dry, dry, dry! was the motto of the NC State vet who gave a lecture on backyard chickens at the library here. So we vented!
We decided to make the nesting box and the door all together because we have a small coop. The door swings open for us to get eggs and to clean the coop. I’m not sure of the pros or cons of this setup yet, because we have only had the coop a couple of days. BUT, I like the design and we really did not know how to make a hinged roof without the possibility of leaks. We attached a latch to the door and put a D-ring through it to keep it secure. I heard that raccoons can open latches given the opportunity. So, we went as safe as possible. The door had to be sanded down a bit to make it fit well, so in the spring I’ll have to do some touch up painting. Again, this was a limitation to doing a modular design and piecing the coop after we painted. The paint also threw the tolerances out a bit.
We gave the ladies 3 boxes, which is probably too many considering we are only having a max of 6 hens in the coop. Some chicken folks say several will lay in one box, they pick favorite boxes, and that sometimes the hens will have a laying party and all crowd into one box at once. We’ll see.
Ok, on to the interior. Once we got our 4 exterior walls built, we worked on the interior features. We did not know what we were going to do inside, because we’ve never had chickens, and because we didn’t know what the space would look like. Don built a ladder for the ladies in case they wanted to roost on it, or use it to hop to the roosting bars. I’ve seen them sitting on the ladder, but when we put the first hen inside the coop, she flew to the roosting bar. Since we have heavy breeds, we wanted to give them a chance as well. We put two 2×4 boards in at the roof for the roosting bars. What we read is that chickens like to have a space to sit flat rather than curl their toes around. Big fat bars or boards are best, especially for winter, when the hens can squat on their feet to keep them warm.
Another downside to the modular design was not being able to paint the interior mods. So, in the spring, I’ll have to go in and clean, then paint. It may put the coop out of commission for a couple of days, which I’m sure will be a pain to the ladies. Notice we built a ledge on 3 sides to contain some of the pine shavings. Why shavings? Reading on backyardchickens.com, we saw that the consensus seems to be they are the easiest and most effective way to keep the coop clean. I plan to sprinkle a little food grade diatomaceous earth in to keep down any bugs and dry out the poop. I will see how long it takes to make the coop nasty and then plan my cleanings around that. We will install a second compost bin somewhere near the coop so I can dump the shavings in it.
Here are the roof trusses. You can see the roosting bars where the level is. We also cut a hole in the far right wall and hung a heat lamp. I don’t think the chicks need it, but they went from a garage to a 25 degree snow storm, so we wanted to be careful. They are also only 9 weeks old. But, I read that at 8 weeks, they were capable of handling the cold. They seem quite fine. I do not see them huddled under the lamp at night. Yes… I do go out and peek in to check on them… and no, I’m not crazy… too much. Roofing was another new housing job we had to learn. Don watched YouTube videos on roofing to learn how. We ended up using 2 packs of shingles, which was expensive. However, he made his own ridge pieces, because the crown piece at Lowe’s was really expensive. We used the shingles we already had to make the ridge. I would recommend looking on craigslist or the free-cycle web-ring in your town to find shingles and tar paper. Someone had all we needed for $13 on craigslist, but the shingles were brown and we wanted black to match our roof because of the neighborhood covenants. That single fact of trying to make it cute for the neighborhood was the cause of the added expense of the coop. Roofing was the scariest part, because a leaky roof will cause rot rather quickly, not to mention that the hens may not be too thrilled to be wet. But, we did it!
We laid tar paper and shingles. It wasn’t too hard. We didn’t have a roofing nailer. I managed to talk Don out of the $200 gun at Lowe’s. That was a challenge. He kept telling me he could use it to repair our roof, but he’d have to climb up there, and that wasn’t too appealing. BEWARE: building your own coop will cost you SO much money. I know the quality is way better that the ones you get by mail… which I have seen before. But, there always seems to be some tool you need to get the job done, and that is where it gets expensive.
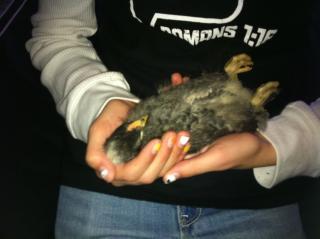
Of course, when we got a short break to warm up, we had to take our Dommie… I mean our Dominique hen… inside with us. She”s a cuddler.
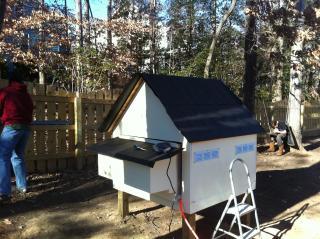
Here is a picture of our coop with the run attached. The run was done on the fly as well. We purchased a big roll of .5 x .5 hardware cloth and attached it to a frame we built as we went. We cut 16 inches of hardware cloth and laid it on the ground under the framing, then tacked it down with landscaping tacks and covered it with soil. We live in a fenced backyard but we do have woods around us and we have seen fox, raccoon and opossum around us. We don’t anticipate a huge problem, but we wanted to build the coop better than needed in case we had a problem. I think the gauge of the hardware cloth is low but we could not find .5x.5 cloth in a high gauge. The higher gauge is 1 x 2, and we read that coons can reach in and eat chickens bit by bit through that size hole. We attached the hardware cloth with .75 inch staples and a pneumatic staple gun. We put in thousands of staples, literally! The backyardchicken forum said to attach the cloth with screws and washers to keep raccoons from pulling out the staples, but I can’t see them pulling these out because they are long and there are so many of them. Our neighbor said that in England, they put down hardware cloth and the foxes burrowed a tunnel under it and got to their 75 chickens. I suppose it depends on how hungry they are and how much time they have. No chicken is an island.
Here is our Buff Orpington in the coop. We put a layer of pine shavings in and turned on the light. They have been in the coop for 3 nights now, with temps down to 19, and they look fine. They know how to use the ramp down to the ground, how to get on the ladder and how to get to the roosting bars. I raised them in the brooder with a perch from a bird cage and so they know how to roost. That was another thing we read on the forum. Sometimes chicks from the brooder do not know how to roost and may huddle on the floor. Ours had no problems.
Here is Madison under the coop. She was sprinkling some oats on the ramp to make sure the hens would use the ramp, which they had no problem with, but they enjoyed the treat.
Lessons Learned:
We had fun making the coop but it was also a big chunk of time out of our schedule. My husband had to take a week vacation to work on it. It takes several days to do. The coop will cost you a lot of money, and I understand now why the online coop folks charge so much. I also saw ads on craigslist for coops and runs by people who know what they are doing, and we probably should have considered having it built. BUT... nothing can compare with the satisfaction of looking out my back window and seeing our girls in the coop we built. It was hard, we had to do things we had never done before, and we made some mistakes, but we have a coop, and we did it ourselves. There is great satisfaction in that!
We needed to build a small coop that was not too obtrusive in our yard. If I had my way, I would have built a walk-in style coop so that we could store feed, shavings and supplies, and a run with a 6 foot height so that I could get in and work. However, that would have been very visible, especially since we are building on a hill in our backyard. The advantage of the hill is that it doesn’t really have much growing on it and we can use the space for chickens without messing up the yard, and it is also very dry and drains well. The previous owners put in a drainage system and retaining wall that works great to keep the hill dry. Our wet yard near the house is a whole ‘nother story, though!
Anyway, we looked at many plans and drew up many pictures. In the end, the plans changes completely and Don decided to make the coop on the fly. Keep in mind, he’s never built a house before and we were looking at all sorts of house building issues. The coop is 4×4. At first, we thought we would insulate the walls so we built framing and attached plywood panels to one side. Then we decided that there was really no need for the extra expense and weight on the coop. We saw somewhere that someone used shower panels on the inside of their coop so they could clean it easily, but we could not find and shower paneling except in a complete wall kit.
We read that you should caulk every place you can, so we did and more! I painted the inside with 2 coats of paint over a primer. As Don built the walls, he decided to make the coop in a modular fashion so that we could move the pieces into the house and paint them. Because we got hit with cold weather pretty fast, there was no way to paint outside. So, we painted in the house.
Don, my husband and master handyman, said that a modular design was a real nightmare for fitting. It would have been simpler to build and assemble outside, but it was too cold to work with paint and caulk. We had to keep telling ourselves that this was a coop and the chickens would not care if there were mistakes.
Another nightmare was the ground. There was an 8 inch or more drop in the ground from top to bottom, and it was also off from side to side. Never build on a hill, ever! We also decided to use the concrete pylons rather than sinking posts into concrete. This is because our neighborhood covenants say no permanent structures without approval. So, we made the coop as non-permanent as possible. This, too, was a real pain because the pylons are triangular and had to be sunk underground anyway to make it possible to put the run in. You can see from this picture that we live on a hill, and we built on the slope at the top.

So, Don got the base in and it was perfectly level. It is very short underneath, which is a bit of a pain because we put our feed underneath. But, it works, and that’s what counts! We hadn’t planned for the concrete pylons to be buried, which is why the coop is a bit shorter underneath. This also meant we had to cut our ramp down because it was too long.
Now we start putting on walls. Of course, Don needs a pneumatic nail gun to get the job done. We found a kit at Lowe’s with several different nailers including a framing nailer and a stapler. On this wall, we cut a hole for ventilation. It also works well that it is a place we can peek in to see our ladies on the roosts. I found a cast iron trivet at World Marketplace, and Don attached it with screws and wire to the inside of the coop.
Here is a side wall shot. We found venting at Lowe’s and put in 2 vents on each side for ventilation. Everything we read said that this is the major cause of problems in the coop. Dry, dry, dry! was the motto of the NC State vet who gave a lecture on backyard chickens at the library here. So we vented!
We decided to make the nesting box and the door all together because we have a small coop. The door swings open for us to get eggs and to clean the coop. I’m not sure of the pros or cons of this setup yet, because we have only had the coop a couple of days. BUT, I like the design and we really did not know how to make a hinged roof without the possibility of leaks. We attached a latch to the door and put a D-ring through it to keep it secure. I heard that raccoons can open latches given the opportunity. So, we went as safe as possible. The door had to be sanded down a bit to make it fit well, so in the spring I’ll have to do some touch up painting. Again, this was a limitation to doing a modular design and piecing the coop after we painted. The paint also threw the tolerances out a bit.
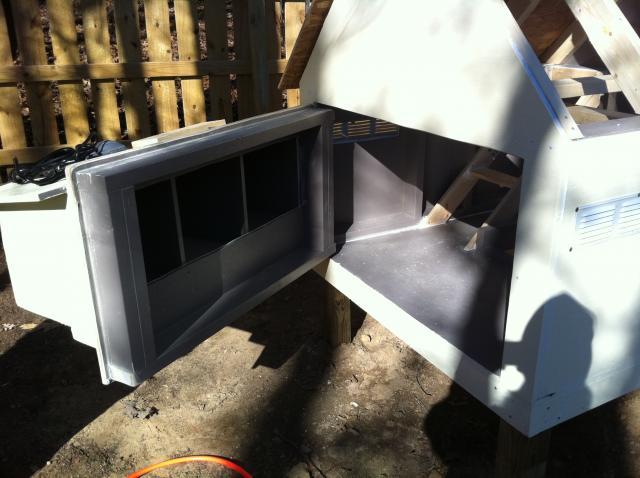
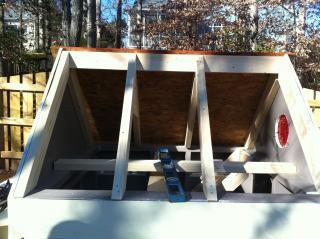
We gave the ladies 3 boxes, which is probably too many considering we are only having a max of 6 hens in the coop. Some chicken folks say several will lay in one box, they pick favorite boxes, and that sometimes the hens will have a laying party and all crowd into one box at once. We’ll see.
Ok, on to the interior. Once we got our 4 exterior walls built, we worked on the interior features. We did not know what we were going to do inside, because we’ve never had chickens, and because we didn’t know what the space would look like. Don built a ladder for the ladies in case they wanted to roost on it, or use it to hop to the roosting bars. I’ve seen them sitting on the ladder, but when we put the first hen inside the coop, she flew to the roosting bar. Since we have heavy breeds, we wanted to give them a chance as well. We put two 2×4 boards in at the roof for the roosting bars. What we read is that chickens like to have a space to sit flat rather than curl their toes around. Big fat bars or boards are best, especially for winter, when the hens can squat on their feet to keep them warm.
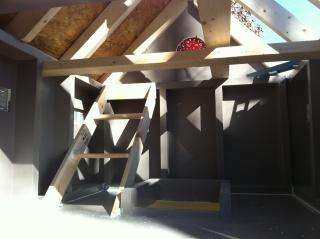
Another downside to the modular design was not being able to paint the interior mods. So, in the spring, I’ll have to go in and clean, then paint. It may put the coop out of commission for a couple of days, which I’m sure will be a pain to the ladies. Notice we built a ledge on 3 sides to contain some of the pine shavings. Why shavings? Reading on backyardchickens.com, we saw that the consensus seems to be they are the easiest and most effective way to keep the coop clean. I plan to sprinkle a little food grade diatomaceous earth in to keep down any bugs and dry out the poop. I will see how long it takes to make the coop nasty and then plan my cleanings around that. We will install a second compost bin somewhere near the coop so I can dump the shavings in it.
Here are the roof trusses. You can see the roosting bars where the level is. We also cut a hole in the far right wall and hung a heat lamp. I don’t think the chicks need it, but they went from a garage to a 25 degree snow storm, so we wanted to be careful. They are also only 9 weeks old. But, I read that at 8 weeks, they were capable of handling the cold. They seem quite fine. I do not see them huddled under the lamp at night. Yes… I do go out and peek in to check on them… and no, I’m not crazy… too much. Roofing was another new housing job we had to learn. Don watched YouTube videos on roofing to learn how. We ended up using 2 packs of shingles, which was expensive. However, he made his own ridge pieces, because the crown piece at Lowe’s was really expensive. We used the shingles we already had to make the ridge. I would recommend looking on craigslist or the free-cycle web-ring in your town to find shingles and tar paper. Someone had all we needed for $13 on craigslist, but the shingles were brown and we wanted black to match our roof because of the neighborhood covenants. That single fact of trying to make it cute for the neighborhood was the cause of the added expense of the coop. Roofing was the scariest part, because a leaky roof will cause rot rather quickly, not to mention that the hens may not be too thrilled to be wet. But, we did it!
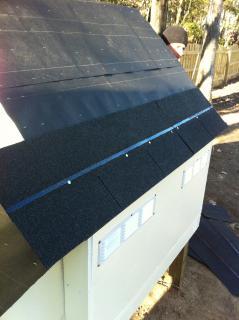
We laid tar paper and shingles. It wasn’t too hard. We didn’t have a roofing nailer. I managed to talk Don out of the $200 gun at Lowe’s. That was a challenge. He kept telling me he could use it to repair our roof, but he’d have to climb up there, and that wasn’t too appealing. BEWARE: building your own coop will cost you SO much money. I know the quality is way better that the ones you get by mail… which I have seen before. But, there always seems to be some tool you need to get the job done, and that is where it gets expensive.
Of course, when we got a short break to warm up, we had to take our Dommie… I mean our Dominique hen… inside with us. She”s a cuddler.
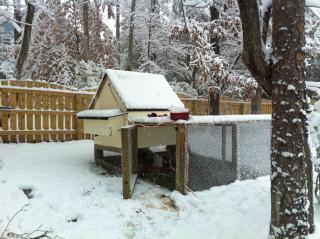
Here is a picture of our coop with the run attached. The run was done on the fly as well. We purchased a big roll of .5 x .5 hardware cloth and attached it to a frame we built as we went. We cut 16 inches of hardware cloth and laid it on the ground under the framing, then tacked it down with landscaping tacks and covered it with soil. We live in a fenced backyard but we do have woods around us and we have seen fox, raccoon and opossum around us. We don’t anticipate a huge problem, but we wanted to build the coop better than needed in case we had a problem. I think the gauge of the hardware cloth is low but we could not find .5x.5 cloth in a high gauge. The higher gauge is 1 x 2, and we read that coons can reach in and eat chickens bit by bit through that size hole. We attached the hardware cloth with .75 inch staples and a pneumatic staple gun. We put in thousands of staples, literally! The backyardchicken forum said to attach the cloth with screws and washers to keep raccoons from pulling out the staples, but I can’t see them pulling these out because they are long and there are so many of them. Our neighbor said that in England, they put down hardware cloth and the foxes burrowed a tunnel under it and got to their 75 chickens. I suppose it depends on how hungry they are and how much time they have. No chicken is an island.
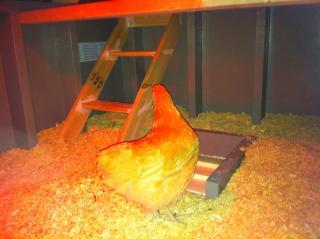
Here is our Buff Orpington in the coop. We put a layer of pine shavings in and turned on the light. They have been in the coop for 3 nights now, with temps down to 19, and they look fine. They know how to use the ramp down to the ground, how to get on the ladder and how to get to the roosting bars. I raised them in the brooder with a perch from a bird cage and so they know how to roost. That was another thing we read on the forum. Sometimes chicks from the brooder do not know how to roost and may huddle on the floor. Ours had no problems.
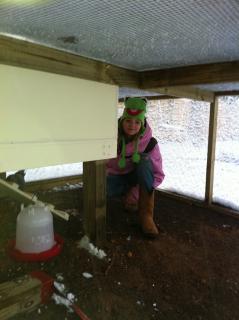
Here is Madison under the coop. She was sprinkling some oats on the ramp to make sure the hens would use the ramp, which they had no problem with, but they enjoyed the treat.
Lessons Learned:
- Do not build when it is too cold to caulk or paint.
- Read lots and lots of forum posts on coops. Look at tons of pictures and draw out your own design that works for you.
- Read books on chickens and write down your ideas. We had so many plans that we got confused. I made a list of "must haves" for our coop and tried to at least stick to that.
- Be flexible. Things may not fit perfectly or be perfect. The fact that I have to go back and paint the interior modifications is just something I have to do. The world did not end because of it.
- If you can build a 6 foot height... DO IT! Squatting will get old. We had no choice, though, so we made sure we put the feeder where it is as easy as it can be.
- Make a peek hole. You think you are not going to go peek in on them? You will. I find myself at the little red "window" talking to them and watching them. I'll ask the hubby to put in another window on the nest box side so I can peek in easier.
- Remember they are chickens and don't think each thing has to be perfect. Caulk is a construction worker's best friend. If you don't have a perfect fit, caulk it and paint over it.
- Read the coop pages here and look at their lessons learned. Plan your coop around it.
- Go to classes and visit other people's coops if you can. Ask questions, especially about what works, what doesn't and what keeps out predators.
- Try to find some pieces from friends, junk piles, craigslist, and free-cycle pages in your town. Coops are expensive and cost more than you think.
We had fun making the coop but it was also a big chunk of time out of our schedule. My husband had to take a week vacation to work on it. It takes several days to do. The coop will cost you a lot of money, and I understand now why the online coop folks charge so much. I also saw ads on craigslist for coops and runs by people who know what they are doing, and we probably should have considered having it built. BUT... nothing can compare with the satisfaction of looking out my back window and seeing our girls in the coop we built. It was hard, we had to do things we had never done before, and we made some mistakes, but we have a coop, and we did it ourselves. There is great satisfaction in that!