
One of the reasons I got chickens was so that my kids could have the opportunity to grow up with animals, the way I did. So it made sense to start from the beginning - with hatching eggs - and to shape the whole experience for my kids' education and enjoyment. I wanted them to be able to participate fully and experience everything.
They had a blast counting the days and watching the babies hatch. We were going to brood in the house for the first few weeks, so we could be close to the chicks and watch and interact with them. So, the brooder was crucial. I really didn't like the default so many people go for - an opaque bin on the floor that you look down into. You only see the chicks' backs, they don't see you well and freak out when you reach in, as you trigger their innate fear of death from the sky. I had to rethink the brooder.
I looked up brooder ideas on BYC and lots of people shared my concerns about the default brooder type. The experienced folks were recommending something that opens on the side so you don't reach down, something the chicks can see out of, and elevated so that everybody can see better - us and them. I took those ideas and designed what turned out to be a very practical and enjoyable brooder, both for us and for the chicks. I am really happy with how it turned out, and we enjoyed having the chicks in it, in our upstairs hallway, for a wonderful 3 weeks! People around here had never seen a brooder like this, and we even got featured on a local farm's newsletter and Facebook page

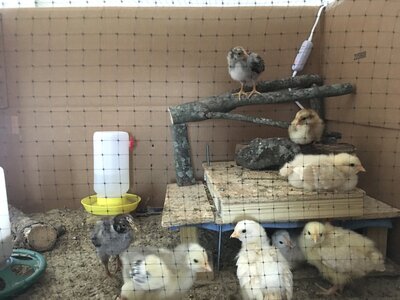
Here is the final result. I call it the Chicken TV Brooder, because of the way it displays the chicks for easy viewing. It's elevated at eye level for the kids, so they can see what's going on, and the chicks can see as well. The access door swings down to open, which is easy for the kids to do - they can just let it drop, no need to hold anything open. It's easy for them to reach in and interact with the chicks, or help clean. The open front, side and top provides lots of light for the chicks. The bird netting is enough to stop the chicks from flying out, and is SO MUCH easier to work with than hard, pokey hardware cloth or chicken wire! For the box, I used an old appliance box I'd saved up. Putting the brooder together was incredibly easy and quick. I built a DIY brooder plate, which was much cheaper than buying one, and so much better than a heat lamp. I used sand in the brooder, scooped with a reptile scoop (smaller holes), and loved it - it never smelled. We would've loved to have the chicks in the house with us longer, but they got big fast, and at 3 weeks, they went out to the coop. Overall it was a wonderful experience, and the brooder design was crucial.

Brooder and incubator, close to each other. The brooder plate was unnecessarily complex... I put a second board
on top to protect the bungee cords from getting pooped on. My next one was simpler. This one still did the job.
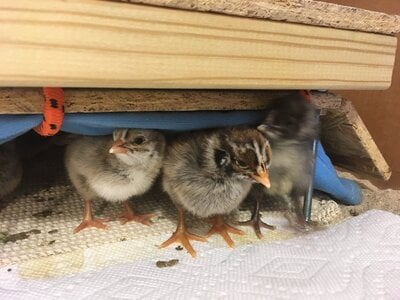
The chicks LOVED being able to see straight out and feel like they're part of the action. They are very curious creatures, and like watching you go about your business. The brooder was right across from our bedrooms and the bathroom, and they'd always flock along the front to watch us get ready in the morning. We would occasionally take them out to explore, and they loved perching on the top edge of the brooder, to look down at their home for a new perspective.

After the first week or two, the chicks got very mobile and curious, and started flying out of the brooder as soon as we opened the door. That's one drawback of this design. I otherwise love the design though, so I added a modification (and I would still do it the same way if I had to do it again). I taped two small Command hooks to either side of the doorway (I don't have a good picture of them, but you can see them in the cover photo at the top), and hung a piece of hardware cloth on them across the front. It was just tall enough that the chicks couldn't jump out, but short enough that I could still reach in for maintenance and to interact with them. And because it was just hung on hooks, it was easy to take off and put back on.
The Build
I used an old appliance box that I'd been saving just in case I ever need it
It was perfect for the job.
The bird netting was SO easy to work with! I just taped it to the cardboard.
I made the door frame out of scrap wood I had lying around, and taped bird netting to it, too.
I used zip ties for the hinges.
I gave it a door knob I had left over from something, for easier opening.
For the "locks", I used scrap pieces of wood that rotate on a nail that holds them together. On the reverse side of the cardboard, I added a thin wooden board, to make the attachment to the cardboard more secure. I then put screws through the board, the cardboard and into the stationary lock piece on the other side.
And there it is!
I'm very happy with this brooder design, and would highly recommend it over the plastic tubs! I think I can credit the open and accessible brooder design, combined with brooding in the house among the clamor of life with young kids, for the totally chill nature of our chickens. They are 5 months old now, and very friendly and relaxed. They are incredibly noise-tolerant - I can run the lawn mower or power tools right next to them and they won't budge. And they let my kids pick them up and carry them around. Total win all around!


")