This project started out as a simple "All we need is a box with a light in it". From there, it has progressed to what it is now. Hopefully it will be useful to others who can't simply allow the bare minimum (and budgets) to be their guide. 

The incubator does start out with a box. It is nothing fancy, no miters, just a box. This one is about 25"x23"x10". Its constructed of solid 1/2" sides. The top is 1/2" plywood birch and the base is 1/4 inch hardwood plywood of some sort that I had leftover from a bookcase I made. I like to cut tops and bottoms slightly larger than my box, and then use a flush cut router bit to trim it to match exactly.
This is the completed box...the initial starting point. The window was cut using a router and a fence. At this point, I haven't decided how Im going to install the window, but its going to be plexiglass that I have leftover.
Much of this incubator was designed 'on the fly' with only a little forethought. I usually like doing details like this because I generally don't have a complete understanding of what I'm wanting until I start building. Major details are of course planned out. Here I decided that I wanted my heat source, controls and wiring separated from the main chamber. This is not necessary, I simply did it because I wanted it to look neat and organized. In the interest of space management, I needed to build a rack to support the incubating eggs so that water containers could be placed underneath in order to provide the appropriate humidity levels. At this point, designing of venting starts to take place as well, though nothing is done to the box yet.
Here, you can see I decided I wanted the incubator to be aesthetically pleasing, so I stained the outside. The inside in purposely left natural so the chicks don't get injured from VOC's if there are any leftover. In the interest of organization, I also decided I wanted some of my controls mounted INSIDE the incubator. This was to prevent tampering. To do this, I used a piece of leftover 1/4" plywood and cut a square to fit between the wall and box. Simple cleats attached to the box allow it to sit comfortably atop, yet allow for easy access to wiring if needed. The 'u-shaped' cutout on the wall was done to accomodate the light bulb and also allow air to circulate behind the electrical cavity. There will eventually be a vent to the outside in that cavity. The heating system has also been mounted.
This is one of three items I was unable to scrounge up. I opted for this over the water heater thermostat and wafer thermostats primarily based on issues others had dealt with. It was pricey, but well worth the cost. It does what it is designed to do....control temperature. I also opted for it because this box is not going to be insulated, and careful control of temperature is going to be important. It has a user definable delta which I set to 1 degree. The part number for this is 111000 I believe.
This is a shot of the control board. This holds the switch and dimmer for the bulb as well as a dimmer for the fans....oh yeah...we need fans, this is a forced air setup. These are shown a little later.
\
I can't put off installing the window forever. I originaly wanted to router out a proper means of securing this with a nice framed interior, but in the interest of time, I opted to simply screw it to the box. It will be caulked later. Yes, those screws are not even, I eyeballed them...sue me.
The vents! So after a lot of anguish over what to do with them, I opted to use the holes I cut out from the wall for my fans. They have a matching set of holes as seen here in the side of the incubator. Its secured to the inside of the incubator and you can rotate it just like you would a grill or smoker vent. I have an image later where you can see how it works. Its simple.
Another shot from inside the incubator. You can see the vent holes in the far end without the adjustment piece. Also, I decided that I wanted to be able to use this as a short term brooder for after the hatch, so I took a piece of gutter gaurd (expanded metal) and cut a 'fence' out of it. I folded over some extra pieces to reinforce it. This will go vertically on the left side of the incubator rack. There are two boards close together that will allow the fence to slip into it and stand upright and keep the chicks from touching the bulb.
Most of the wiring is done and the Ranco is mounted to the outside. This is the only adjustable piece I want on the outside, and it can be locked.
A shot of the inside. I need to be able to plug in the egg turner to a constant power source, so I wired in a receptacle before the Ranco that will keep the turner powered full time.
The Ranco has been set at 99 degrees in 'heating' mode.
Remember the fans? This is where they are mounted. They are controlled by a dimmer, which is far too big for them so its really just an on/off switch. Turns out two fans is NOT too much airflow. This was determined during testing where I disconnected one. The 'holes' from the fans are what the vents will be controlled by.
The whole system up and running in test mode.
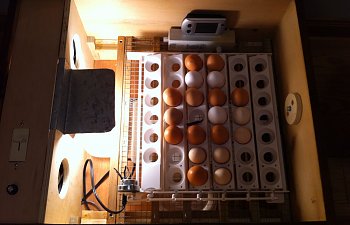
This is what it looks like with the egg turned plugged in. I tested this for 24 hours and various configurations to make sure it works. The turner motor gets HOT...so make sure its plugged in and in use when you test your temps...it HAS to contribute in some manner or another.
Close up and running. Testing. In the photos that follow you can see the thermocouple for the Ranco, as well as two other thermometers. The one on the bottom is a thermo/hygro that I re-purposed from my failing weather station. The cool thing about this is that it wirelessly transmits to a base station, which is plugged into my computer. I can monitor and log ALL data for temperature and humidity. I can also set high/low alarms for both, which is nice. If the power goes out, or there is some malfunction, the unit will start beeping at me and I can check it out. My testing involved using the unit as is. The changes I ended up making are adding more water/wider pans to the bottom, as well as placing a towel over the entire unit. The box lid, once in use, warped slightly, which allowed way too much humidity to escape. I saw this on the log of data. The short term solution was to put a doubled up towel over it which not only insulate, but covers that gap along the two edges where it is warped.
The second change I made was the addition of a 'heat shield'. This incubator requires a 75-100W bulb, which gets pretty hot on that plexiglass. I did not want it to melt, so I built a shield out of flashing. Problem solved. An additional shield was built that goes down and perpendicular to the plexiglass heat shield. Its purpose is to shade the eggs from direct radiant heat. It prevents the eggs closest to the bulb from getting too hot. Even though this is forced air, the eggs closest to the bulb receive the most radiant heat. This shield stops that, and also forces hot air out the sides to be picked up and circulated by the fans. So far, it works very well. It also will work well when in brooder mode. Its not so bright on the chicks.
Closed up and ready to incubate.
I will post the log data from testing when I get a chance to screen capture it. Hopefully this data and my trial/error will be of use to others.
The incubator does start out with a box. It is nothing fancy, no miters, just a box. This one is about 25"x23"x10". Its constructed of solid 1/2" sides. The top is 1/2" plywood birch and the base is 1/4 inch hardwood plywood of some sort that I had leftover from a bookcase I made. I like to cut tops and bottoms slightly larger than my box, and then use a flush cut router bit to trim it to match exactly.
This is the completed box...the initial starting point. The window was cut using a router and a fence. At this point, I haven't decided how Im going to install the window, but its going to be plexiglass that I have leftover.
Much of this incubator was designed 'on the fly' with only a little forethought. I usually like doing details like this because I generally don't have a complete understanding of what I'm wanting until I start building. Major details are of course planned out. Here I decided that I wanted my heat source, controls and wiring separated from the main chamber. This is not necessary, I simply did it because I wanted it to look neat and organized. In the interest of space management, I needed to build a rack to support the incubating eggs so that water containers could be placed underneath in order to provide the appropriate humidity levels. At this point, designing of venting starts to take place as well, though nothing is done to the box yet.
Here, you can see I decided I wanted the incubator to be aesthetically pleasing, so I stained the outside. The inside in purposely left natural so the chicks don't get injured from VOC's if there are any leftover. In the interest of organization, I also decided I wanted some of my controls mounted INSIDE the incubator. This was to prevent tampering. To do this, I used a piece of leftover 1/4" plywood and cut a square to fit between the wall and box. Simple cleats attached to the box allow it to sit comfortably atop, yet allow for easy access to wiring if needed. The 'u-shaped' cutout on the wall was done to accomodate the light bulb and also allow air to circulate behind the electrical cavity. There will eventually be a vent to the outside in that cavity. The heating system has also been mounted.
This is one of three items I was unable to scrounge up. I opted for this over the water heater thermostat and wafer thermostats primarily based on issues others had dealt with. It was pricey, but well worth the cost. It does what it is designed to do....control temperature. I also opted for it because this box is not going to be insulated, and careful control of temperature is going to be important. It has a user definable delta which I set to 1 degree. The part number for this is 111000 I believe.
This is a shot of the control board. This holds the switch and dimmer for the bulb as well as a dimmer for the fans....oh yeah...we need fans, this is a forced air setup. These are shown a little later.
\I can't put off installing the window forever. I originaly wanted to router out a proper means of securing this with a nice framed interior, but in the interest of time, I opted to simply screw it to the box. It will be caulked later. Yes, those screws are not even, I eyeballed them...sue me.
The vents! So after a lot of anguish over what to do with them, I opted to use the holes I cut out from the wall for my fans. They have a matching set of holes as seen here in the side of the incubator. Its secured to the inside of the incubator and you can rotate it just like you would a grill or smoker vent. I have an image later where you can see how it works. Its simple.
Another shot from inside the incubator. You can see the vent holes in the far end without the adjustment piece. Also, I decided that I wanted to be able to use this as a short term brooder for after the hatch, so I took a piece of gutter gaurd (expanded metal) and cut a 'fence' out of it. I folded over some extra pieces to reinforce it. This will go vertically on the left side of the incubator rack. There are two boards close together that will allow the fence to slip into it and stand upright and keep the chicks from touching the bulb.
Most of the wiring is done and the Ranco is mounted to the outside. This is the only adjustable piece I want on the outside, and it can be locked.
A shot of the inside. I need to be able to plug in the egg turner to a constant power source, so I wired in a receptacle before the Ranco that will keep the turner powered full time.
The Ranco has been set at 99 degrees in 'heating' mode.
Remember the fans? This is where they are mounted. They are controlled by a dimmer, which is far too big for them so its really just an on/off switch. Turns out two fans is NOT too much airflow. This was determined during testing where I disconnected one. The 'holes' from the fans are what the vents will be controlled by.
The whole system up and running in test mode.
This is what it looks like with the egg turned plugged in. I tested this for 24 hours and various configurations to make sure it works. The turner motor gets HOT...so make sure its plugged in and in use when you test your temps...it HAS to contribute in some manner or another.
Close up and running. Testing. In the photos that follow you can see the thermocouple for the Ranco, as well as two other thermometers. The one on the bottom is a thermo/hygro that I re-purposed from my failing weather station. The cool thing about this is that it wirelessly transmits to a base station, which is plugged into my computer. I can monitor and log ALL data for temperature and humidity. I can also set high/low alarms for both, which is nice. If the power goes out, or there is some malfunction, the unit will start beeping at me and I can check it out. My testing involved using the unit as is. The changes I ended up making are adding more water/wider pans to the bottom, as well as placing a towel over the entire unit. The box lid, once in use, warped slightly, which allowed way too much humidity to escape. I saw this on the log of data. The short term solution was to put a doubled up towel over it which not only insulate, but covers that gap along the two edges where it is warped.
The second change I made was the addition of a 'heat shield'. This incubator requires a 75-100W bulb, which gets pretty hot on that plexiglass. I did not want it to melt, so I built a shield out of flashing. Problem solved. An additional shield was built that goes down and perpendicular to the plexiglass heat shield. Its purpose is to shade the eggs from direct radiant heat. It prevents the eggs closest to the bulb from getting too hot. Even though this is forced air, the eggs closest to the bulb receive the most radiant heat. This shield stops that, and also forces hot air out the sides to be picked up and circulated by the fans. So far, it works very well. It also will work well when in brooder mode. Its not so bright on the chicks.
Closed up and ready to incubate.
I will post the log data from testing when I get a chance to screen capture it. Hopefully this data and my trial/error will be of use to others.