We began by deciding on the size of the coop to be 12' x 12' and then cementing in concrete pillars to raise the coop off ground level just a bit. First it meant getting the menfolk together to work on it.


Next came wall framing. The walls were made of 2 x 4's with the bottom and top runners being 2 x 4 x 12.


Framing for the girls' picture window is complete...lovely view for them.

Great garage sale find...a metal door, never hung and just waiting to go into the coop. $ 50.00 so I could not pass it up.

Roof is 2 x 4 hung in bolted hangers with cross bracing.

All construction sites need a supervisor...Lilly made sure she was walking all around to ensure it was being built according to specifications and instructions.

Whoa be to anyone who tried to take a potty break...Lilly chased em down to make them keep working.

All framed in and enclosed. Lilly was a slave driver!


A wonderful pop door for the girls was made for the exterior of the Keep.

A door was made for housekeeping to get into the run area.


Then ventilation openings were cut around the roofline. Then the priming and painting commenced inside the Keep. A lovely light blue with darker blue trim.


The flooring was installed and allowed to set for 24 hours so the adhesive was fully set/dried.


The metal roof was installed and insulated. The very center panel is translucent to add light inside. The roof is 8' tall at the front and 6' tall at the back. For a 12' x 12' structure we have more than enough slant grade to keep snow and rain off the roof and funneled to the back of the coop and away from the run area.
The exterior was painted barn red with white trim. The first coast went on slow because it was so cool that morning.

A drawbridge was made for the girls. It can be raised and attached to the side of the Keep for extra security at night if it is needed.
Both wondows were covered with 1/4" hardwire cloth for security.
A temporary wall was made from 2 x 4s and chicken wire and installed. This is to house the little girls until they are big enough to join the flock.
A door was included for Housekeeping to get in.
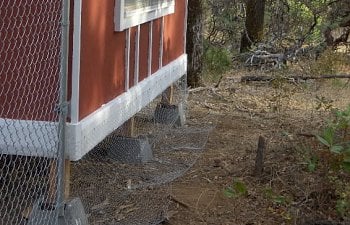
1" chicken wire was ran around the base of the coop on three sides. It was staked down and ran out away from the coop about 28". It will have top soil put on top of it and Spring planting will go all around the coop to help discourage digging predators and give the girls a place outside they can get away from the elements if needed. The chicken wire was cut and split at the corner of the pillars so that one continuous piece goes around the three sides. this will also be done inside and under their run fencing.
A drawbridge was made for the girls. It can be raised and attached to the side of the Keep for extra security at night if it is needed.

Both wondows were covered with 1/4" hardwire cloth for security.


A temporary wall was made from 2 x 4s and chicken wire and installed. This is to house the little girls until they are big enough to join the flock.

A door was included for Housekeeping to get in.


This is looking from the little girls' area into the bigger girls' area which is next to the run.


This is the little girls' area. We also house a little roo in here named Deville.


The sign for the Keep is being made. I just grabbed a jigsaw and a piece of OSB and went to it. So far this is as far as I have gotten.

The girls' are also getting some outdoor activity in their run. DD and I have added a treat stand for them. We have to drill in the loop to hold the chain, which will dangle a head of lettuce or other yummy item for them.
The future plans are to make the girls their winter drapes, get the exterior of the run covered in top soil and ready for planting in Spring, add a window box and do some touch up painting. it will be an ongoing project for awhile yet but it is worth it.
Total cost of the Keep and the Run is $1,000.00 so far. I anticipate another $ 150.00 - $ 200.00 to be spent on materials for permanent roosts, nest boxes and feed bins/feeders.
I will continue to update this page as additions are completed and little touches added.
LadyHawk, William, Cheyenne and the girls and roo of Chapman Creek thank you for looking at their coop page.