Coop Construction
January 29, 2015 by beriel79

Our chicken coop began its life as an old, sad, playhouse that we considered demolishing several times. When we decided to get chickens I began researching coop construction and fell in love with the idea of having an adorable and functional space for my flock. Most of the pre-fab coops you can buy online are very small and didn’t look very sturdy or predator proof. I knew I wanted to have more than 3 chickens and since we have 20 acres of woods behind our house predator proof was a must. And so it began — turning the sad playhouse into a safe place for our hens.
As you can see the playhouse needed help. The back side and part of the floor had rotted and the roof was crumbling. And it was purple. I have nothing against the color purple on shirts or fingernails but not on a structure in my backyard that I have to look at every day. I took these pictures in the middle of winter when my obsession with chickens began and for the next several months I thought and planned and dreamed of spring when my Dad and I would start our big project. This is the sketch I perfected during that time. I took into consideration the functionality, the cost and of course the ability of the structure to survive NH winters for years to come. I did not want to have to build this twice!
sketch of the nesting boxes
coop is 8ftx6ft and run is 12ftx8ft
Finally spring came, the snow melted and we were able to start building. The first couple of days were spent moving a tree that was in the way, building the walls for the run and repairing the rotted side and floor. We built the walls for the run on the ground and then screwed them into place with 6 in deck screws. I positioned the 4×4’s 3 ft apart so I could use 36 in hardware cloth and not have to cut in lengthwise.
moving a tree that was in theway
we built the walls of the run out of pressure treated 4×4’s that I painted ahead of time
we used 6 in deck screws to attach the run wall to the coop
repaired the rotting rear wall and framing in the nesting box area
Next we had to remove the old roof so we could frame the new one. I decided to use a slanted roof for two reasons. First, I wanted the front taller (8ft) so I could use a regular size screen door for the entrance to the run. Second, I decided to use metal roofing and I could order the grey panels I wanted in the exact length needed, which is a lot less cutting and cut fingers! The edges of the metal roofing are sharp!
custom barn door built by my Dad
roof demo
framing the roof
framing the roof
Next came some work on the inside. I decided to use fiberglass insulation to make the walls air tight and the hens could easily generate their own heat in the winter. Also, since the coop is in a shady spot it stays cooler inside the coop in the summer. I used shed windows I found at HomeDepot.
fiberglass insulation
shed windows
nesting box
Next was the tedious and exhausting task of installing the hardware cloth. I used a pneumatic stapler attached to an air compressor and concrete coated staples. This combination worked great!!! MUCH easier than a staple gun or hammering nails. I started by scraping back the top layer of dirt before placing the hardware cloth. Then I folded the coop edge at a 90 degree angle so it stayed in place while I stapled it. I trimmed it when necessary to fit around rocks and stumps. Once it was in place I staked it down with landscaping pins, put the dirt back on top and had our landscapers put river stone all around the base of the coop/run. I have not had anything even attempt to dig under it. Hardware cloth is very stiff and has sharp edges and is overall a nightmare to work with. BUT, in the end I’m very glad we used it and didn’t opt for the less expensive alternative. My husband jokes and says I built the Fort Knox of chicken coops!
hardware cloth skirt
had to be creative around the rocks!
hardware cloth buried under dirt and rocks
concrete coated staples
Next we added the metal roof, the screen door and some finishing touches including the nesting boxes and the pop door. The nesting boxes are 12x12x12in. The door in the back is low enough so my kids can go check for eggs without help. Carabineers keep the doors secure from predators. The nesting boxes are lined with peel and stick tiles for easy cleaning. I cut the pop door opening the correct size so someday I can add an automatic coop door. I left the eaves under the coop roof open for ventilation.
nesting boxes
still n eeds a roof!
inside nesting boxes
pop door open
pop door closed
finished excpet for the roof
left side
right side
We installed paneling over the insulation so the chickens wouldn’t peck at it and it would look neater. I also used vinyl for the flooring. The roost leans inside a large “sandbox” that I scoop out every few days. Instead of sand I use sweet pdz which absorbs moisture and odors. In these pictures the box is directly on the floor but once the chickens got bigger I made 4×4 legs for it so it’s higher and off the floor. The roost is covered with indoor/outdoor carpet that I hose down when it gets dirty. You can see in the pics below, I blocked off the nesting box area so the chickens wouldn’t get used to roosting or sleeping in them. I also got them accustomed to drinking from their bucket waterer right away.
move in day!
checking everything out
they like it!
they look so small on the big roost!
I added some branches, stumps, and an old ladder and they had a great time exploring their new home.
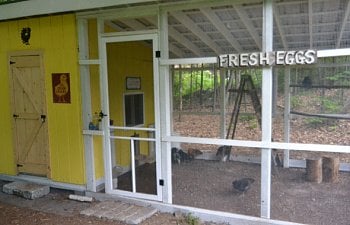
This project was the MOST time consuming project I’ve taken on and I could not have done it without my Dad’s help and guidance In the end I would not have done much differently. I’m considering painting the coop grey to match our house this summer (I loved the yellow at first, but now I’m finding it annoying. lol). I love looking out my kitchen window and seeing the hens roosting on the branches and pecking in the dirt. And the fresh eggs make it all worth it!
Finished!
Fresh Eggs!
January 29, 2015 by beriel79

Our chicken coop began its life as an old, sad, playhouse that we considered demolishing several times. When we decided to get chickens I began researching coop construction and fell in love with the idea of having an adorable and functional space for my flock. Most of the pre-fab coops you can buy online are very small and didn’t look very sturdy or predator proof. I knew I wanted to have more than 3 chickens and since we have 20 acres of woods behind our house predator proof was a must. And so it began — turning the sad playhouse into a safe place for our hens.


As you can see the playhouse needed help. The back side and part of the floor had rotted and the roof was crumbling. And it was purple. I have nothing against the color purple on shirts or fingernails but not on a structure in my backyard that I have to look at every day. I took these pictures in the middle of winter when my obsession with chickens began and for the next several months I thought and planned and dreamed of spring when my Dad and I would start our big project. This is the sketch I perfected during that time. I took into consideration the functionality, the cost and of course the ability of the structure to survive NH winters for years to come. I did not want to have to build this twice!

sketch of the nesting boxes

coop is 8ftx6ft and run is 12ftx8ft
Finally spring came, the snow melted and we were able to start building. The first couple of days were spent moving a tree that was in the way, building the walls for the run and repairing the rotted side and floor. We built the walls for the run on the ground and then screwed them into place with 6 in deck screws. I positioned the 4×4’s 3 ft apart so I could use 36 in hardware cloth and not have to cut in lengthwise.

moving a tree that was in theway

we built the walls of the run out of pressure treated 4×4’s that I painted ahead of time

we used 6 in deck screws to attach the run wall to the coop

repaired the rotting rear wall and framing in the nesting box area
Next we had to remove the old roof so we could frame the new one. I decided to use a slanted roof for two reasons. First, I wanted the front taller (8ft) so I could use a regular size screen door for the entrance to the run. Second, I decided to use metal roofing and I could order the grey panels I wanted in the exact length needed, which is a lot less cutting and cut fingers! The edges of the metal roofing are sharp!

custom barn door built by my Dad

roof demo

framing the roof

framing the roof
Next came some work on the inside. I decided to use fiberglass insulation to make the walls air tight and the hens could easily generate their own heat in the winter. Also, since the coop is in a shady spot it stays cooler inside the coop in the summer. I used shed windows I found at HomeDepot.

fiberglass insulation

shed windows

nesting box
Next was the tedious and exhausting task of installing the hardware cloth. I used a pneumatic stapler attached to an air compressor and concrete coated staples. This combination worked great!!! MUCH easier than a staple gun or hammering nails. I started by scraping back the top layer of dirt before placing the hardware cloth. Then I folded the coop edge at a 90 degree angle so it stayed in place while I stapled it. I trimmed it when necessary to fit around rocks and stumps. Once it was in place I staked it down with landscaping pins, put the dirt back on top and had our landscapers put river stone all around the base of the coop/run. I have not had anything even attempt to dig under it. Hardware cloth is very stiff and has sharp edges and is overall a nightmare to work with. BUT, in the end I’m very glad we used it and didn’t opt for the less expensive alternative. My husband jokes and says I built the Fort Knox of chicken coops!

hardware cloth skirt

had to be creative around the rocks!

hardware cloth buried under dirt and rocks

concrete coated staples
Next we added the metal roof, the screen door and some finishing touches including the nesting boxes and the pop door. The nesting boxes are 12x12x12in. The door in the back is low enough so my kids can go check for eggs without help. Carabineers keep the doors secure from predators. The nesting boxes are lined with peel and stick tiles for easy cleaning. I cut the pop door opening the correct size so someday I can add an automatic coop door. I left the eaves under the coop roof open for ventilation.

nesting boxes

still n eeds a roof!

inside nesting boxes

pop door open

pop door closed

finished excpet for the roof

left side

right side
We installed paneling over the insulation so the chickens wouldn’t peck at it and it would look neater. I also used vinyl for the flooring. The roost leans inside a large “sandbox” that I scoop out every few days. Instead of sand I use sweet pdz which absorbs moisture and odors. In these pictures the box is directly on the floor but once the chickens got bigger I made 4×4 legs for it so it’s higher and off the floor. The roost is covered with indoor/outdoor carpet that I hose down when it gets dirty. You can see in the pics below, I blocked off the nesting box area so the chickens wouldn’t get used to roosting or sleeping in them. I also got them accustomed to drinking from their bucket waterer right away.

move in day!

checking everything out

they like it!

they look so small on the big roost!
I added some branches, stumps, and an old ladder and they had a great time exploring their new home.


This project was the MOST time consuming project I’ve taken on and I could not have done it without my Dad’s help and guidance In the end I would not have done much differently. I’m considering painting the coop grey to match our house this summer (I loved the yellow at first, but now I’m finding it annoying. lol). I love looking out my kitchen window and seeing the hens roosting on the branches and pecking in the dirt. And the fresh eggs make it all worth it!
Finished!

Fresh Eggs!