Nuthatchs' Boid House
Greetings, one and all
Here's my coop's DIY page, where I attempt to translate my mediocre-at-best sewing skills into "I hope I don't maim myself permanently." carpentry skills.
*Please note that the materials guide is approximate for the framing lumber as most of it was from the last coop or my pile of scrap materials.
If you know how to build it better, in tools, methods, or materials, please use your discretion.
This coop is built by a gal who is 5'3", if you are more than 5" taller, please add 6"(or more, if you're close/over 6') to all vertical measurements.
Backstory:
A little over 3 years ago, I started designing my new coop to replace my old one that was falling apart.
I wanted a chicken coop that would fit my needs/wants:
- Big enough for 12 chickens. (the boids)
- Walk in. But that's usually given at the size I needed.
- Good ventilation.
- Extreme sun and weather resistant. We have intense summer sun that can warp plywood and often get heavy storms during monsoon season. We also get winter storms where several feet of snow can drop in a short time; I didn't want to worry about the coop collapsing from the weight.
- Appeal. The last coop was a lean-to/shed style coop, it worked but it was ugly. (ugly!)
- Predator security. Here we have the typical raccoons, coyotes, skunks, fox (gray, rare), and bobcats. As well as javelina, who are strong and can be very destructive when trying to get the feed. And Elk, who also want the chicken feed and can eat a full #50 sack in a matter of minutes.
- Be under $400 from start to finish and use as much scrap I have laying around. (both to clean the yard and make it as cheap as possible)
I didn't want a coop that looked like a coop, I wanted something that would blend into the area and forest. All my neighbors like the chickens and I wanted something nice for them to look at.
I spent many hours scrolling through coop pages here, the classic Monitor or half-monitor design made up the bulk of articles. Nice, but they seemed too complicated for my skill level. Plus, they look like chicken coops.
Not counting the monitor-type coops, most of the rest of the coops were sadly out of my budget and/or skill level.
In full disclosure, the only power tools I own are a drill and a skill saw, so miter cuts or anything except the most basic of carpentry techniques would be out of my reach.
A few coops stood out for me, all were wonderfully creative, none were what I would call 'chickeny', and some even looked doable!
I love these two but neither is practical to build for me.
The Henhaus
In the Norway Pines Coop
I love this one though it also wouldn't work for me due to its need for real tools and skill.
Southern Farmhouse Coop
These two, I love the look of and felt I could handle the A-Frame design. It also looked cheap to build.
My Chick Chalet in the Carolina Hills
A-Frame Duck House + Day Shelter
I didn't want a full A-Frame as I needed some vertical space for the roosts, room for me to matinence the litter, and a flat wall surface for the nestboxes to mount, hence the walls. I thought the ladies would appreciate that.
After some comparing, I figured that corrugated metal roofing was probably the easiest for the unskilled to work with, it was also cheaper, both upfront and in the long run.
I did have this sketched out but I left my graph pad in the coop while building for notes and the chickens had their way with it. My original design was very similar, except the front window was a rectangle and there was an awning over the porch.
What you will need:
Materials:
7 sheets of Standard 8'x 4' plywood of your choice ( I don't recommend MDF in areas that will likely be subject to moisture, such as floors or walls.)
14 2"x 4"s
1 box of 1/2 inch self-tapping metal-to-wood lath screws. I originally bought 1 1/2 inch screws, they were unnecessarily long and I need to trim a few.
2 boxes of 3" 8# star drive deck screws. I prefer the coated kind. (if you've never used star drive, you'll be delighted at how much easier they make things than standard Phillips)
1 box of 1-1/2 inch 8# star drive construction screws
1 sheet of stucco lath, typically 3'x 8', hardware-cloth can also be used. I find stucco lath easier to work.
8-10 2"x3"s
16 hurricane ties (I'm sure there are better choices for what I was using them for, but they're what I had.)
10 8' x2 7" corrugated steel sheets
1 10' corrugated steel ridge cap
4 2" rigid angle ties
1 hollow core 24" door (likely for closets, from the restore.)
1 tube DAP door and trim sealant
1 gallon can of outdoor paint, the color of your choice. I used Behr Pro Exterior, it was $28 a can.
2 3" or 4" barrel slide locks
2 gate pull handles
3 heavy duty hinges
1 double hinge hasp lock
1 medium duty carabiner
2 cabinet hinges
2 1"x3" furring strips
2 1x2 furring strips
Windows of choice
4. aluminum pallets, optional- I don't have the skill or type of land to make a lumber and deck block foundation. If you know how to, you should.
Tools:
Caulk gun
Large saw for framing lumber ( I only own a jig saw and I borrowed a Sawzall.)
table saw if you have it, for cutting the plywood
Skill or jig saw for cutting holes and trimming. A Sawzall will work for those if you have the strength and control of a marble sculptor.
Drill
T-Square
chalk line (optional but handy for cutting the plywood relatively plumb)
ear protection (unless you like hearing loss)
eye protection (unless you want to justify an eyepatch to your family)
work gloves (unless you enjoy digging splinters out from under your fingernails)
measuring tape
pencils or sharpies
Good drill bits. The type with a solid octagonal area for the drill to grip securely is preferable to the cheaper ones. Safe yourself some swearing. They aren't much more money.
Blades for your saws: fast lumber blade, plywood blade, and metal blade.
How to:
Arrange your pallets in a square on level ground (ha, I live on the side of a mountain!) or build a proper foundation for your floor. If it leans a bit, you can call it self-draining.
Attach 2 sheets of plywood to the foundation with the proper screws. Mark off the overhanging plywood and trim it off. Throw it into the scrap wood pile for later. Maybe you'll make skis one day.

Since I was building my coop by myself, I opted for the barn-raising method, assembling a section at a time and raising it as I went along.
Measure the length of your floor. This measurement will be the length (front to back) of your top and bottom framing 2"x4"s on your walls.
I wanted my walls to be 3' high. For a future note, a 2"x 4" is about 1" 3/4" thick, so I cut 4. sections, 32"1/2 long, out of my 2"x 4"s.
Attach them (with the 3" screws, use appropriate sized pilot holes) between the long lengths, two in the ends and the other two spaced equally apart in the middle. It helps if you're on a level surface and can brace up against something to drill. Raise your framing and secure it into your floor with the 3" screws. Into a floor stud or pallet is recommended.
Repeat for the opposite wall.

In the next part, we have the walls with the pop door and with the people door, it is a little trickier.
Measure between the existing walls (side to side) and cut two 2"x4"s to this length. This is your pop-door side.
Cut the proper height studs and attach the two ends between the lengths, just as you did before. For the two middle studs, decide how wide and tall the pop door will be, my pop door is 10"x 12". I figured that a door that small, in the off chance a dog or a coyote gets in the run during the day, they might not be able to get in the coop.
l attached the two middle studs to be 10" apart and a small framing stud at 12" high. (see above picture) Hindsight note: I should have raised my pop door about 4"-5" off the top of the bottom length to better accommodate coop litter. I'll likely raise it later. Kicking straw out of the way to open and close the door gets tedious.
Raise and moor to the floor and the side walls.

For the people door:
Measure the width of your door, add 1" 1/2" to that measure. That is the distance between the studs that will frame the door. My door is 24" wide so that is 25" 1/2".
The height of my door is 60" as I'm only 5'3, if you are much taller, please add more height as needed. Cut your door framing studs to this height and also cut a small stud for the top of the frame, cut to the calculated width.
Attach the top of the door frame to the side studs to make an open-ended rectangle. You could close off the bottom open end with another stud and use that stud as a threshold.
Measure between the two side walls, it should be the same measurement as before with the pop-door wall.
Subtract from this: the measurement of the doorway, including the 3" 1/2" of both studs. Divide this measurement in half for either side of the door.
Cut the 4 top and bottom studs at this measurement. Explanatory note: My door is 24", plus the 1"1/2" buffer, plus the 3"1/2" stud width, that's 29", I subtracted that from the width between the walls to get the width and divided that for either side.
Cut 2 verticle studs for the ends, as the middle studs are the door frame, and attach everything with the 3" screws. Raise and moor to the floor and the side walls
Now, I used the top of the door frame the support the two roof rafters. To do this, I needed to frame up the other side using the width measurements for the door frame and height calculated to be level with the door. I added some bracing pieces, probably from a stair stringer, that I found in my scrap pile. It doesn't hurt to make sure it's solid.
The part with the most calculations is over. Those who know how to properly calculate measurements are still trying to figure out what was just written and how I'm still alive. But the rest of us can move with the rest of the tour.

Hindsight Note: I put up the side wall plywood after I put up the rafters. That was dumb and caused me no little frustration and took more time. Don't be me, measure, cut, and put the side walls next with the 1" 1/2 screws.

I gave the floor a coat of outdoor paint to help it hold up against chicken ploppin's and spilled water. Here, I used the hurricane ties and 1 1/2 " screws to attach the rafters to the top 2x4s of the walls and to the 2x4s that run from back to front. Measure and mark the opposite sides to make sure the rafters on both sides line up evenly and meet end to end. Use the rigid angle ties to attach the ends.


Now you can take one of your sheets of plywood and start walling in the people door side of the coop.
*I'd like to blame allergies, I'm allergic to oaks, and this year, we had the heaviest oak 'pollening' that I can remember. There was a thick velour of pollen on everything.

This part is optional if you use more rafters (I really should have) and don't have the intense sun as I do. I didn't want to waste the plywood sheets from the last coop, however, they weren't in good condition to be used as walls or floors. I ended up using them to layer on the rafters to insulate the chickens from the metal roof, and add some extra support for the roofing. Should you choose to do this, (my mom suggested this, Thanks Mom!) screw scrap blocks to the rafters on each end where the bottom of the sheet will go, that way you can slide the plywood up the roof and they can rest on the blocks while you screw it in place.


I made a cathedral-shaped silhouette out of paper and traced it onto the wall and cut it out with a skill saw. I really wanted an octagon window, like from a glass top lamp table from the 90's. I looked everywhere for one. It seems like every thrift store has three of those tables until I need one. HFH The Restore had a real octagon window but it was too big for the area. The windows are thick glass shelves that are stacked up the opening and secured with overzealous caulking and 2"x3"s .


Using some scrap plywood, I cut shutters and the curved trim above the window.
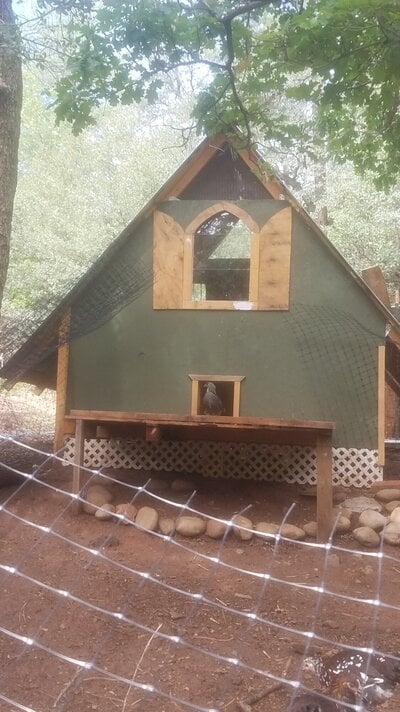
The peak vents are 24" on all sides and covered with stucco lath that has been secured by the lath screws and sandwiched between the rafters and furring strips with the 3" screws.
 The wee peeps approve of the new changes.
Adding 1" leftover trellis to the fronts underneath keeps small predators out and small chickens in. It also looks nicer than the pallet ends and spiderwebs. I really should have raised the pop-door up, I'll have to do that eventually.


I added a porch instead an immediate ramp, the girls love to bask in the sun and preen on it. A ramp up will be added eventually. I should have weather proofed the porch but I wasn't sure how long it would take for the fumes to stop leaching. Just wait until I find toddler-sized Adirondack chairs.

Back side of the coop, windows on either side of the door are being installed, both to let in light and so I can see to make sure the neighbors aren't out before I scurry back into the house in my pjs, carrying eggs in my shirt.

I attached 1"x 2"s to the inside of the door jam to break drafts from blowing straight in through the cracks around the door.


The hardware cloth was sectioning off a corner for the babies to hang out in. They have long since integrated in to the big girls. Nest boxes have since been added and everything is going smoothly. I still haven't raised the pop door since the straw hadn't turned into to big an issue yet.
Thanks for reading.