This has been a long time coming. We've had our birds for just over a year and half, but there were some last touches on the coop (A ROOF!) that needed doing before we wrote it all up. Now the top is on, and the flock is growing and this is how we did it...

Firstly, we are a family of full time working artists. We have a small homestead in mountains of western Maryland. We make our living selling out craft of sculpted leather masks at Renaissance Festivals and other events. We aren't full time in our homestead, meaning we approach it as a hobby, for the fun. We have organic gardens, large composting areas, a small orchard, and had always wanted chickens. We felt they were the last piece missing from our integrated system. We were right.
The first step was figuring out location on our quarter acre, rural backyard. We had made a decision to let a friend with poultry raise our first flock of chicks, since our show schedule and lack of infrastructure would make it tricky. So with new babies safely at a foster home, we stacked out and drew and designed and moved flags, and leveled several areas. Ultimately, we decided it best to keep them close to the house, and took up a single block of our garden. It is laid out in 16x16 foot squares, and we gave one up to the birds.
So, with space allocated, in April of 2013, we started banging together pallets. You can see coop and run space, with the tall locust poles to anchor it. We moved that square of pallets around several times, wiring it together to see how it fit into the yard. Great way to visualize.
We decided to primarily use pallets, because....pallets. Free, usable and straight forward. Well...mostly. I would say to anyone considering pallets, that if you don't already have building skills, it is perhaps more difficult than it seems. They vary in size, weight and board hardness. We broke many drill bits, few walls or angles are straight, and there was plenty of cursing and banging. However, it's a great learning experience and our pre-existing building skills were honed.
An important and "Aha!" moment in design visualization for me. The moment when I realized I was building and Aviary. Yep. Duh. Really. Seems silly, but it really hit me all at once. We are avid naturalist and birders, and when it occurred to me to look not just at coops for inspiration, but other forms of bird housing, the whole design really unfolded for me. So, consider that if you are reading along planning your own bird box.
Helpers matter, and experience is a lifetime thing. As home schoolers, everything is education. As self-employed artists, everyday is take you kid to work day, and career day at school. Here is my assistant, using her tools.
We purchased on a select few things, that we couldn't source from recycled items. We raided dump piles and friends donated. Our neighbor has a large dump of demo debris and many items came from there, as well as design choices dictated by finds. We bought the rafters for the roofs, so we would have long pressure treated ones with stable grain.
Right away I discovered a design issue. Always build your door and coop tall enough to stand up in. Really. We have hit our heads many, many times.
Roof on, front framed in, tarpaper going on to protect plywood. The full sheets came out of that dump pile we mentioned. We kept digging until we had enough to cover the whole Garden Block. At 16x16 foot, that will be a total of 256 square foot of cover for the birds! It's a great space and were very lucky, but it is also a big chunk of hard surface to deal with run off. Here is the Mrs. and I together for scale.
Yep, a dirt floor, on rock footers. Packed clay. One thing our property has a lot of is clay and rocks. Our town of Mount Savage is famous for it's fire brick and the pits are on the mountain behind our home. We are fast learners and did a lot of research before and as were were building. We designed for our resources. One of those is litter materials. There are 13 pine trees bordering our property and we have pine straw in abundance as well as leaves. So early on we decided on dirt floors with deep litter. It has worked great!
Once the walls were up and we had jammed the stones under them, packing with clay, we dug trenches around all four sides and stapled on the grid wire, laying it out into the trench. The southern range of the long tailed weasel is the Potomac River. We live north of that. When asked what chicken predators we have, we say, "All of them." Weasels, Racoons, Skunks, Hawks, Snakes, Bobcats, Bears, Hillbillies. We built for those. We regularly discuss chicken losses with friends due to predators. Most times, it is due to faulty designs. We use to keep ferrets and know how to weasel proof. We are naturalist and tend to think like the animals we study. We would never fault a predator for wanting chicken dinner. We live in their space. So we build for them. We haven't lost a bird yet. Not saying we won't and not being cocky, but pre-planned is prepared.
Trench across the front. Over this we laid more rock. About that 1/2 grid wire. It was rather hard to source a significant roll of it. We wanted to trench coop and run, and would use it on the run all the way up. Everywhere we called folks either couldn't get it, had trouble ordering it, or openly scoffed at us. Several said, "Why don't you just use chicken wire?". Well, as many folks on here know, chicken wire is designed to keep chickens in, not predators out. A coon can tear through it, or pull the heads off. So, the whole thing is trenched and wired in. It was buy far, the most expensive piece of the coop. About $150 at a local Southern States in Amish country. I told the fellow that helped load it about the scoffers. He laughed and said, "That's cause you're doing it right!"
Outside cladding going in. Another mistake. We cheaped out on the cladding. I used 1/4 inch ply. I did prime it first on both sides with Kilns anti-fungus primer, but still, not 1/4 pressure treated. Don't scrimp. We haven't had any problems...yet. We have long overhangs and keep it painted, but it wasn't the wisest of moves. Only time will tell.
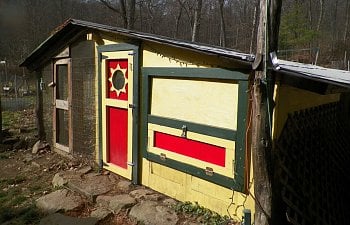
You can also see the "soffits" under the front eaves. Those are matched on the back. The coop faces South by South West, the same as the house. We wired all the soffits with the grid, and attached it with staple nails, and a bunch of reused roofing nails with wide tabs. The back of the coop, facing N by NW, gets the wind. The corner behind the Mrs. is due North. So in average days, the soffits are open, and the ventilation is awesome. The row of windows on the left of the image is open most of the year, and there is a back window. I planned a porthole in the door, and you will note the rectangle under the big opening. The big one is the future egg box, and the lower ones are closable vents. Another design point, hard to explain. Note the blue foam insulation on the back wall. Those are bits of recycle foam. We worked it into the walls and nailed it to the exterior wall. This leaves a gap of a few inches on the interior walls. Once the interior cladding went up, there was a small gap around the top rim of the pallet walls and around the bottom. There is a noticeable air flow out the top, as hot air rises from the the deep litter. More circulation. We filled the inside of the pallets first six inches with gravel and stones. Blocking any snake or varmints that manages to get past the outside trenches and wire, but still allowing air passage.
Back view of the North Corner. Trenches in place, northern window, tar paper on. We had plans for this corner which will be later in the post. The corner gap, (crooked walls) was covered with trim boards.
Door on, plywood covering the egg box until I figure it out, and a temporary run on the side, Gotta get the girls in now.
First night in the coop. Simple roost, and the walls aren't painted yet, but they are ready to go. We started with four hens and a rooster.
Front step. Like I said, lots of rocks on our property. We have sense begun extending it.
Door details. A bit of maple branch for a inside handle.
All the interiors are painted in white Kilz primer for mildew control and light. Here is the port I cut in the door, with a screen frame for the drop.
Sun detail around the porthole. Funny that. A lot of folks really comment on it, but it's an easy thing to do. As "Rennies" (Those who make their living working renfests) cutting clever stuff out of plywood is a daily job.
I am proud of the door. Ever seam is caulked and sealed. No rot.
Here is the trap for the porthole. I used a scrape of old plex and ply. Used sisal rope for a door seal on it. We used sisal on the egg door as well, just running it around the stops and stapling it down. I figured that we needed a draft rid, but foam would be a pecking hazard if the hens get to it. So, sisal they could digest. Works great.
Porthole closed. Nice and tight and we can still see in.
Litter board. Slots into a channel to keep the deep drift back. Works as an emergency rooster shield as well.
Coops need decor as well. So here is one of the girls.
Painted this one up during a lull in the build.
Interior finished up with new roost. A friend who is a folklorist saw it and said, "It's the proverb of the chicken ladder!" I had to find out what it meant. Seems there is a German saying. "Life is like a chicken ladder. Short and crappy". Hehehehehhehe...
Pop door. Researching on here I discovered the idea of a cutting board door that wouldn't swell or twist. Also found the design for the self latching system with the swing arm.
Better detail of the arm and swing action. Pull on the string, the arm swings and unlatches. Close it and the counter weights swing it back over. Very clever and simple. A cutting board door means no grip on the outside so a Coon can't lift the door and the latch works as well. Later, we were given an auto door control. So, timer with auto door and the whole system lets the girls out in the morning. However, we ultimately realized we didn't need an auto door. The run we built is just as predator proof. So now, the door just stays open unless we want to shut the girls on one side while working. Still, it was fun making it.
So, starting to work on the run and figuring layout for posts, etc. Since this was going to be an open run, fully attached, I used locust tree posts, something else we had lots of. Here some of my future residents cause me some grief, being in the way an all.
We decided to run the rafters, (Once again, purchased, so they would be stable and pressure treated) on the flat. Since we ran on close spacing, and had the heavy supports, etc, I felt it worked out well.
Here is a corner rafter, this one of 1x4So, it could sit up on the rim joist.
Detail of the notching in of the corner post.
Detail of how the roof rafter engages with the coop roof. That is the wired soffit showing. We used an altered rafter tie to attach them.
Once the roof of recycled ply was up and tar papered, we tried an experiment that ultimately failed. Bark shingles. We have so many large locust trees on the proper, that shed huge sheets of bark, I had to try it. While very visually pleasing, the roof would need to be a steeper pitch, and they would have to be cut at a clean edge, and even then would hold water and rot. Still, worth the try. A chicken coop is a chance to explore such things. Still might do it on a shed.
Door building. The wire doors for the runs were built with recycled 2x4 and I used ship lapped joints for strength. Since I didn't want to get out my table saw, I made my connections using a skilsaw. Easy, and straight forward, but super intense. It's a great technique but not for the faint of heart. Use eye protection, always when using power tools.
Start by laying out your overlaps. Set you blade to cut halfway through.
Slice away, making a serious of relieving cuts, or "Kerfs" then suing your blade to nibble away. Please note, this isn't a technique for those with no tool experience. You have to be VERY careful, as always, with the saw.
How the overlap works.
I used gorilla glue and screws and clamped it all together.
Here is a finished door. With wire. The center 2x6 support isn't lapped, but I drilled pocket screws for it. You'll know the three points of locking. Hooks top and bottom, with the spring latches. The center one a swivel hasp. The wooden quick close is only used during the day. Inside the frame there is a jam of 2x2 and another litter board. This seals the door completely, so that there isn't a snake's gap. The 3 locks are the same on all the entrances. This means that a coon would have to be very, very smart indeed. If they figure that out, they are welcome to the eggs and I for one, welcome our new raccoon overlords.
It was about this time that I discovered the book on my shelf that perhaps I should have been using all along. It is called, "Birdhouses You Can Build In A Day"! I began thinking that perhaps I should have stuck with wrens and finches, but I pressed on.
We began the wiring in of the run. We used the 1/2 grid wire, and since we had old dog fencing on the property, over the half inch, we hung a roll of 2x3 grid. The firs line of defense for snakes, coons, weasels, the second...well...bears. We had it, and it looks great, so we went with it. The Mrs. looks great laying out the wire for the run as well.
Like the coop, we ran a trench and buried the wire out as a digging stop. You can also see the front beam that was required to set the door, serving as a threshold. It was salvaged out of a 18th century barn ruin. Covered in old axe marks, and notched for beams, it was a real pleasure to reuse. A continuing story of agriculture.
The corners required some extra patching. These are the areas the predators would most likely dig at. You can also see the second grid.
The odd little back corner we have future plans for.
Sometimes it's the little steps. One day when going through the door, I felt a scratch from the edge of the larger wire. So I took my dremel to the ends.
That was the basics of the primary coop. We built a planter bed underneath the long edge which is a main path in our gardens. So in this we grow marigolds and green beans. These go to the birds, and they are fun treats for the kids to pick and feed through the wire. It catches the run off. A future task is to add a gutter system and rain barrel for their drinking water.
Of course, a coop needs a lovely paint job, and for us, there was never a question of palette. I love the door.
There was the matter of that gap where an egg box should be. So, my next job was creating the point of the whole system. After all, chicken coops are mostly and egg delivery system. So, since we had planned for expansion, knowing the effects of "Chicken Math" I designed a two tier open nest box, with closable vents underneath. You can also note that I designed the egg box to be "Inside" the coop, not protruding. We had the room and floor space inside, and putting in, meant less roofing, chances for air leaks, water issues, etc. I ultimately removed the center partitioned to the bottom box. They don't seem to mind. You can also see the tall pole on the right, which supports power for the coop. We DON'T HEAT, but, we do use a water heater to prevent icing up, etc. Also lighting. More on the power system later.
Created a drop door with jam of scrap wood. Used the sisal rope "caulking" I mentioned earlier.
The chains are designed to be unhooked. So when collecting eggs, you can let it rest, and when cleaning, drop it all the way down.
A note on our interior set up. Feeders and water on hanging chains. We have since moved them around a bit and stopped using the bricks under them. The bench was a nice idea at first, a place to sit and have some chicken time for our kids, but ultimately, as all things chicken, covered in poop. So out it went. The roosts in the back aren't fixed. We use a variety of forked branches and wedge them together. We change that up periodically, to make it interesting, etc. Also, the litter/bedding on the dirt floor. We save money anytime we can. So we use leaves, pine straw, and occasionally, purchased straw bales. We also grow lots of aromatics, such as peppermint and oregano, and cut them to add. We think that intense oil plants like that, as well as the pine straw, eliminate most issues with mites, etc. We haven't had any problems yet, so perhaps it works.
With our first winter, we had planned all along to wrap the run in plastic. We are at elevation, about 1900 ft. on the edge of the Allegany Plateau. Our winters can get really severe, and deep cold. I wanted to keep the ventilation going, but eliminate the wet draft and snow in the run. So, we wrapped it like a green house. Worked great. The original plan was slant that Southern side, and grow peas in it. However, low germination and difficult watering, means it didn't work out. Still the plastic was awesome. On days when the outside temps were in the teens or even negatives, the inside was above freezing.
There is that back corner again. Plastic up and lathe and scrap to keep it on. Still no proper roof, so a big tarp to keep everyone dry underneath. You can see a single pallet set up as a wind block. This is towards the end of the winter. During the bulk of it, we used the space to store bales of straw on pallets against that North wall. It added insulation, since they roost on the other side, and we used it as we went, since leaves and pine straw run out half way through the cold months. The pallet also gives a hint to future plans.
Spring was sprung, and the girls were back out on the garden beds.
Off comes the plastic.
The addition goes on. It's whole separate coop/run area, attached, and connected with a chicken door. We call it the nursery. Since it was spring, the new hens were here, taking us from 4 and rooster, to 10. The addition will allow us easy integration between two flocks, a place to let a hen go broody and raise babies, put a bird with an injury, etc. When it's not being used for all that, the door will stay open and our hens will have more floor space.
We better hurry, the Easter bunny was out and about and spreading her charms around. Encouraging the girls to lay for the season.
Using locust posts and pallets, and tying it all together. Using scrap like this takes a lot of..err...tinkering.
Tar paper and scrap ply for the back cladding.
Another old beam for a sil. Also, pallets and scrap framing for the interior. Long term there will be a tiny coop in here, with a window to look in, and vents, and an egg box, just in case.
Wired up, trenched, rocked, and ready. Got to build another door as well.
Just in time. Here come the occupants. We were VERY happy to get them out of the workshop. Few things as filthy as teen chicken.
Happy in their coop side. Between the two runs there is only grid wire. The two flocks can see each other, and even interact, but no contact. When ultimate mingling happened, it went pretty smoothly, with few fights, and only a little blood.
Just after integration, we made a tough call. We butchered our first bird. Little John the Rooster was becoming WAY aggressive and even blooding himself on the wire as we passed by. A good looking boy, but all attitude. Roosters are supposed to be that way, but the cons finally outweighed the pros and off he went. It was a nice learning curve for us.
In a great surprise, just after slaughtering the rooster, one of our girls went broody. At first, we thought she was on non-fertile eggs, but we learned that even though it had been a week or so, they can hold the fertility, so...we let her sit on them in the new nursery.
Of the six eggs she was on, only one survived. Very cute.
Here she is with her one chick, on the nursery side.
The irony that the one chick, turned out to be a rooster, a Golden Laced Wyandotte/White Leghorn cross, isn't lost on us. For no, "Little D" as he is called, is in the flock. We shall see what his future fate is.
Coops need accessories, so here is the calcium feeder I built.
We the girls ranging some, we wanted to properly fence the gardens, and since the gate to the main vegetable gardens interacted with the coop, we built a Japanese style Torii gate of locust and barn lumber, and tied the fencing to it.
Since we want to ultimately sell eggs publicly, we wanted to be legit, so we registered our flock with the state of Maryland and got our egg license. The girls weren't too impressed with it, but I still hung a copy of it up in the coop. Silly, I know, but I felt it the right thing to do. It makes them feel responsible.
Here is another calcium dispenser, this one made from an a bottle and a tin can. From canned chicken. Yep. Also, you can see the door between the nursery and run side. It stays open unless we need it closed. We have a rope and guide system so it can be operated from outside.
Here is the electrical connections. I sunk and eye bolt into the tall support pole, about nine foot up. Stretched two strands of clothes line wire between it and another eyebolt on the house, about 15 feet away. Then, ran the heavy duty extension cord along it, wrapping it with more wire, much like real power lines are run, binding it tight. I don't like using an extension cord, but have run and outside connection yet. One day. Until then, this runs into a window and supplies the lights and heat for the water during the winter. The systems keeps it up off the ground and support from wear and tear.
With the new additions, we needed to expand our roosts areas. So, first a big spring mucking out, onto tarps. Our compost loves it.
Then a big scrub down, some more painting, and new roosts of maple logs. I tacked them in on the blocks. Figure if they every get to nasty, I will just pull them out and burn.
During the cold months, the north side soffits, over the roosts, get stuffed with empty feed bags, some with reused bubble wrap inside. Keeps the ladies draft free. We leave the middle open and the south facing ones all the way. The whole coop, you can feel a venting, but not across where they sleep.
Inside of the egg box. The upper is closed off with poultry wire until needed. The coop and run can hold about sixteen birds. We will slowly reach that and stabilize. Might not ever need the upper egg box. If so, I rebuild with a sloped roof on it. Easy to do.
The reason for all this work. Happy hens. Fresh leaves on the floor and lots of bugs. They range, but do spend a lot of time in the run.
So, with cold weather approaching again, and the new girls all integrated, and the new roo figuring out his place, what was it we were missing?....hmmm....OH! Right! A roof! The most expensive, and most important part of most builds. So, we didn't want to do another winter with tarps and tarpaper, and had managed to source some recycled materials, it was time to really finish this build. So, with first snow falling, I got to work.
Here is the mess of tarps, tarpaper, and failed bark shingles, with the remains of the year's green beans on the wire.
A patch work of tarps and boards to hold everything down. Very tired of looking at it.
I kept feeling like a rooster up there, so on the during the prep, on the last day in the 60s, I gave a good crow for the camera. I hope to get a Weathercock Vane one day, Until then, I guess I will have to do.
All torn off and a new layer of tar paper. Roofing options were limited. Any expense on a chicken coop means more expensive eggs. So, while we could have purchased roofing anytime, the principle of using as much recycled as possible was there. However, roofing is tricky. It is the most important part of the structure. We also didn't want to use asphalt on the South facing run side, so that we could harvest the rain water. So that was always going to be corrugated, and we just had to find it all. The North side, we very much wanted to do a green roof of some sort. We looked at the options and expense, and ultimately put rolled asphalt on it. We figure if we ever get a membrane, we can lay a green roof on it, with some structural additions to hold the weight. So, a another approximate $80 in tar paper, and rolled roofing, and the ladies have a roof for the winter.
First snows of the year. Temps falling. Better get busy.
Playing puzzle with the three different types of corrugated roofing from dump. Took a while and some extra screws. Later it will get every screw head caulked and sealed and a coat of paint. What color?
All roofed up. Soon the plastic goes back on, and we go back into winter mode.
So, that's it. I hope my experience and learning can help other new chicken keepers. We love our little coop and have had great success. Happy chicken keeping from all those here at Flora Vale Farmstead.
The Humans: Leah, Shane & Ellawyn. The Cats: Rosie & Luna. The Chickens: Two Leghorns: Speedy & Sandy, Two Buff Orphingtons: Rosebud & Butternut. Four Black Stars: Betty, Judy, Brownie, & Robin. Two Golden Laced Wyandottes: Sweetie & Ditzy. and one Golden Laced/Leghorn Cross rooster, Dixie.
"
Keep 'em flyin.
Firstly, we are a family of full time working artists. We have a small homestead in mountains of western Maryland. We make our living selling out craft of sculpted leather masks at Renaissance Festivals and other events. We aren't full time in our homestead, meaning we approach it as a hobby, for the fun. We have organic gardens, large composting areas, a small orchard, and had always wanted chickens. We felt they were the last piece missing from our integrated system. We were right.
The first step was figuring out location on our quarter acre, rural backyard. We had made a decision to let a friend with poultry raise our first flock of chicks, since our show schedule and lack of infrastructure would make it tricky. So with new babies safely at a foster home, we stacked out and drew and designed and moved flags, and leveled several areas. Ultimately, we decided it best to keep them close to the house, and took up a single block of our garden. It is laid out in 16x16 foot squares, and we gave one up to the birds.
So, with space allocated, in April of 2013, we started banging together pallets. You can see coop and run space, with the tall locust poles to anchor it. We moved that square of pallets around several times, wiring it together to see how it fit into the yard. Great way to visualize.
We decided to primarily use pallets, because....pallets. Free, usable and straight forward. Well...mostly. I would say to anyone considering pallets, that if you don't already have building skills, it is perhaps more difficult than it seems. They vary in size, weight and board hardness. We broke many drill bits, few walls or angles are straight, and there was plenty of cursing and banging. However, it's a great learning experience and our pre-existing building skills were honed.
An important and "Aha!" moment in design visualization for me. The moment when I realized I was building and Aviary. Yep. Duh. Really. Seems silly, but it really hit me all at once. We are avid naturalist and birders, and when it occurred to me to look not just at coops for inspiration, but other forms of bird housing, the whole design really unfolded for me. So, consider that if you are reading along planning your own bird box.
Helpers matter, and experience is a lifetime thing. As home schoolers, everything is education. As self-employed artists, everyday is take you kid to work day, and career day at school. Here is my assistant, using her tools.
We purchased on a select few things, that we couldn't source from recycled items. We raided dump piles and friends donated. Our neighbor has a large dump of demo debris and many items came from there, as well as design choices dictated by finds. We bought the rafters for the roofs, so we would have long pressure treated ones with stable grain.
Right away I discovered a design issue. Always build your door and coop tall enough to stand up in. Really. We have hit our heads many, many times.
Roof on, front framed in, tarpaper going on to protect plywood. The full sheets came out of that dump pile we mentioned. We kept digging until we had enough to cover the whole Garden Block. At 16x16 foot, that will be a total of 256 square foot of cover for the birds! It's a great space and were very lucky, but it is also a big chunk of hard surface to deal with run off. Here is the Mrs. and I together for scale.
Yep, a dirt floor, on rock footers. Packed clay. One thing our property has a lot of is clay and rocks. Our town of Mount Savage is famous for it's fire brick and the pits are on the mountain behind our home. We are fast learners and did a lot of research before and as were were building. We designed for our resources. One of those is litter materials. There are 13 pine trees bordering our property and we have pine straw in abundance as well as leaves. So early on we decided on dirt floors with deep litter. It has worked great!
Once the walls were up and we had jammed the stones under them, packing with clay, we dug trenches around all four sides and stapled on the grid wire, laying it out into the trench. The southern range of the long tailed weasel is the Potomac River. We live north of that. When asked what chicken predators we have, we say, "All of them." Weasels, Racoons, Skunks, Hawks, Snakes, Bobcats, Bears, Hillbillies. We built for those. We regularly discuss chicken losses with friends due to predators. Most times, it is due to faulty designs. We use to keep ferrets and know how to weasel proof. We are naturalist and tend to think like the animals we study. We would never fault a predator for wanting chicken dinner. We live in their space. So we build for them. We haven't lost a bird yet. Not saying we won't and not being cocky, but pre-planned is prepared.
Trench across the front. Over this we laid more rock. About that 1/2 grid wire. It was rather hard to source a significant roll of it. We wanted to trench coop and run, and would use it on the run all the way up. Everywhere we called folks either couldn't get it, had trouble ordering it, or openly scoffed at us. Several said, "Why don't you just use chicken wire?". Well, as many folks on here know, chicken wire is designed to keep chickens in, not predators out. A coon can tear through it, or pull the heads off. So, the whole thing is trenched and wired in. It was buy far, the most expensive piece of the coop. About $150 at a local Southern States in Amish country. I told the fellow that helped load it about the scoffers. He laughed and said, "That's cause you're doing it right!"
Outside cladding going in. Another mistake. We cheaped out on the cladding. I used 1/4 inch ply. I did prime it first on both sides with Kilns anti-fungus primer, but still, not 1/4 pressure treated. Don't scrimp. We haven't had any problems...yet. We have long overhangs and keep it painted, but it wasn't the wisest of moves. Only time will tell.
You can also see the "soffits" under the front eaves. Those are matched on the back. The coop faces South by South West, the same as the house. We wired all the soffits with the grid, and attached it with staple nails, and a bunch of reused roofing nails with wide tabs. The back of the coop, facing N by NW, gets the wind. The corner behind the Mrs. is due North. So in average days, the soffits are open, and the ventilation is awesome. The row of windows on the left of the image is open most of the year, and there is a back window. I planned a porthole in the door, and you will note the rectangle under the big opening. The big one is the future egg box, and the lower ones are closable vents. Another design point, hard to explain. Note the blue foam insulation on the back wall. Those are bits of recycle foam. We worked it into the walls and nailed it to the exterior wall. This leaves a gap of a few inches on the interior walls. Once the interior cladding went up, there was a small gap around the top rim of the pallet walls and around the bottom. There is a noticeable air flow out the top, as hot air rises from the the deep litter. More circulation. We filled the inside of the pallets first six inches with gravel and stones. Blocking any snake or varmints that manages to get past the outside trenches and wire, but still allowing air passage.
Back view of the North Corner. Trenches in place, northern window, tar paper on. We had plans for this corner which will be later in the post. The corner gap, (crooked walls) was covered with trim boards.
Door on, plywood covering the egg box until I figure it out, and a temporary run on the side, Gotta get the girls in now.
First night in the coop. Simple roost, and the walls aren't painted yet, but they are ready to go. We started with four hens and a rooster.
Front step. Like I said, lots of rocks on our property. We have sense begun extending it.
Door details. A bit of maple branch for a inside handle.
All the interiors are painted in white Kilz primer for mildew control and light. Here is the port I cut in the door, with a screen frame for the drop.
Sun detail around the porthole. Funny that. A lot of folks really comment on it, but it's an easy thing to do. As "Rennies" (Those who make their living working renfests) cutting clever stuff out of plywood is a daily job.
I am proud of the door. Ever seam is caulked and sealed. No rot.
Here is the trap for the porthole. I used a scrape of old plex and ply. Used sisal rope for a door seal on it. We used sisal on the egg door as well, just running it around the stops and stapling it down. I figured that we needed a draft rid, but foam would be a pecking hazard if the hens get to it. So, sisal they could digest. Works great.
Porthole closed. Nice and tight and we can still see in.
Litter board. Slots into a channel to keep the deep drift back. Works as an emergency rooster shield as well.
Coops need decor as well. So here is one of the girls.
Painted this one up during a lull in the build.
Interior finished up with new roost. A friend who is a folklorist saw it and said, "It's the proverb of the chicken ladder!" I had to find out what it meant. Seems there is a German saying. "Life is like a chicken ladder. Short and crappy". Hehehehehhehe...
Pop door. Researching on here I discovered the idea of a cutting board door that wouldn't swell or twist. Also found the design for the self latching system with the swing arm.
Better detail of the arm and swing action. Pull on the string, the arm swings and unlatches. Close it and the counter weights swing it back over. Very clever and simple. A cutting board door means no grip on the outside so a Coon can't lift the door and the latch works as well. Later, we were given an auto door control. So, timer with auto door and the whole system lets the girls out in the morning. However, we ultimately realized we didn't need an auto door. The run we built is just as predator proof. So now, the door just stays open unless we want to shut the girls on one side while working. Still, it was fun making it.
So, starting to work on the run and figuring layout for posts, etc. Since this was going to be an open run, fully attached, I used locust tree posts, something else we had lots of. Here some of my future residents cause me some grief, being in the way an all.
We decided to run the rafters, (Once again, purchased, so they would be stable and pressure treated) on the flat. Since we ran on close spacing, and had the heavy supports, etc, I felt it worked out well.
Here is a corner rafter, this one of 1x4So, it could sit up on the rim joist.
Detail of the notching in of the corner post.
Detail of how the roof rafter engages with the coop roof. That is the wired soffit showing. We used an altered rafter tie to attach them.
Once the roof of recycled ply was up and tar papered, we tried an experiment that ultimately failed. Bark shingles. We have so many large locust trees on the proper, that shed huge sheets of bark, I had to try it. While very visually pleasing, the roof would need to be a steeper pitch, and they would have to be cut at a clean edge, and even then would hold water and rot. Still, worth the try. A chicken coop is a chance to explore such things. Still might do it on a shed.
Door building. The wire doors for the runs were built with recycled 2x4 and I used ship lapped joints for strength. Since I didn't want to get out my table saw, I made my connections using a skilsaw. Easy, and straight forward, but super intense. It's a great technique but not for the faint of heart. Use eye protection, always when using power tools.
Start by laying out your overlaps. Set you blade to cut halfway through.
Slice away, making a serious of relieving cuts, or "Kerfs" then suing your blade to nibble away. Please note, this isn't a technique for those with no tool experience. You have to be VERY careful, as always, with the saw.
How the overlap works.
I used gorilla glue and screws and clamped it all together.
Here is a finished door. With wire. The center 2x6 support isn't lapped, but I drilled pocket screws for it. You'll know the three points of locking. Hooks top and bottom, with the spring latches. The center one a swivel hasp. The wooden quick close is only used during the day. Inside the frame there is a jam of 2x2 and another litter board. This seals the door completely, so that there isn't a snake's gap. The 3 locks are the same on all the entrances. This means that a coon would have to be very, very smart indeed. If they figure that out, they are welcome to the eggs and I for one, welcome our new raccoon overlords.
It was about this time that I discovered the book on my shelf that perhaps I should have been using all along. It is called, "Birdhouses You Can Build In A Day"! I began thinking that perhaps I should have stuck with wrens and finches, but I pressed on.
We began the wiring in of the run. We used the 1/2 grid wire, and since we had old dog fencing on the property, over the half inch, we hung a roll of 2x3 grid. The firs line of defense for snakes, coons, weasels, the second...well...bears. We had it, and it looks great, so we went with it. The Mrs. looks great laying out the wire for the run as well.
Like the coop, we ran a trench and buried the wire out as a digging stop. You can also see the front beam that was required to set the door, serving as a threshold. It was salvaged out of a 18th century barn ruin. Covered in old axe marks, and notched for beams, it was a real pleasure to reuse. A continuing story of agriculture.
The corners required some extra patching. These are the areas the predators would most likely dig at. You can also see the second grid.
The odd little back corner we have future plans for.
Sometimes it's the little steps. One day when going through the door, I felt a scratch from the edge of the larger wire. So I took my dremel to the ends.
That was the basics of the primary coop. We built a planter bed underneath the long edge which is a main path in our gardens. So in this we grow marigolds and green beans. These go to the birds, and they are fun treats for the kids to pick and feed through the wire. It catches the run off. A future task is to add a gutter system and rain barrel for their drinking water.
Of course, a coop needs a lovely paint job, and for us, there was never a question of palette. I love the door.
There was the matter of that gap where an egg box should be. So, my next job was creating the point of the whole system. After all, chicken coops are mostly and egg delivery system. So, since we had planned for expansion, knowing the effects of "Chicken Math" I designed a two tier open nest box, with closable vents underneath. You can also note that I designed the egg box to be "Inside" the coop, not protruding. We had the room and floor space inside, and putting in, meant less roofing, chances for air leaks, water issues, etc. I ultimately removed the center partitioned to the bottom box. They don't seem to mind. You can also see the tall pole on the right, which supports power for the coop. We DON'T HEAT, but, we do use a water heater to prevent icing up, etc. Also lighting. More on the power system later.
Created a drop door with jam of scrap wood. Used the sisal rope "caulking" I mentioned earlier.
The chains are designed to be unhooked. So when collecting eggs, you can let it rest, and when cleaning, drop it all the way down.
A note on our interior set up. Feeders and water on hanging chains. We have since moved them around a bit and stopped using the bricks under them. The bench was a nice idea at first, a place to sit and have some chicken time for our kids, but ultimately, as all things chicken, covered in poop. So out it went. The roosts in the back aren't fixed. We use a variety of forked branches and wedge them together. We change that up periodically, to make it interesting, etc. Also, the litter/bedding on the dirt floor. We save money anytime we can. So we use leaves, pine straw, and occasionally, purchased straw bales. We also grow lots of aromatics, such as peppermint and oregano, and cut them to add. We think that intense oil plants like that, as well as the pine straw, eliminate most issues with mites, etc. We haven't had any problems yet, so perhaps it works.
With our first winter, we had planned all along to wrap the run in plastic. We are at elevation, about 1900 ft. on the edge of the Allegany Plateau. Our winters can get really severe, and deep cold. I wanted to keep the ventilation going, but eliminate the wet draft and snow in the run. So, we wrapped it like a green house. Worked great. The original plan was slant that Southern side, and grow peas in it. However, low germination and difficult watering, means it didn't work out. Still the plastic was awesome. On days when the outside temps were in the teens or even negatives, the inside was above freezing.
There is that back corner again. Plastic up and lathe and scrap to keep it on. Still no proper roof, so a big tarp to keep everyone dry underneath. You can see a single pallet set up as a wind block. This is towards the end of the winter. During the bulk of it, we used the space to store bales of straw on pallets against that North wall. It added insulation, since they roost on the other side, and we used it as we went, since leaves and pine straw run out half way through the cold months. The pallet also gives a hint to future plans.
Spring was sprung, and the girls were back out on the garden beds.
Off comes the plastic.
The addition goes on. It's whole separate coop/run area, attached, and connected with a chicken door. We call it the nursery. Since it was spring, the new hens were here, taking us from 4 and rooster, to 10. The addition will allow us easy integration between two flocks, a place to let a hen go broody and raise babies, put a bird with an injury, etc. When it's not being used for all that, the door will stay open and our hens will have more floor space.
We better hurry, the Easter bunny was out and about and spreading her charms around. Encouraging the girls to lay for the season.
Using locust posts and pallets, and tying it all together. Using scrap like this takes a lot of..err...tinkering.
Tar paper and scrap ply for the back cladding.
Another old beam for a sil. Also, pallets and scrap framing for the interior. Long term there will be a tiny coop in here, with a window to look in, and vents, and an egg box, just in case.
Wired up, trenched, rocked, and ready. Got to build another door as well.
Just in time. Here come the occupants. We were VERY happy to get them out of the workshop. Few things as filthy as teen chicken.
Happy in their coop side. Between the two runs there is only grid wire. The two flocks can see each other, and even interact, but no contact. When ultimate mingling happened, it went pretty smoothly, with few fights, and only a little blood.
Just after integration, we made a tough call. We butchered our first bird. Little John the Rooster was becoming WAY aggressive and even blooding himself on the wire as we passed by. A good looking boy, but all attitude. Roosters are supposed to be that way, but the cons finally outweighed the pros and off he went. It was a nice learning curve for us.
In a great surprise, just after slaughtering the rooster, one of our girls went broody. At first, we thought she was on non-fertile eggs, but we learned that even though it had been a week or so, they can hold the fertility, so...we let her sit on them in the new nursery.
Of the six eggs she was on, only one survived. Very cute.
Here she is with her one chick, on the nursery side.
The irony that the one chick, turned out to be a rooster, a Golden Laced Wyandotte/White Leghorn cross, isn't lost on us. For no, "Little D" as he is called, is in the flock. We shall see what his future fate is.
Coops need accessories, so here is the calcium feeder I built.
We the girls ranging some, we wanted to properly fence the gardens, and since the gate to the main vegetable gardens interacted with the coop, we built a Japanese style Torii gate of locust and barn lumber, and tied the fencing to it.
Since we want to ultimately sell eggs publicly, we wanted to be legit, so we registered our flock with the state of Maryland and got our egg license. The girls weren't too impressed with it, but I still hung a copy of it up in the coop. Silly, I know, but I felt it the right thing to do. It makes them feel responsible.
Here is another calcium dispenser, this one made from an a bottle and a tin can. From canned chicken. Yep. Also, you can see the door between the nursery and run side. It stays open unless we need it closed. We have a rope and guide system so it can be operated from outside.
Here is the electrical connections. I sunk and eye bolt into the tall support pole, about nine foot up. Stretched two strands of clothes line wire between it and another eyebolt on the house, about 15 feet away. Then, ran the heavy duty extension cord along it, wrapping it with more wire, much like real power lines are run, binding it tight. I don't like using an extension cord, but have run and outside connection yet. One day. Until then, this runs into a window and supplies the lights and heat for the water during the winter. The systems keeps it up off the ground and support from wear and tear.
With the new additions, we needed to expand our roosts areas. So, first a big spring mucking out, onto tarps. Our compost loves it.
Then a big scrub down, some more painting, and new roosts of maple logs. I tacked them in on the blocks. Figure if they every get to nasty, I will just pull them out and burn.
During the cold months, the north side soffits, over the roosts, get stuffed with empty feed bags, some with reused bubble wrap inside. Keeps the ladies draft free. We leave the middle open and the south facing ones all the way. The whole coop, you can feel a venting, but not across where they sleep.
Inside of the egg box. The upper is closed off with poultry wire until needed. The coop and run can hold about sixteen birds. We will slowly reach that and stabilize. Might not ever need the upper egg box. If so, I rebuild with a sloped roof on it. Easy to do.
The reason for all this work. Happy hens. Fresh leaves on the floor and lots of bugs. They range, but do spend a lot of time in the run.
So, with cold weather approaching again, and the new girls all integrated, and the new roo figuring out his place, what was it we were missing?....hmmm....OH! Right! A roof! The most expensive, and most important part of most builds. So, we didn't want to do another winter with tarps and tarpaper, and had managed to source some recycled materials, it was time to really finish this build. So, with first snow falling, I got to work.
Here is the mess of tarps, tarpaper, and failed bark shingles, with the remains of the year's green beans on the wire.
A patch work of tarps and boards to hold everything down. Very tired of looking at it.
I kept feeling like a rooster up there, so on the during the prep, on the last day in the 60s, I gave a good crow for the camera. I hope to get a Weathercock Vane one day, Until then, I guess I will have to do.
All torn off and a new layer of tar paper. Roofing options were limited. Any expense on a chicken coop means more expensive eggs. So, while we could have purchased roofing anytime, the principle of using as much recycled as possible was there. However, roofing is tricky. It is the most important part of the structure. We also didn't want to use asphalt on the South facing run side, so that we could harvest the rain water. So that was always going to be corrugated, and we just had to find it all. The North side, we very much wanted to do a green roof of some sort. We looked at the options and expense, and ultimately put rolled asphalt on it. We figure if we ever get a membrane, we can lay a green roof on it, with some structural additions to hold the weight. So, a another approximate $80 in tar paper, and rolled roofing, and the ladies have a roof for the winter.
First snows of the year. Temps falling. Better get busy.
Playing puzzle with the three different types of corrugated roofing from dump. Took a while and some extra screws. Later it will get every screw head caulked and sealed and a coat of paint. What color?
All roofed up. Soon the plastic goes back on, and we go back into winter mode.
So, that's it. I hope my experience and learning can help other new chicken keepers. We love our little coop and have had great success. Happy chicken keeping from all those here at Flora Vale Farmstead.
The Humans: Leah, Shane & Ellawyn. The Cats: Rosie & Luna. The Chickens: Two Leghorns: Speedy & Sandy, Two Buff Orphingtons: Rosebud & Butternut. Four Black Stars: Betty, Judy, Brownie, & Robin. Two Golden Laced Wyandottes: Sweetie & Ditzy. and one Golden Laced/Leghorn Cross rooster, Dixie.
"Keep 'em flyin.