FREE Printable Coop Plans are included in a PDF File under Downloads (on the right side). Enjoy!
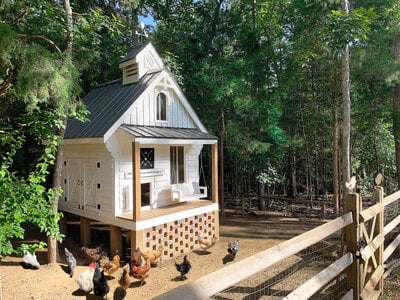
Hi Everyone and welcome to my coop build article! I hope you enjoy reading this article as much as I enjoyed building this coop. We finally reached "home" about 4 years ago here in Charlotte, North Carolina when completed our dream home and then it was time to build our Dream Coop to match!
CONCEPT - When I set out planning the coop I knew that I wanted it to "match" our home style. I started by capturing key elements of our house that I wanted to incorporate in the build such as our front porch and beams, brick latticework, corbels and gable accents, metal roofing and pitches, cupola, arched windows, and of course the color, siding style and trim (phew!). It proved to be a daunting task to get all of those features squished into one 7'x9' coop footprint. Now that it is all done, you can judge for yourself if I accomplished my goal... but it all started with some Chicken Scratch on a piece of paper!
DRAFTING - One of the most important things before you start is to take your vision and put it on paper. Even if you can't "draw" you can still sketch some basic ideas. After a number of revisions I finally came to a design I liked. Below are a few of the images I sketched over the course of a week while I thought about things I liked, changed my mind, and changed my mind again! I was originally going to build an 8'x10' footprint but when I put a tape measure where I was going to build, I didn't like the "fit" in the physical space. So I reduced the overall build size by 1 foot on each length to 7'x9'.
PLANS: Once my on-paper drafting was done, I set out to building (because I'm a creative, impulsive type and I was ready to cut some wood!). I knew things would change on me some as I built (and I knew I'd change my mind some too!) so I wasn't going to spend time over-engineer plans since I had the vision in my head. The plan images you see in this article I made after the build mainly so others could build this coop (or one like it) if they wanted to!
TOOLS & MATERIALS - And so it was time to actually start construction! For my materials, I wanted everything in the coop to be treated lumber, including the siding- so I purchased accordingly. I also used all coated deck screws and exterior parts. I don't mind sharing with you that the entire material purchase for this coop from many, many trips to Lowes was about $1800. So not a small budget by any means, but given what I got for that money, I feel it was pretty well spent. I will also discuss the individual materials in much more detail as we go through the build descriptions.
MATERIALS:
- 2x12's, 2x8's, 2x4's for primary framing wood
- 6x6 and 4x4 posts with quick-set concrete
- 1x6's for the siding and trim
- 2.5" and 3" coated deck screws, 5" Lag Screws
- Black hinges and latches
- 3' wide metal panels, drip edge and flashing for the roofing
- Standard size bricks for the front lattice work and mortar
- Reclaimed window panes (optional)
- Circular Saw for most cuts (you could also use a miter saw)
- Reciprocal Saw (Sawsall) is very helpful with the posts
- Jigsaw is needed to do the scrolling trim parts (if you choose to do those)
- Drills for pre-drilling and fastening screws/etc
- Impact Driver (I prefer these to drills for screws)
- Nail Gun for Trim Nails (and of course air compressor/tank)
- And of course the "Basics"... Tape Measure, Levels, Pencils, Hammer, etc.
")
BASE FRAMING / FOUNDATION - My goal with the base framing was to leave the main floor of the coop as open as possible so the poop would pass through the bottom screening wire for easy raking / clean-up underneath. In the past I had used 1/2"x1/2" wire flooring but... well some chickens poop bigger than others... and ultimately that size wire gets clogged up. So I went up to 1"x1" which is large enough to pass most poop, but small enough to keep any predators out. Additionally, the 1x1 wire is 16 gauge vs. traditional 18 gauge which doesn't sound like much difference but it is in fact a substantially stronger wire. I am happy to report that all the poop passes right through the wire (partially because the roosts are 18"-48" up, so as gross as it may sound, it gets some good velocity and the wire just shreds it). Yucky, yes- but efficient and effective, for sure! You can see the actual installed screen on the frame a few pictures down.
I absolutely overdid the number of 6x6 posts on the base, but I wanted to build this coop to last- and also to look good- so overdoing it was just fine by me. I also didn't want to have any cross-braces under the coop frame on the posts because I need to get my rake under there easily for cleaning.
Chicken Tip: Setting posts can be a real pain in the chicken neck. The best way I have found to do it is mark the locations as best you can before you dig, then dig a little bigger than you need, level them side to side in the hole, and after you set the concrete cut the tops off. In the left picture below, before I set the 8 posts in concrete, I wrapped them with the beams I planned to use for the base plate and floor joists. This ensured at least the top of the beams were exactly where I wanted them for my build.
CONCRETE - With the frame nice and stable, I was able to level the legs and pour my concrete. The soil in NC is pretty amenable to posts directly in concrete and that is the method I personally prefer, but many high-end builders suggest pouring concrete piers and then setting your posts down on the piers and attaching with metal brackets/other. I think up North this becomes more important with freezing lines and the like. It's really a personal preference.
NOTCHING THE FRAME - For a heavy build, which this coop is since it is all treated lumber, it's much stronger to notch the beams rather than just hang your wood off the side and screw through it. Notching allows you to rest the wood on the post for direct downward force and also screw into the post for sheer force, meaning you get the best of both worlds. The only downside of notching is it is also a real pain! I use my circular saw because you can cut clean, straight lines. Some people use chainsaws, which is also effective but less exact.
You can see below in the left picture that the base plate boards fit snugly into the notches (they don't have to be sunk all the way down in the posts, just enough to screw into). You can then screw them in through the face for a super tight fit. I also have the luxury of a 5-Year-old helper named Mirabelle who always puts my work to the test, as you can see on the right. After her thorough inspection to ensure everything was level I was able to continue on to the nest boxes.
Chicken Tip: if you find your beams are not leveling out nicely with your notches, don't worry, notches are very forgiving. You can put shims under the ends of your boards to get them to level up perfectly, and then you can screw into the posts while they are shimmed and everything will hold tight. Even with all the prep work I did, I still had to shim the back right corner post, I assume that was due to some settling/movement as the concrete set.
NEST BOXES - Nest boxes are always one of the most fun parts of the build for me... I'm not sure why because they're actually quite putsy and repetitive. I am sure my wife would tell you it is because they are made of a bunch of squares and I like linear things, but I prefer to think it is because I care about the comfort and joy of the hens as they lay their eggs. My wife is probably right.
My flock varies from 20-30 chickens so I wanted to build the coop and boxes appropriately for that amount of birds. The widely-accepted ratio is 1 box per 5 laying hens, so I "needed" 4-6 and I don't mind extras. The overall size also allowed for a nice fit for a 4 box wide by 2 box tall configuration.
I also like to raise chickens with their mamas whenever they go broody, so I added the top brooder area as a "private space" for the first few weeks for my new moms and their chicks. I like to keep them in the coop because they are still part of the flock and not completely removed, but segregated for peaceful chick-raising. The area to the right (by the red number 3 below) is a storage space for feed, tools, treats, bedding, etc.

The nice thing about this nest box unit is it can be built completely separate from the coop, and then just put into place. When building it, keep in mind that a 2x12 these days is really more in the 11-1/4" range, and thus not actually 12". When you are framing out the boxes, if you want to have perfect cubes, you should adjust accordingly.
When I set the box on the frame, I inset it one 2x4 width because you need that space for the doors to close flush. I also put a ripped 2x4 along the bottom edge as a step-in. (Note: I will use the term "ripped" a lot when referring to 2x4's. All this means is you cut the 2x4 in half which gives you a smaller, more-square piece of wood to work with.) Chickens like to step into the boxes and having a front edge facilitates that and also is great way to keep the bedding from going all over the place (I use pine shavings).
For the upper boxes, the hens will need to jump up there and thus need a landing perch before stepping in. I used another 2x4 rip but I spaced it off the edge about 2" so they had room for their toes to catch on the perch before heading in. Since hens aren't light, I had to drill holes and put in 5" lag screws so this perch was plenty strong.
To finish off the brooder space, I put an off-cut of the 2x12 to create a bit of a private box for the mama hen and babies- and then screened off the rest of the space. Like on the boxes, I put a rip along the base to keep the bedding in.
One of the funniest things about building nest boxes is apparently they're the coolest new thing to play on, sleep on, and everything else you can think of. My "assistant" greatly enjoyed crawling in and out of them while I worked. And my barn cats found this area to be an excellent napping spot out of the sun (that is Sonny on the left and Gummy on the right). I figure if all of these critters like the boxes, the hens are sure to as well! Turns out I was right- the boxes are a hit!
You can see in the below images that the Nesting Boxes are indeed a hit and just recently Snowflake welcomed 6 new chicks to the flock in the brooder!
MAIN FRAMING - With the base / foundation done and the nest boxes built and ready to attach- it was time to start actually framing the coop! Since the front porch is roughly 2' wide, this makes the actual coop space a 7'x7' "box". The nice thing about this measurement is you can make all your lengths with a standard 2x4x8' and have very little drop (waste).
I also wanted to make sure there was nowhere in the coop (except the roosts) where the chickens could land or sit- because if they can get there, they will, and then with a chicken comes poop! I made sure I didn't have any exposed flat areas where chickens could get to.
The framing is rather straight forward, I went with "L's" in the corners, which is where you butt one 2x4 up to another and it creates an L shape. This is a very strong connection and creates a strong foundation for the rest of your framing between those corners. Aside from the 7'x7' framed box, I added vertical supports wherever I had openings (doors/windows) and cross beams as headers over and under those for support. A few places I added some blocking to keep the frame strong overall, you can see those locations in the images.

WINDOWS (Optional) - Windows were another feature I wanted to incorporate in my coop build. I found some old, reclaimed panes for free locally on craigslist and they had 3 matching ones I used in this build. The window framing was determined by the size of the windows I had- and as you build your own coop you can adjust as necessary for whatever windows you have. There's really no reason for operable windows, so I just screwed the wooden panes directly to the 2x4 frame. It's easy and secure.
I leave my chickens in the coop until about 7:30AM, so I figured in the Summer months they would appreciate the extra light in the morning before I let them out. I lined the windows up (and the access doors) for both aesthetics and to ensure that one side of the coop would not have windows in case the chickens didn't like them! Thankfully, they had no issues with them at all- and I love being able to do a quick visual check / headcount at bedtime.

BRICKWORK (Optional) - Another aspect that I wanted to incorporate in my build was brick lattice under the porch and I also didn't think that aesthetically the coop would look right being roughly 30" off the ground- maybe too much like a beach house- so I wanted to "ground it" with something and the brick was a natural fit. The lattice design was a carryover from my house, but it's also nice because it saves material and is very easy to lay. Also, another nice feature (because I am no brick mason!) is that the brick is purely visual- it doesn't actually support anything except itself... so that took the pressure off of not being experienced there.
Chicken Tip: If you're looking to build this coop and don't care for the brick, you can achieve a great look by dropping some cross braces in the front like you see done on most decks. I considered that (take a look back at my drawings!) and I think it would ultimately have achieved a similar look, but I really wanted the challenge of incorporating the brick.
NAILERS / BLOCKING - Once I got the main 7'x7' box framing done, I had to go back and think about "nailers". A nailer is a board in the frame you can nail your siding into, so if you have a big gap somewhere in the framing- you will likely need a nailer there. There were a few spots that I added some 2x4 offcuts to block in spaces.
I also had to figure out the roof height now (I knew I wanted the pitch to be around 45 degrees) so I had to go back to middle school math and remember how to get the hypotenuse of a right triangle to get the length of the rafter. Thankfully for you, I put those measurements in the plans! On the front I also needed to make an adjustment to the framing for the upper window. I'll talk a little more about how I achieved the curve in the window later on (spoiler: it's all trim!) but you can see here it is just a framed square for the window.
DECKING / FRONT PORCH - Next I put the decking on and set the 4x4 posts on the front porch. Using the 4x4 posts, I was able to finish framing out the front shed roof. For the decking, first I cut all my boards and then I laid them out on the frame to find the perfect amount of space so they fit equally. Even though the 4x4's on the porch are theoretically structural, they hold very little roof weight and are mainly for looks, so I didn't mind putting them on top of the deck boards. I adjusted the 4x4 height to match the top of the window height so as you approached the coop from the front, that nothing was cut off by the roof. If you have windows that are cut off by the roof line, this looks weird, so plan accordingly with whatever size windows you get.
Chicken Tip: You don't often see ripped floor boards on a deck because you have gaps between the boards that you can adjust however big or small you need to get an even fit. In my case, it turned out my gap was about 1/4".
ROOF FRAMING - At this point, it's time to go on to the roof framing! Roof planning is extremely important if you are going to use metal because you need to space the rafters appropriately so they align to the locations in the metal that you can screw through (for instance, you don't want to hit a metal seam at a rafter because you can't screw through a seam). The good news is this is really easy if you have your material on site. Simply measure where the best attachment spots are on the metal panels (usually they are 2' or 3' wide) and space the rafters to match.
Some of the finer details of the roof were a bit harder to plan for though. For instance, I knew I wanted overhangs in the front and back which meant I had to cantilever the roof out past the framing. You can see in the pictures below where I attached another 2x4 to support the overhang. In the back, I minimized this overhang to just being a 2x4 width past the edge since you can do that without any special additions... and it's the back! On the plans I also show the ridge coming out a bit longer than the first rafter, this is a great look- but I didn't actually do it on my coop because I put the cross trim there instead and it would have been too busy.

I also went with "closed boxing" for my roof edge instead of open rafter tails. In truth, I think open rafters on this build would look better, but since I was matching my house that wouldn't have been appropriate... so I stayed the course. Honestly, if you are reading this and going to build, I'd go with open rafter tails! It's such a neat look and you save two boards in the process since you don't need to box them in. No matter which way you go, don't block in the space between the rafters where they go above the wall because that is great spot for ventilation! Instead just put some screening over the hole there and that will allow the air to escape out of the top. Good coop ventilation is very important. I won't lecture you on the benefit of ventilation vs. warm chickens, but read up on it. A dry chicken is a warm chicken (in most cases) so ventilation is key.
One of the potential weak points in my framing was not having any horizontal braces where the roof meets the walls. Usually it's a good practice to drop a few braces across the top of your wall framing to hold them together against sheer (sideways) force. In this case, there's a specific reason I omitted these- because if I ran those cross braces on top of the walls, there would be chickens roosting all over them! And as we already know: with chickens, comes poop- and poop where I don't want them pooping (in this case since the braces would be perpendicular to the other planned roosts, the chickens up there would poop on the other birds on the lower roosts!).
Instead I notched all of the rafters so they sat on top of the walls and then I added the cross bracing up high where the chickens could not feasibly get to. Those high up braces you can see in the right picture below, and they added plenty of roof support.
Chicken Tip: I live in North Carolina (aka Hurricane country!) so I put hurricane clips on all of my rafters (those are the little metal things you can see where the rafters hit the top of the wall framing in the picture below, above my lovely assistant). Hurricane clips will make this roof extremely strong against even the fiercest winds and even if you don't have hurricanes, you will still have strong thunderstorms, and I'd use clips for any roof this large.
CUPOLA - Next it was time to move on to the Coop-ola... I mean Cupola. Let's have a brief discussion about cupolas. Cupolas are terrible, evil little mini-buildings attached to your big building to make it look nicer. Although they're small and insignificant- they take an absolute ton of work and planning to incorporate. They're basically something you should tell someone you don't like to go do... "Hey you! Why don't you go build a Cupola!".
Joking aside... they are quite attractive and if I am going to have a "Farmhouse Coop"... well, I guess it has to have a Cupola. This cupola is actually functional too. Let's take a look at the plan and how it came together on the roof.

One of the interesting things about a cupola is that it sits on the ridge of your coop, which is by default the absolute highest part of your entire build. In my case this was 14 feet up, and although I have no issues with heights, it is an extremely hard place to get to easily and an even harder place to actually work. For this reason, you see a lot of professional builders build the entire finished cupola on the ground and then rent a lift truck to get it up on the roof and fasten it down. I now understand why they do that. Since I had to manually lift the thing up there by myself, I could only make it so heavy, which meant I had to stop the "ground building" for the frame as shown in the left image. Well... this means you have to complete all other aspects of that cupola up on the roof, and that's no fun, at all.
When you put the cupola up, you have to align it to sit on two rafters or put a brace between rafters and attach it to that. I also put screening behind the louvers for even more ventilation (so yes, it's actually functional!) and then added the siding. When I got on the ground and looked up, it just looked so plain in the front, so I built a little trim piece to match the doors. The cupola roof was the least fun part. I had to cut all the metal by hand to fit since the cupola was too small to match up to the standard metal sheet size (you can buy straight metal sheers for this, they look like heavy-duty scissors). I also had to cut a custom strip to make the ridge cap... all of which I did by hand. I'm not trying to complain here, just saying I'm in good shape and my hand still hurt for days. Bless all you roofers out there.
Ultimately, I think the cupola does add an incredible accent that compliments the entire build, so despite how putsy it was to build and how long I had to hang off the rafters trying to finish it, I do think it was worth it.
ROOF DECKING - For my build, I decided to do a full roof deck out of 1x6's because my initial plan was to put the same shingles I have on my house. I found out later that apparently most shingles are custom order and take a long time to get in, but metal panels are readily available. So I went to metal panels, which means the decking was pointless! Live and learn! I suppose the decking looks really nice for the chickens inside the coop when they look up....
In truth, you only need decking if you are going with shingles or something like slate or tile. If you use metal, you can fasten it right to the rafters. Again, make sure your rafters are spaced properly. Metal roofing is probably cheaper than shingles when you factor in not having to do the decking.
PRE-PAINTING & STAIN - Whether you decide to go with decking or not, pre-painting is your friend! Anywhere that you know is going to get into super tight quarters when you put the roof on (like rafter tails, boxing, exposed facades, undersides of the decking, etc) you should paint now while you can get to it without having to tape anything off and contort your body to reach areas which currently are right in your face! At a minimum, before the roof goes on you should paint any exterior-facing wood that actually touches the metal so that it is done because it is very hard to tape off those places. (And of course paint that
ROOFING MATERIALS - One of the nice things about metal panels is they are built smart for you to make your job easy and come in a ton of colors to fit your project. I went with a Charcoal Grey, Ribbed Panel. There are 3 main prefabricated panel types that you literally just screw to your roof deck / rafters: Ribbed / Raised Panels and R-Panels are usually 3' wide. There are also 5-V panels which are usually 2' wide. Both of these you can screw right through the top of the metal panel using a screw with a rubber washer (which they also sell in the color of the metal!).
Chicken Tip: Almost all readily available metal panels can be cut to your specific length at a metal shop and they can also provide the flashing, drip edge and ridge cap in colors to match your panels. Lowes doesn't have a good metal selection (I love Lowes, but they're not a metal shop) and they also won't cut anything to length for you. No matter where you live in the US there is probably a sheet metal shop nearby that can not only beat the Lowe's price- but they will have a ton of metal colors and can also cut everything to your specifications. Having said that, I can't stress enough pre-planning for the metal size you choose. So pick the metal before you frame the roof! If you frame for an R-Panel and go with a 5-V nothing will line up.
ROOFING - So now it is time to actually put whatever roof you decided on- on the coop! I have a love/hate relationship with roofing. The love side is your project takes a huge turn towards done when it has a roof on it, it's dried-in for the most part, and it looks substantially different than before you had a roof on it. The hate side of it is that roofing is a bit of a pain because obviously you're up on the roof! Additionally, if you want to do the roof correctly, it takes a lot of work and a lot of trim you might otherwise not expect. For my roof, I have drip edge on any of the flat faces where the roof touches the eaves (the front porch and sides). I have a flashing wherever the siding touches the roof (front face and cupola). And I have ridge cap on both the main ridge and the cupola. That is of course all before I put the metal panels on!
Chicken Tip: The metal panels have nice big grooves / ribs that line up so you can easily keep your spacing right. Make sure to keep square to the framing as you go, it is really easy to angle down just 1/8" on the first panel by accident and by the time you get to the other side, that 1/8" has become 2" and the whole roof is messed up! Metal panels are not very heavy so one trick I used is to put a single screw in the top middle of the first panel, get it as straight as I could and set the next panel the same way- and so on until the last panel. That way I can make sure all panels were straight, and once I confirmed I went back and fastened them all down. You don't have to go crazy with the screws either, just a couple in the bottom, middle and top will hold the panel securely.
ROOSTS - I think my favorite part of a coop, even more so than the nest boxes, is the Roosts! What a great opportunity for some fun accentuation. Chickens actually enjoy wider roosts as opposed to thin ones, when possible. You can look on the forums about that but most suggest at least a few inches wide. I scoured my property for the coolest hardwood branches I could find that would span the entire 7'. These are serious roosts! I found branches with ups and down and dips and knots to give my chickens a plethora of roosting choices. If you don't have a woods, using 2x4's will also be plenty strong! Although my plans show 2 roosts, I decided to go with 3 because I wanted a 3-tier setup. Really, for roosting you can do a lot of different configurations, and I like to have a tiered hierarchy that matches the chicken's social pecking orders. I have no proof, but I feel from experience that doing different height roosts alleviates some of the in-coop fighting (and of course having plenty of extra space helps!). For my roost heights I went with 18", 30" and 42" up. Most of my chickens like to roost on the top two.
Since the framing has plenty of upward boards to screw into, you have a lot of options of where to place your roosts. For mine, I pre-drilled through the outside of a 2x4 upper and then used a 6" lag screw in each post end. You have to remember you may have 50lbs or more of chicken-weight on any of these so they need to be strong. My assistant tested the strength of my roosts in the right image above... and we won't talk about using my kid to make sure the roosts are safe for the chickens- she volunteered, promise!
Below you can see about 2/3 of my flock settling in for the night with plenty of space to spare. The top roost is of course for the cool kids. The middle roost gets a lot of love too- and all the youngins' get the bottom roost. When I moved to this coop from my old one (which had a lot less room, but still "enough") the chickens started coming in much earlier at night. I like to think that is because they love the roosts so much, but likely it is because they have plenty of space in here to settle in without getting picked on!
Chicken Tip: On a quick poop side note (who doesn't love poop side notes?!) you can see the 1"x1" wire screen is virtually poop free. Score! Since you have a ton of space to play with- when picking where the roosts will go- make sure you try to get your chicken butts above the screen and not the floor joists to minimize the poop in the coop. Also make sure not to put the roosts too close to one another so that they don't poop on birds below them. Otherwise, have fun with the roosts and be creative!

SIDING MATERIALS - There are a ton of options out there for siding and honestly aside from the overall look of the structure, your siding is the most prevalent feature noticeable on your coop (I'd argue siding and roofing, simply because of their relative size compared to everything else). You can research siding that will work for you but I will let you in on my secret- I absolutely love using treated dog-eared fence boards. These boards are incredibly cheap and easy to work with! They measure roughly 6" wide x 6' long (I cut off the dog-eared end). They cost about $1.50 each at Lowes and they're out there in huge pallet piles on the hardware side.
If you do the quick math, that's 3 square feet of board coverage for $1.50, or 50 cents per square foot of coverage. You really can't beat that price- not to mention you can rip them in half to make 3" trim boards for your window and doors. They're also easy to paint or stain.
My favorite "by-product" / added benefit of using them is they create an amazing interior look as well (which you can see in the roost picture above, that's just the back-sides of the siding boards!). You essentially get an outdoor and indoor finish with the same board... so if you really want to apply chicken math here, that means you are getting 6 square feet of coverage per board (3 inside and 3 outside) and you are paying just 25 cents per square foot. That's about 1/4 the price of plywood!
SIDING & WINDOWS- Like roofing, siding is very rewarding because you get to see huge differences in a short amount of time. For this build you may want to invest in a miter saw if you don't have one because there are a lot of 45 degree cuts in the framing, siding and trim- but you can do them with a circular saw too. For this plan, in keeping with the house design, I wanted "Board and Baton" siding up top and "Lap Siding" down below. Both of these are pretty easy to do.
For board and baton you simply cut your boards facing upward and butt them up next to each other. With board and baton siding you should start with the middle board and work your way out to the edges. The "batons" are the thin strips that go over the seam which both cover the unsightly seam and keep the water out. This is an extremely common siding used for barns.
Chicken Tip: Because you have batons covering the seams of your boards, this also gives you an inch or so of "play" in spacing them. This means that like the front decking boards, you can space your boards out some to make a greater distance, or squeeze them together tight to avoid having to rip an end board. On my build since I had a straight 7' width, the boards came together nicely butted up.
For lap siding, you literally just lap the board over top the one below it. The overlap creates the waterproofing. Unlike board and baton, for lap siding you want to start with the bottom board and work your way up. If you are meticulous, you can estimate your overlap so that your boards are all full width when you reach the top, but honestly the top board is going to terminate into the eave and be almost invisible up there anyway. Instead, I focused on the overlap size that met the look that I liked best. I preferred a 3/4" overlap. There is a downside to lap siding though, and that is the vertical edges (on the corners of your frame where the boards end). When you lap them, your boards stick out about an inch and thus leave a small gap. I ran vertical boards on the edges which you can see below, these make a nice finished edge and also are 3/4" thick so they knock out half the problem. The other space I had to run a thick bead of caulk on. That's not so fun... but the end result is attractive (you can see the un-caulked edges two pictures down).
Before I started the siding I went ahead and set my windows. These windows are not operable, they are just wood window panes with glass. I leveled them and set them with screws right through the panes where I wanted them. Then I started siding with the board and baton up top. First I trimmed the arched window which I'll talk about a little later in the Trim section. This gave me a center-line to work from and I finished out to the roof eaves. The bottom of the boards overlapped the flashing above the front shed roof so that any water on that face goes down the boards and right onto the roof, and off the coop.
Chicken Tip: For the trim, I simply rip the siding boards in half! (You can tell how much I like these fence boards!) It makes for a really nice ~3" wide trim board. I used a traditional square frame with mitered corners for the windows. This is the most basic window and door trim. Because of where my windows were situated, I had a few nasty boards to cut. These required a jigsaw because I was cutting squares in-line out of flat boards. Thankfully there were only 2 like this. Another note, since the width of the coop is 7 feet, and my fence boards are 6', they can't make the whole run; however, this wasn't much of an issue on the front face because the window break up the distance. So the front actually has no seams.
The back on the other hand has a ton of seams! But that's why it is the back. Also, for the back I decided to just go with the lap siding all the way up because the face was not broken up by a porch roof (like on the front). You could of course run a straight board to break up the face and do board and baton up top if the back of your coop will face something you want to look nice. For my coop location, it just faces acres of woods, so I didn't find it necessary to impress the deer and foxes.
Last step before I installed the doors was to go and trim out all the door openings. I did this just like the windows, a simple 45 degree mitered corner on a 3" wide trim board. Simple, but appealing.
DOORS/HARDWARE - Doors are tricky! There's a couple things you need to plan for to be successful with doors. One thing is the door width- if you want to do it right, you want your door to close into a gap in the framing so it sits flush with the siding. It's not hard to accomplish this if you plan for it. This is why I left a 2x4 depth wherever I was putting a door as noted in the framing section. Since I am also framing the doors with 2x4's, they fit right in there, and then the siding material to finish the doors and the trim equal out for a flush finish. When I cut my doors into the frame, I cut 1/4" less than the opening both up and across. This means my door should have a 1/8" gap all the way around. Sometimes I cheat the height a bit more and give a good 1/4 on the bottom so nowhere scrapes as the doors settle over time.

The next tricky part of doors is the hinges and making sure they open and close smoothly. One thing to be sure of is that you align a 2x4 with where your hinges are going to be. As you can see above in the right image, I make sure to use a 2x4 frame for my doors. This allows you to put nice long screws in your hinges which will keep them from settling too much. When your doors settle, they start rubbing on the frame and don't open and close well. When setting your doors, place your door in the hole but sit it on top of a 1/8" rip. This doesn't have to be wood, find anything 1/8" thick and stick it down in the frame. This keeps everything nice and straight when you put your screws in the hinges and gives you space for the door to operate. Once you have everything screwed in, when you pull the shim out and your door should open and close with ease.
Chicken Tip: Here's a hinge hack for you- putting hinges on like "normal" will inevitably settle at some point. If you have an opportunity for your doors to open up, or down, those hinges will stay good much longer because they're not having to hold up the weight of the doors. Keep that in mind as you design your doors. I think opening to the side is usually preferred as "normal" but a big clean-out door may be much better served with top or bottom hinges.
The last tricky part of doors is the latches. Unless you are really good at doors you should buy only latches that have plenty of give in them. The reason is no matter how good you are, your doors and hinges will settle some over time- and especially with lots of use. If you have very precise latches, they will not line up for long. Straight-bolt latches are usually not a good choice unless you are confident in your doors because they are extremely exact (the bolt has to go into a very small hole). Hook-and-Eye latches are much more forgiving, but are not very attractive generally speaking. There are some iron forged latches online you can buy which cost the same as bolt latches at Lowes (about $4) which have plenty of play in them and look great too.
One nice thing about doors is they break up the faces of the siding and strangely, that is part of what makes your coop look nice- the complexity of so many things going on but all working in unison to achieve a beautiful look. So don't skimp on your doors. They are a pain in the neck and take a really long time to do right- but in the end they are a key element of the project that you want to make sure looks great.
For the door trim, I like the barn-style look and went with a very traditional "X". Historically this was done to help shore up the barn door because they covered huge expanses (usually 10' or more) and the X was actually a huge nailer to keep all the other boards in the door in place. On the coop doors they're just decorative, but they do add a lot of character with just a couple pieces of ripped siding. My X's are only about 2" wide instead of 3" though. Easy to do, instead of ripping a siding board in half, I just ripped it in thirds. To get the angles, the easiest way I have found is to cut a trim board a little larger than the inset on your fully built door, hold it up on the face where it will go and then just draw a straight line for the cut angles with a pencil. If you try to mathematically figure out the angles, you're probably not going to get a tight fit. If you draw it right up there on the door- you know you have the right angle (I guess I should say "correct" angle)!
INTERIOR - As mentioned earlier in the siding section, one of the huge benefits of using the fence boards for siding is you get an automatically-finished interior! You literally don't have to do anything to the inside walls and it still looks great. Score!
There are a few loose ends you need to tie up though that are not walls, mainly eliminating any flat space that a chicken can go try to bed down on- because they will and they'll poop there and you will have a heck of a time cleaning it. In my coop design there is only one place this is an issue and that is where the nest box insert goes. So I went in after the fact and just closed off all the walls there (if you recall, this was the storage space on the outside so it will also close in the back of that area too). There's no need to overlap boards, just go in and cover up any holes with straight cuts. You can see where I did this on the right side of the left image below.
This is also a good time to put the final screening for the venting in the rafters if you didn't already do so. If you followed the plan, there should be 3 open rafter sections on each side you will want to cover with screening. These are great to have because they let out the gasses in the coop through the top, thereby increasing the air breath-ability of your flock. They will thank you for it.
RAMP - If you have too much time on your hands and watch how chickens walk, work their way through brush and branches, and generally get around- you will notice their feet are designed to claw/clutch things. If you make a flat ramp, they slip all over the place because they simply don't have flat feet for walking like people do. Instead, you want to give them spaces where their toes can easily grip. For this reason I like to think of coop ramps more as "ladders" than "ramps". For my ramp, I ripped a bunch of 1.5" x 12" pieces of leftover siding off-cuts and nailed them into two rails made from a 2x4 ripped in half. Then I spaced the ladder rungs out about 1" apart to leave room for chicken toes (you can see this working in the picture on the left). This gives them great grip and they get up the ladder quickly and with ease.
You also want a nice long, low angle ramp. If your ramp is too steep your chickens will struggle. You want them to be able to walk up, not hop or jump each rung. If they can't walk up they will start congregating on your ramp and cause a chicken-traffic jam which usually leads to pecking. Attach the ramp right under the door to make it easy for them to step into the coop. My ramp (see the right image) is almost 7' long to get up about 30".
TRIM, DETAILS & PERSONAL TOUCHES - Lastly, we come to the "fun part" of the coop, and that's all the little things we all do to make our coop; "our coop". If you've read this far, you've already seen that I took most of my inspiration from trying to match my home and squeeze all those elements into a 7'x9' structure. The specific things that I enjoyed the most in that matching process were the cupola (not the build, but the look haha) and the fun rooster weathervane on top of it. I also enjoyed building the front porch swing, which was a heck of a lot easier than the cupola and just a fun addition. In truth, the chickens go on it on occasion, but not a bunch. It has actually become a great place to store eggs temporarily as you can see in the right image below.
Some finer details that were not big but really brought things home were the little decorative cross in the gable (which is now thinner than in previous images because I re-did it as it was too thick looking!) and of course the corbels in the eaves which I jigsawed out. These little trim items go a long way to make this coop feel like it is ours, and for us to all be proud of.
The arched window was a fun feat as well. It's actually just a normal rectangular window but I trimmed it down to make it appear like it is an arch. If you look closely in some of the pictures, you can see the glass continues past the trim. To make the arch I figured out the right width for the look and then used a big salad bowl from the kitchen to trace the arch. Then I cut it out using a jigsaw, and ultimately added the siding around it. I think it turned out great!
Aside from the trim details, there are a few other personal touches that I want to point out because I think you could easily copy them for your own coop! Ironically, we never could come up with a coop name that didn't feel contrived or too over the top. The closest to a name we got was "Creme de la Coop" but we couldn't get past the elitist undertones of the name and we like everyone and are just not stuck-up... so we decided, I guess it just doesn't have a name! It's "Our Coop". So we went with a fun sign that felt rustic and connected to us, each of the letters on it (MJMJ) are the first initials of the 4 family members' names.
Anyone who has kept chickens for awhile also knows the inevitable impermanence of them, it's just a fact of nature that some chickens stay around a long time, and some come and go. I wanted to somehow show our "flock roster" on the coop since we name most of our chickens (which if you are skilled at chicken math means I actually only have a couple chickens), but I didn't want to write them on the coop and have to take them off or worse, X them off or paint over them. So I came up with a cards-in-tray idea that has each of the individual chicken images on it in a silhouette and then their names written in sharpies below. The end turned out better than I could have imagined for two reasons- one because it looked great and I can add and remove chickens as needed, and two because my daughter finds it just the most fun thing to do to pull them all off and reorganize them regularly based on her favorite chickens of the week.
Here's Hennel walking in front of the sign. And of course the little "EST. 2020" to commemorate this build. The physical tray I built using some trim boards from Lowes and the "cards" are actually just an MDF whiteboard I cut up (you can buy whiteboard at Lowes too in the cut board section) and then attached stickers to and wrote the names with a sharpie.
IN CLOSING - I truly hope you have enjoyed reading this article about our coop build. Whether you build this coop or not, I highly suggest building your own coop if you can. There's a sense of connection to you flock and pride in your accomplishment when you build one- let alone being able to sit back and look at it with the satisfaction of a job well done. No matter what you decide, I hope you found some helpful information in this article for your own build.
And lastly, I'll leave you with a few images of "us" and our new coop on the land. From our family to yours- we wish you nothing but the best that life has to offer!