I'd love to highlight my very first coop- The Burrow! This will be a long, picture heavy article. The Burrow was inspired by the Wichita Cabin Coop and the Chick Inn.
Photos of the rough plans are posted at the bottom of the article in case it helps anyone!
First, a VERY cautionary tale, and one that has been told before. I'm not proud of any of this:

Design/Specs:
We wanted a coop that would utilize space well since we are in a suburban set up, and landed on the Witchita style design. I liked that it increased the space for the run underneath the actual coop, and looked really nice so it wouldn't piss off our neighbors. We of course needed the coop to be predator proof. Predators in my area include foxes, raccoons, hawks, eagles, bears, mountain lions, coyotes, and many more... but in reality, the biggest predator around is my absolutely bird crazy german wirehaired pointer. We also wanted a nice sized run because we did not anticipate very much free ranging occurring with aforementioned bird dog. We wanted big windows to be able to look in, and open air ventilation.
Run: 8' x 12'
Coop: 4' x 8'
Roof: Just over 7' and highest point, just over 5' at lowest point
Chickens: built for 8, could possibly stretch to 9-10
Cost: Around $3,500-$4,000 Reminder- peak lumber prices during pandemic
Timeframe (2021):
Chicks purchased May 1st (and another May 2nd... and another May 3rd..) 5 total!
Coop plans solidified May 8th
Construction began May 9th
Chicken move in day June 16th
Continued finishing touches throughout the year
Biggest lessons learned:
Construction:
After placing an online order for the scam coop and purchasing our adorable chicks, it was as I was researching more a few days later that I realized my epic mistake. I texted my best friend with a "uhhh... I need a rather large favor", and thankfully my friend agreed to help us. Without him, we would have likely needed to rehome our baby chicks.

Day one
Beer, pizza and design night. We of course supplied all beer and food for this project (plus the promise of future eggs), it was the least we could do! We let our friend know what we were thinking, pulled up coop designs on this forum and he took notes and headed home with ideas. The next time we met up to begin construction, he had full design plans with measurements ready to go. I can't even begin to express my gratitude, and I fully realize how lucky we are!

1st weekend
Laying the foundation. We selected a spot that would be shaded and wind blocked by two sides by fences. We dug a trench for our foundation, which was built off of pressure treated 6'' by 6'' fir. Sounds simple, but we are in the rocky mountains and in a former river bed, so digging in our soil is very difficult. A spud bar must be used to dig up rocks nearly the size of a teenage human's head, and you fill buckets and buckets of these just to dig small holes. For this reason, we did not lay a skirt of hardware cloth buried around the coop- our theory is that the boulders will be enough to deter burrowing predators. I do monitor for signs of burrowing near the coop and would adjust my strategy if needed! We laid the foundation, put dirt back in around it, and let it sit for a week to settle into the ground.
Construction tip: we screwed in a temporary piece of lumber between the foundation just to act as a support for the frame of the foundation while we were moving and positioning it. This lumber was removed the following weekend before working on it. My friend also had a laser thing to get out to measure to make sure it was perfectly level. Pretty cool!
2nd weekend
Framing the run! Between the first and second weekend, I was able to find some T&G boards off of craigslist that saved us a good $400-$500. We knew we were in for a VERY expensive coop, so every little bit helped. The framing design, and sizing of the entire coop was done such that we utilized the most out of every piece of lumber. The run framing was measured and built directly on the foundation (rather then assembled elsewhere then screwed onto the foundation).

Construction tip: Temporary diagonal supports added as needed in each corner for stability and holding the structure together as we worked. These were later removed, but we did end up adding permanent diagonal supports for stability of the structure near the end of the process.
The floor of the coop itself was framed and built outside of the coop, and then screwed into the existing frame of the overall structure. OSB was then used to cover the framing of the coop floor.
Then, the coop itself was framed, with the spacing measured according to placement for windows and nesting boxes.
Next up, the framing and OSB was added for the roof of both the coop and the run.
3rd Weekend
I wasn't in town this weekend so I received pictures from my husband! And I'm glad I wasn't there, because we got about a foot of snow (end of May) that had to be worked around!! My poor lilacs didn't make it. This photo was taken the following morning of the snowfall:
After shoveling out the working space, the shingles were added. We opted for shingles to match our home, and for cost savings (lol- look at us pinching pennies on a nearly $4k coop).
Next, my friend used some sort of torch type thing to dry out the OSB that was on the coop floor (wet from the snow) in order to add our laminate flooring. Laminate flooring was found in our garage leftover from an area in our home.
Construction tip: A temporary structure was built and screwed into place to press the flooring down while it dries to guarantee a good seal and no bubbles or anything! This temporary structure was screwed into the coop framing and left there until next weekend.
Hardware cloth also started being added- my friend came up with a really awesome, secure way for the hardware cloth to be sandwiched in place by the framing of our coop. The entire frame of our run was double framed so that the hardware cloth was sandwiched between two pieces of lumber. The unique part of it is in the following construction tip.
Construction tip: The double framing of the coop was done and pieced together in such a way that the hardware cloth would be framed on the inside for two of the sides of the hardware cloth piece, and the outside for other two sides. This was accomplished but cutting a square out of each corner of the hardware cloth so that two sides of the hardware cloth could be on the inside, while the opposite 2 sides could be on the outside. I tried to show this in photos- these two photos show hardware cloth that actually hasn't been double framed yet. To sandwich the hardware cloth shown in these photos, lumber needed to be added at the top and bottom on the outside, and added to the verticals on the inside of the run. This makes it so the hardware cloth is equally strong when pressure is applied on both the inside and the outside.
4th weekend
Hardware cloth continues to be added, and more framing is added to the coop to frame out the open air ventilation, windows, and nesting boxes. We planned for windows on all 4 sides of the coop to be able to add additional ventilation when needed (and so I can look in at the chickens).
Then the doors were built- the coop door is HUGE, but gives me great access to the coop. It is heavy so we needed some pretty big hardware to accommodate it. For this door, the frame was built, then the T&G added, then the window cut out. Then the hardware cloth was added to the window via framing on both sides, like the rest of the hardware cloth.
The run doors are split into two for dutch doors- I'm finding it very useful to use to be able to throw scratch and treats into the run for the chickens, and also to hand things in and out if I am in the coop and need to keep the chickens inside. Diagonal pieces of lumber were added to all doors for support for such large doors.
5th weekend
It was time to add the tongue and groove to actually enclose the coop! We knew we wanted to paint the coop prior to the chickens moving in just to make it easier, so we decided to first paint the framing of the coop since we were doing a separate color for the framing.
Painting tip: We purchased these putty knives in a few different sizes to cut the paint with instead of using tape for the hardware cloth. These little tools were a HUGE timesaver around some pretty painful detail areas.
Then it was time to add the T&G! I had been waiting for this moment, it really started to look like a coop at this point!! On the inside, when possible, the hardware cloth for the windows was framed with the tongue and groove rather than using extra framing pieces.
We have open air ventilation on 2 of the sides. We do plan on expanding this in the future to accommodate more chickens- what we have now is good for 5 chickens but I think will not be enough for 8-9 chickens. I think on the side in this photo, we will be taking the ventilation down to the window. I will also be thinking about adding ventilation on the side opposite of this, however it is our winter wind side.
Nesting boxes are framed up off the coop floor a bit.
Next came framing out and building the nesting boxes. We have 3, probably could have gotten away with 2. They prefer one of them, but all three actually do get used!
A metal edge thing was added to keep the laminate flooring down and smooth the edges. This was a really nice touch! The door slides nicely, and there are no sharp corners at all.
The coop door was also attached.
And the coop was painted! Wow! Such a crazy difference, paint really makes it look so good! The paint colors were matched to our home. I resisted the urge to do something really bright and fun, to do something more satisfying to our neighbors. I love our house colors though, so I am so happy with how it turned out!!
6th and final weekend
Run doors were attached (painted all the doors before attaching them), the nesting boxes got their lid and shingles, and hardware attached to the doors and nesting boxes. We opted for simple hardware with a carabiner to close them, but we are having issues with the doors banging in the wind. For now, I have added door stops into the crack of the coop door to make it secure but I think this summer we will be updating the hardware.
Our hen door was created, and the ramp. I was obsessive about the ramp, convinced it was way too steep for the chickens. It was totally fine, they figured it out right away!
Our hen door cord seems to not slide very well- one big mistake we made was painting the hen door after it was attached, and I think the paint affects how it slides. I also think the cord has too much give and needs to be replaced for a different material.
We also painted the inside of the coop and made sure the framing on the inside of the run was painted- we did NOT want to do this after the chickens moved in.
Here you can see the dead tree that we accommodated that we ended up having to chop down mid build.
The final detail that was needed before the chickens could move in- roosting bars! This was a secure and clever way of adding them- it makes it really easy to take them out and put them back in for cleaning, yet they are secure and do not budge for the chickens.
Move in day!
We waited a few days because it got very hot, and we wanted to do a few additional paint touch ups... but then finally, on June 16th, it was move in day!! I was so happy! I think my flock was extremely happy too! We had additional details we still needed to add, but it was ready for chickens.
In this photo you can see how I hang my weather monitor that is connected to our weather station. It monitors temp and humidity. I always assume in the cold winter that the temp near the chickens is slightly warmer because they create heat and aren't up by the open air ventilation.
The chickens were so happy and cute!
Mulch was added later in June, we knew the remaining grass wouldn't last long:
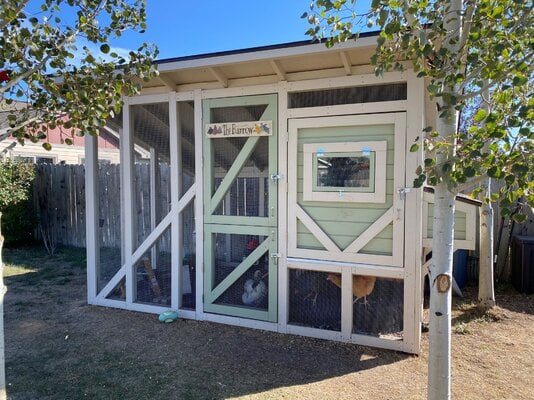
My beautiful sign that I had made from an artist on Etsy was added later in June as well:
Added a tractor tire purchased off of craigslist for their dust bath in July:
Created their feeder in July:
Windows created, painted, and added in September (Still need to add something to be able to prop them open in the summer):
Winter run wind protection added in January 2022:
I hope someone finds our build of The Burrow helpful! I'm happy to answer any questions via comment or messages. Enjoy!
Plans

Photos of the rough plans are posted at the bottom of the article in case it helps anyone!
First, a VERY cautionary tale, and one that has been told before. I'm not proud of any of this:
- DON'T come home from work on Friday, open a bottle of wine with your spouse, and decide to impulsively purchase on an online prefab coop to start your backyard chicken flock. Unfortunately, I did too little research and I'm embarrassed to say I fell for a website that was basically a scam (fairly well known on this website).
- DON'T purchase adorable baby chicks before having the coop set up and ready to go. In my defense, I had placed the online order and received the automated shipping notice. But even if you are purchasing a coop, make sure it is at your house, and set up, and absolutely what you want before bringing live chickens into the mix.
- DON'T decide to get into the backyard chicken hobby during the middle of a pandemic when lumber prices were literally at their peak (May 2021... cringing at those prices) with little planning. We realized the coop we purchased was a scam, already had our baby chicks, and had to foot the bill to get our coop constructed fast enough to house the chicks. It didn't give us enough time to search for enough deals on used materials (there weren’t a ton of great deals at the time in my area due to lumber prices), and in reality the best option would have been to WAIT.
Design/Specs:
We wanted a coop that would utilize space well since we are in a suburban set up, and landed on the Witchita style design. I liked that it increased the space for the run underneath the actual coop, and looked really nice so it wouldn't piss off our neighbors. We of course needed the coop to be predator proof. Predators in my area include foxes, raccoons, hawks, eagles, bears, mountain lions, coyotes, and many more... but in reality, the biggest predator around is my absolutely bird crazy german wirehaired pointer. We also wanted a nice sized run because we did not anticipate very much free ranging occurring with aforementioned bird dog. We wanted big windows to be able to look in, and open air ventilation.
Run: 8' x 12'
Coop: 4' x 8'
Roof: Just over 7' and highest point, just over 5' at lowest point
Chickens: built for 8, could possibly stretch to 9-10
Cost: Around $3,500-$4,000 Reminder- peak lumber prices during pandemic
Timeframe (2021):
Chicks purchased May 1st (and another May 2nd... and another May 3rd..) 5 total!
Coop plans solidified May 8th
Construction began May 9th
Chicken move in day June 16th
Continued finishing touches throughout the year
Biggest lessons learned:
- I already gave you my cautionary tale to start this article- that unfortunate set of events were the biggest mistakes we made.
- My coop and my run each are built to hold a different amount of chickens. 4' sq of space per chicken in the coop means that my coop can hold 8 chickens, and then 10' sq ft of space in the run means that my run can hold 9.6 chickens. It's nice that they have more space in the run, but I do wish these were synced. Right now I have 5 chickens and plan to add 2 more in 2023. We shall see how high I end up pushing this number, in the end. I'm thinking we might end up with 9 total at one point so that we can add 2 chicks at a time so they have a friend. But, I worry about space issues and will see how the flock dynamics progress.
- Size- of course I want a bigger coop, for more chickens! I think everyone says that. Realistically though, this was a good size for our yard. Anything larger would have been a bit obnoxious (or at least this is what my husband says...).
- Better roosting bar design. I did not fully think through my roosting bar situation well enough to accommodate a poop board under the roosting bars. Honestly though, the clean up isn't really that bad because they all roost on the bar closest to the door.
- We selected a spot, based on the layout of our yard and where we could get them some shade and wind block. This spot required us to be very close to two trees. This limited the size of the coop and made it difficult to work, as well as made it so we had to place it in just the right spot. I’m reality, we would have liked to place it a little closer to our fence. One of the trees ended up dying (discovered while we were building), and we ended up cutting down the second (they were part of an aspen cluster). In hindsight, we should have just done this from the start to clear the space for the coop and place it in our ideal place.
- Dutch doors to the run have been super useful.
- Having a full roof over the coop is very valuable in my area- provides shade in the summer, and insulates in the winter when it is covered in snow.
- The way the hardware cloth was done is unique and makes it extra predator proof- something my bird dog tests daily. I detail this later in the article
- The wichita style coop provides an area under the coop for which I keep their dust bath- it's always dry under there.
- It looks fantastic. There's no denying that part!
Construction:
After placing an online order for the scam coop and purchasing our adorable chicks, it was as I was researching more a few days later that I realized my epic mistake. I texted my best friend with a "uhhh... I need a rather large favor", and thankfully my friend agreed to help us. Without him, we would have likely needed to rehome our baby chicks.
Day one
Beer, pizza and design night. We of course supplied all beer and food for this project (plus the promise of future eggs), it was the least we could do! We let our friend know what we were thinking, pulled up coop designs on this forum and he took notes and headed home with ideas. The next time we met up to begin construction, he had full design plans with measurements ready to go. I can't even begin to express my gratitude, and I fully realize how lucky we are!
1st weekend
Laying the foundation. We selected a spot that would be shaded and wind blocked by two sides by fences. We dug a trench for our foundation, which was built off of pressure treated 6'' by 6'' fir. Sounds simple, but we are in the rocky mountains and in a former river bed, so digging in our soil is very difficult. A spud bar must be used to dig up rocks nearly the size of a teenage human's head, and you fill buckets and buckets of these just to dig small holes. For this reason, we did not lay a skirt of hardware cloth buried around the coop- our theory is that the boulders will be enough to deter burrowing predators. I do monitor for signs of burrowing near the coop and would adjust my strategy if needed! We laid the foundation, put dirt back in around it, and let it sit for a week to settle into the ground.
Construction tip: we screwed in a temporary piece of lumber between the foundation just to act as a support for the frame of the foundation while we were moving and positioning it. This lumber was removed the following weekend before working on it. My friend also had a laser thing to get out to measure to make sure it was perfectly level. Pretty cool!
2nd weekend
Framing the run! Between the first and second weekend, I was able to find some T&G boards off of craigslist that saved us a good $400-$500. We knew we were in for a VERY expensive coop, so every little bit helped. The framing design, and sizing of the entire coop was done such that we utilized the most out of every piece of lumber. The run framing was measured and built directly on the foundation (rather then assembled elsewhere then screwed onto the foundation).
Construction tip: Temporary diagonal supports added as needed in each corner for stability and holding the structure together as we worked. These were later removed, but we did end up adding permanent diagonal supports for stability of the structure near the end of the process.
The floor of the coop itself was framed and built outside of the coop, and then screwed into the existing frame of the overall structure. OSB was then used to cover the framing of the coop floor.
Then, the coop itself was framed, with the spacing measured according to placement for windows and nesting boxes.
Next up, the framing and OSB was added for the roof of both the coop and the run.
3rd Weekend
I wasn't in town this weekend so I received pictures from my husband! And I'm glad I wasn't there, because we got about a foot of snow (end of May) that had to be worked around!! My poor lilacs didn't make it. This photo was taken the following morning of the snowfall:
After shoveling out the working space, the shingles were added. We opted for shingles to match our home, and for cost savings (lol- look at us pinching pennies on a nearly $4k coop).
Next, my friend used some sort of torch type thing to dry out the OSB that was on the coop floor (wet from the snow) in order to add our laminate flooring. Laminate flooring was found in our garage leftover from an area in our home.
Construction tip: A temporary structure was built and screwed into place to press the flooring down while it dries to guarantee a good seal and no bubbles or anything! This temporary structure was screwed into the coop framing and left there until next weekend.
Hardware cloth also started being added- my friend came up with a really awesome, secure way for the hardware cloth to be sandwiched in place by the framing of our coop. The entire frame of our run was double framed so that the hardware cloth was sandwiched between two pieces of lumber. The unique part of it is in the following construction tip.
Construction tip: The double framing of the coop was done and pieced together in such a way that the hardware cloth would be framed on the inside for two of the sides of the hardware cloth piece, and the outside for other two sides. This was accomplished but cutting a square out of each corner of the hardware cloth so that two sides of the hardware cloth could be on the inside, while the opposite 2 sides could be on the outside. I tried to show this in photos- these two photos show hardware cloth that actually hasn't been double framed yet. To sandwich the hardware cloth shown in these photos, lumber needed to be added at the top and bottom on the outside, and added to the verticals on the inside of the run. This makes it so the hardware cloth is equally strong when pressure is applied on both the inside and the outside.
4th weekend
Hardware cloth continues to be added, and more framing is added to the coop to frame out the open air ventilation, windows, and nesting boxes. We planned for windows on all 4 sides of the coop to be able to add additional ventilation when needed (and so I can look in at the chickens).
Then the doors were built- the coop door is HUGE, but gives me great access to the coop. It is heavy so we needed some pretty big hardware to accommodate it. For this door, the frame was built, then the T&G added, then the window cut out. Then the hardware cloth was added to the window via framing on both sides, like the rest of the hardware cloth.
The run doors are split into two for dutch doors- I'm finding it very useful to use to be able to throw scratch and treats into the run for the chickens, and also to hand things in and out if I am in the coop and need to keep the chickens inside. Diagonal pieces of lumber were added to all doors for support for such large doors.
5th weekend
It was time to add the tongue and groove to actually enclose the coop! We knew we wanted to paint the coop prior to the chickens moving in just to make it easier, so we decided to first paint the framing of the coop since we were doing a separate color for the framing.
Painting tip: We purchased these putty knives in a few different sizes to cut the paint with instead of using tape for the hardware cloth. These little tools were a HUGE timesaver around some pretty painful detail areas.
Then it was time to add the T&G! I had been waiting for this moment, it really started to look like a coop at this point!! On the inside, when possible, the hardware cloth for the windows was framed with the tongue and groove rather than using extra framing pieces.
We have open air ventilation on 2 of the sides. We do plan on expanding this in the future to accommodate more chickens- what we have now is good for 5 chickens but I think will not be enough for 8-9 chickens. I think on the side in this photo, we will be taking the ventilation down to the window. I will also be thinking about adding ventilation on the side opposite of this, however it is our winter wind side.
Nesting boxes are framed up off the coop floor a bit.
Next came framing out and building the nesting boxes. We have 3, probably could have gotten away with 2. They prefer one of them, but all three actually do get used!
A metal edge thing was added to keep the laminate flooring down and smooth the edges. This was a really nice touch! The door slides nicely, and there are no sharp corners at all.
The coop door was also attached.
And the coop was painted! Wow! Such a crazy difference, paint really makes it look so good! The paint colors were matched to our home. I resisted the urge to do something really bright and fun, to do something more satisfying to our neighbors. I love our house colors though, so I am so happy with how it turned out!!
6th and final weekend
Run doors were attached (painted all the doors before attaching them), the nesting boxes got their lid and shingles, and hardware attached to the doors and nesting boxes. We opted for simple hardware with a carabiner to close them, but we are having issues with the doors banging in the wind. For now, I have added door stops into the crack of the coop door to make it secure but I think this summer we will be updating the hardware.
Our hen door was created, and the ramp. I was obsessive about the ramp, convinced it was way too steep for the chickens. It was totally fine, they figured it out right away!
Our hen door cord seems to not slide very well- one big mistake we made was painting the hen door after it was attached, and I think the paint affects how it slides. I also think the cord has too much give and needs to be replaced for a different material.
We also painted the inside of the coop and made sure the framing on the inside of the run was painted- we did NOT want to do this after the chickens moved in.
Here you can see the dead tree that we accommodated that we ended up having to chop down mid build.
The final detail that was needed before the chickens could move in- roosting bars! This was a secure and clever way of adding them- it makes it really easy to take them out and put them back in for cleaning, yet they are secure and do not budge for the chickens.
Move in day!
We waited a few days because it got very hot, and we wanted to do a few additional paint touch ups... but then finally, on June 16th, it was move in day!! I was so happy! I think my flock was extremely happy too! We had additional details we still needed to add, but it was ready for chickens.
In this photo you can see how I hang my weather monitor that is connected to our weather station. It monitors temp and humidity. I always assume in the cold winter that the temp near the chickens is slightly warmer because they create heat and aren't up by the open air ventilation.
The chickens were so happy and cute!
Mulch was added later in June, we knew the remaining grass wouldn't last long:
My beautiful sign that I had made from an artist on Etsy was added later in June as well:
Added a tractor tire purchased off of craigslist for their dust bath in July:
Created their feeder in July:
Windows created, painted, and added in September (Still need to add something to be able to prop them open in the summer):
Winter run wind protection added in January 2022:
I hope someone finds our build of The Burrow helpful! I'm happy to answer any questions via comment or messages. Enjoy!
Plans