(this article was remade now that I have a little more knowledge on incubating quail eggs)
Gather the necessary equipment:
First, gather the necessary equipment for incubating Coturnix quail eggs, including an incubator with a built-in thermostat and humidity control. You will also need a hygrometer to measure humidity levels and a spray bottle for maintaining humidity. Ensure that the incubator is clean and disinfected before use, and set it up according to the manufacturer's instructions.
Preparing before Incubation:
Coturnix quail eggs should be stored at room temperature (around 70°F or 21°C) for no more than ten days before incubation.
Marking & turning the eggs:
After the pre-incubation period, carefully place the quail eggs in the incubator. Ensure they are positioned horizontally with the pointy ends slightly lower than the rounded ends. If you're using an automatic egg turner, place the eggs in the provided slots. Otherwise, manually turn the eggs at least three times a day, marking one side with an "X" and the other with an "O" to track rotation.

Temperature & Humidity:
Maintaining the correct temperature and humidity levels is crucial for successful incubation. Set the incubator's temperature to around 100°F (38°C) for Coturnix quail eggs. Check the thermometer regularly to ensure accuracy and adjust the thermostat if needed. Gradually increase humidity levels throughout incubation, starting with 50-60% for the first 14 days and then increasing to 70-80% during the final days.
(As you can see in the photo my humidity is way too low)
When to manually turn eggs:
During the incubation period, whether using an automatic egg turner or performing manual rotations, ensure the eggs are turned at least three times a day to prevent sticking and maintain healthy development. Alternate between the marked "X" and "O" sides when manually turning the eggs, being gentle and careful not to shake or drop them.
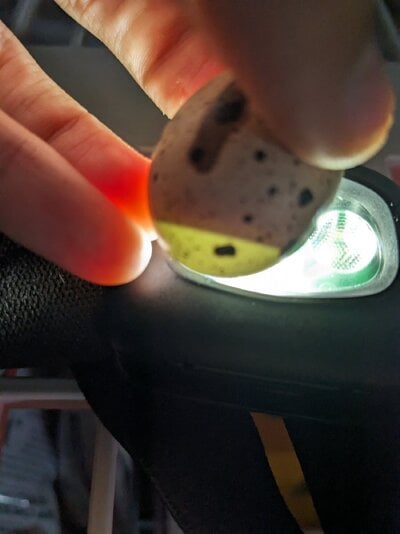
Candling:
Around day 7 of incubation, you can begin candling the eggs. Hold each egg up to a bright light source, such as a flashlight, in a dark room, and gently rotate it to observe the developing veins and a well-defined air sac. Discard any clear, unfertilized eggs. On day 16, initiate the lock-down period by stopping egg turning and maintaining high humidity levels (70-80%) to facilitate hatching.
(Photo from when I candled a fertile and developing egg on day 4 of incubation)
Here is an infertile egg on day 4-5
Lockdown:
As the hatch day approaches, you may notice the quail chicks beginning to pip (make small holes) in the eggshell. Do not interfere with the hatching process unless necessary. The chicks will usually hatch on their own within a day or two. Maintain high humidity levels to prevent the egg membrane from drying out and hindering the hatch. Once the chicks have hatched, transfer them to a brooder with a heat source, fresh water, and a suitable starter feed designed for quail. Observe the chicks closely for any health issues or abnormalities and remove any unhatched or weak chicks from the incubator.
(Picture taken from my old incubator during lockdown)
Remember to refer to specific incubator guidelines and adjust the incubation process accordingly based on the breed of Coturnix quail you are incubating.
Types of incubators I recommend in general:
there are lots of different incubators our there but some of my all time favorites have been the Nature right 360 incubator, Kebonnix incubator, and the Hova incubator, these incubators work amazing for quail eggs especially!
(My Kebonnix incubator in the box)
(With the quail eggs and lid removed)
(The Kebonnix incubator egg candling feature)
Gather the necessary equipment:
First, gather the necessary equipment for incubating Coturnix quail eggs, including an incubator with a built-in thermostat and humidity control. You will also need a hygrometer to measure humidity levels and a spray bottle for maintaining humidity. Ensure that the incubator is clean and disinfected before use, and set it up according to the manufacturer's instructions.
Preparing before Incubation:
Coturnix quail eggs should be stored at room temperature (around 70°F or 21°C) for no more than ten days before incubation.
Marking & turning the eggs:
After the pre-incubation period, carefully place the quail eggs in the incubator. Ensure they are positioned horizontally with the pointy ends slightly lower than the rounded ends. If you're using an automatic egg turner, place the eggs in the provided slots. Otherwise, manually turn the eggs at least three times a day, marking one side with an "X" and the other with an "O" to track rotation.
Temperature & Humidity:
Maintaining the correct temperature and humidity levels is crucial for successful incubation. Set the incubator's temperature to around 100°F (38°C) for Coturnix quail eggs. Check the thermometer regularly to ensure accuracy and adjust the thermostat if needed. Gradually increase humidity levels throughout incubation, starting with 50-60% for the first 14 days and then increasing to 70-80% during the final days.
(As you can see in the photo my humidity is way too low)
When to manually turn eggs:
During the incubation period, whether using an automatic egg turner or performing manual rotations, ensure the eggs are turned at least three times a day to prevent sticking and maintain healthy development. Alternate between the marked "X" and "O" sides when manually turning the eggs, being gentle and careful not to shake or drop them.
Candling:
Around day 7 of incubation, you can begin candling the eggs. Hold each egg up to a bright light source, such as a flashlight, in a dark room, and gently rotate it to observe the developing veins and a well-defined air sac. Discard any clear, unfertilized eggs. On day 16, initiate the lock-down period by stopping egg turning and maintaining high humidity levels (70-80%) to facilitate hatching.
(Photo from when I candled a fertile and developing egg on day 4 of incubation)
Here is an infertile egg on day 4-5
Lockdown:
As the hatch day approaches, you may notice the quail chicks beginning to pip (make small holes) in the eggshell. Do not interfere with the hatching process unless necessary. The chicks will usually hatch on their own within a day or two. Maintain high humidity levels to prevent the egg membrane from drying out and hindering the hatch. Once the chicks have hatched, transfer them to a brooder with a heat source, fresh water, and a suitable starter feed designed for quail. Observe the chicks closely for any health issues or abnormalities and remove any unhatched or weak chicks from the incubator.
(Picture taken from my old incubator during lockdown)
Remember to refer to specific incubator guidelines and adjust the incubation process accordingly based on the breed of Coturnix quail you are incubating.
Types of incubators I recommend in general:
there are lots of different incubators our there but some of my all time favorites have been the Nature right 360 incubator, Kebonnix incubator, and the Hova incubator, these incubators work amazing for quail eggs especially!
(My Kebonnix incubator in the box)
(With the quail eggs and lid removed)
(The Kebonnix incubator egg candling feature)