Setting up a perfect DIY brooder temperature control system on a budget.
#1. Most common is using distance between the brooder and the light.
#2. Is using a dimmer to control the brooders temperature.
#3. Is using a temperature controller.
#1 & #2 are the most common. I started with #1 in early years and went with #3 later.
Pros to #1 is little to no cost.
Con is similar to #1 and #2. Unless surrounding environment is controlled to an exact temperature you're constantly readjusting and humidity can play a factor as well. Exact temperatures are virtually impossible to achieve. Most thermostats are set to 1 to 2 degrees above and below their set temperature 🌡 So your brooder temperature will vary by 1 to 2 degrees at best.
Also, with #1 constantly having to tweak distance which can be maddening and with method #1 and #2 no alarm to alert of wide swings in temperature.
Pro to #3 is that you can control temperature 🌡 with variances to your specifications with an alarm should they deviate.
Con is light will be going off/on more frequently depending on your set range greatly reducing operating life of your light.
There is a solution.
Combine dimmer with a temperature 🌡 controller.
The dimmer will allow you to fine tune the light so when the temperature varies it will be minimized and under ideal circumstances the light will stay on greatly increasing the operating life of the bulb.
Also, have the advantage of an alarm for the temperature 🌡 controller to alert you if the environment has caused the temperature to drop greatly below the set temperature.
We even have an inexpensive baby alarm to relay the condition to our home. You could do more complex wireless solutions but then your installation cost will go up extensively.
Since most thermostats vary by 1 to 2 degrees recommend the following setup:
If you want your to keep the temperature at 95 degrees F set temperature controller to 96 degrees and it's lower temperature 🌡 to 94 degrees.
Then fine tune dimmer so the actual temperature will nominally be a stable 95 degrees.
In this case the temperature controller will drive the heat to 95 degrees but not more because the dimmer has ensured the temperature cannot exceed 95 degrees under normal conditions.
However if the temperature were to rise above 96 degrees due to unforeseen circumstances the controller would immediately shut off the light until the temperature falls below 96 degrees again.
On the lower end if temperature were to fall below 94 degrees due to unforeseen circumstances the temperature 🌡 controller would automatically alarm
You can get a temperature controller for around $35 and a dimmer for around $10. Total investment of $45.
Other than power failure you can control temperature within a 1 degree variance.
Has advantage of a worry free system other than power failure. This too can be addressed but now we're talking about power backups that can get into $100's and even $1,000s and unfortunately while these systems can power a computer for 24 hours they can only power a 150 watt bulb for about 90 minutes.
Can also buy bulbs that have built in backup power but the dimmable is separately controlled from dimmer in your system and during this time you would have no control over brightness. If power goes out during cold winter your brooder temperature would get too cold and in the summer too hot but this would also be true of the power backup system.
To actually set it up for first time suggest setting the temperature controller to above your target temperature at first say 100 degrees for a 95 degree target.
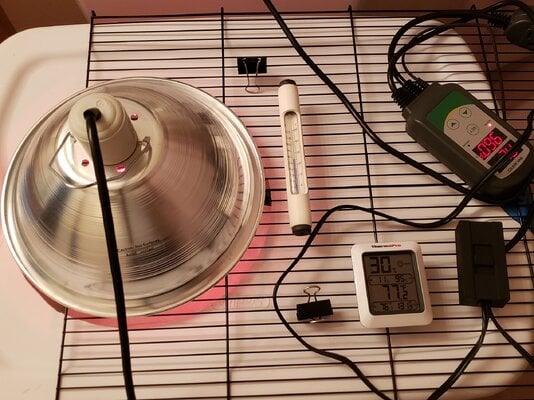
Use your slider to adjust luminosity until the external thermometer (I use two different kinds of thermometers. A bulb and digital side by side.) is stable at 95 degrees.
The thermometers should initially be directly underneath the light. After setting you can move the digital and bulb thermometer to other parts of the brooder to monitor.
Always have a bulb thermometer in your brooders and check often. Digital thermometers sometimes fail.
Then set your temperature controller to 96 degrees and the upper range to 1 degree and lower range to 2 degrees.
Next might have to calibrate the temperature sensor to match the temperature of the external stable digital thermometer. The thermal coupler should be underneath the bedding therefore will have a different temperature than the thermometers on the surface. Never trust the thermal coupler as your only source of temperature measurement.
Personally I only trust the bulb thermometer for true temperature but be careful here as well because bulb thermometers take time to stabilize to true temperature.
The setup should now keep the light on and maintain a constant stable temperature.
A final note even if there isn't a power failure on the dimmer controlled system. In the winter the dimmer limited system could get too cold while w/o the dimmer there would be better chance of maintaining the set temperature with the temperature controller. This is because you've limited the brightness of the lamp but you would get an alarm however if you're not at home that's of little value.
In the future I might post on a more advanced system using wifi alarms & controls, however I have to first create one and test it with a brood before posting.
The system I describe above is the one I currently use to manage the temperature of my brooder.
Lot to think about and could also improve but improvisation means more money
Just depends on whats more important.
Hope this helps if considering making your DIY brooder temperature 🌡 controller system less worrisome.
#1. Most common is using distance between the brooder and the light.
#2. Is using a dimmer to control the brooders temperature.
#3. Is using a temperature controller.
#1 & #2 are the most common. I started with #1 in early years and went with #3 later.
Pros to #1 is little to no cost.
Con is similar to #1 and #2. Unless surrounding environment is controlled to an exact temperature you're constantly readjusting and humidity can play a factor as well. Exact temperatures are virtually impossible to achieve. Most thermostats are set to 1 to 2 degrees above and below their set temperature 🌡 So your brooder temperature will vary by 1 to 2 degrees at best.
Also, with #1 constantly having to tweak distance which can be maddening and with method #1 and #2 no alarm to alert of wide swings in temperature.
Pro to #3 is that you can control temperature 🌡 with variances to your specifications with an alarm should they deviate.
Con is light will be going off/on more frequently depending on your set range greatly reducing operating life of your light.
There is a solution.
Combine dimmer with a temperature 🌡 controller.
The dimmer will allow you to fine tune the light so when the temperature varies it will be minimized and under ideal circumstances the light will stay on greatly increasing the operating life of the bulb.
Also, have the advantage of an alarm for the temperature 🌡 controller to alert you if the environment has caused the temperature to drop greatly below the set temperature.
We even have an inexpensive baby alarm
to relay the condition to our home. You could do more complex wireless solutions but then your installation cost will go up extensively.Since most thermostats vary by 1 to 2 degrees recommend the following setup:
If you want your to keep the temperature at 95 degrees F set temperature controller to 96 degrees and it's lower temperature 🌡 to 94 degrees.
Then fine tune dimmer so the actual temperature will nominally be a stable 95 degrees.
In this case the temperature controller will drive the heat to 95 degrees but not more because the dimmer has ensured the temperature cannot exceed 95 degrees under normal conditions.
However if the temperature were to rise above 96 degrees due to unforeseen circumstances the controller would immediately shut off the light until the temperature falls below 96 degrees again.
On the lower end if temperature were to fall below 94 degrees due to unforeseen circumstances the temperature 🌡 controller would automatically alarm
You can get a temperature controller for around $35 and a dimmer for around $10. Total investment of $45.
Other than power failure you can control temperature within a 1 degree variance.
Has advantage of a worry free system other than power failure. This too can be addressed but now we're talking about power backups that can get into $100's and even $1,000s and unfortunately while these systems can power a computer for 24 hours they can only power a 150 watt bulb for about 90 minutes.
Can also buy bulbs that have built in backup power but the dimmable is separately controlled from dimmer in your system and during this time you would have no control over brightness. If power goes out during cold winter your brooder temperature would get too cold and in the summer too hot but this would also be true of the power backup system.
To actually set it up for first time suggest setting the temperature controller to above your target temperature at first say 100 degrees for a 95 degree target.
Use your slider to adjust luminosity until the external thermometer (I use two different kinds of thermometers. A bulb and digital side by side.) is stable at 95 degrees.
The thermometers should initially be directly underneath the light. After setting you can move the digital and bulb thermometer to other parts of the brooder to monitor.
Always have a bulb thermometer in your brooders and check often. Digital thermometers sometimes fail.
Then set your temperature controller to 96 degrees and the upper range to 1 degree and lower range to 2 degrees.
Next might have to calibrate the temperature sensor to match the temperature of the external stable digital thermometer. The thermal coupler should be underneath the bedding therefore will have a different temperature than the thermometers on the surface. Never trust the thermal coupler as your only source of temperature measurement.
Personally I only trust the bulb thermometer for true temperature but be careful here as well because bulb thermometers take time to stabilize to true temperature.
The setup should now keep the light on and maintain a constant stable temperature.
A final note even if there isn't a power failure on the dimmer controlled system. In the winter the dimmer limited system could get too cold while w/o the dimmer there would be better chance of maintaining the set temperature with the temperature controller. This is because you've limited the brightness of the lamp but you would get an alarm
however if you're not at home that's of little value.In the future I might post on a more advanced system using wifi alarms & controls, however I have to first create one and test it with a brood before posting.
The system I describe above is the one I currently use to manage the temperature of my brooder.
Lot to think about and could also improve but improvisation means more money
Just depends on whats more important.
Hope this helps
if considering making your DIY brooder temperature 🌡 controller system less worrisome.