About 3 years ago our family moved out to the country and live on 10 acres. We had talked about doing different types of homesteading activities and near the top of the list was raising chickens. Several of our neighbors have them so we asked lots of questions, saw how they did things, and I did lots of research online. When March of this year came and the kids and I were out of school for the rest of the semester, I decided to focus on something positive: my plans for chickens and a coop! It gave me something to focus on and look forward to instead of all the crazy going on. I spent hours learning SketchUp to make my plans. I planned out costs. I spent hours on Pinterest and BYC. And after hours and hours of work, I am now mostly done and excited to share it with you!
In all my searching, I came across a coop by the blogger Twelve On Main which I loved and was my inspiration for my plans. (Original design). I liked how she had a shed portion for storage and the coop section. I also liked the attached closed in run. I felt that was important for where we live as there are a lot of predators including coyotes, bobcats, hawks, owls, and I even saw a bald eagle last week. Our acreage used to be a farm field so it is completely bare. Not even a shrub for protection. So the covered run. So I took her design and made a plan on SketchUp. Here is a video of my plan:
Here are some layouts of the plan that I used in the building process. This is how envisioned it looking with a fenced in garden area that they could have to roam with raised garden beds. I also planned on a rain barrel to collect water to use for the gardens and chickens. However, with lumber prices being what they are, the full plan will have to wait.

These are the line drawings of what it was going to look like.
Below are the dimensions that I originally planned. The final building didn't end up being exactly like the plans, but they were the starting point for my father-in-law to do most of the framing. A copule of big changes were that I made the finished run about 16 feet long instead of 10. I also made my shed portion of the coop go to the 4th stud instead of the 3rd. It gave me a bit more storage room and the chicks still have plenty of room themselves.

Here are some close ups of what I planned for the inside. I ended up going with a single level roost bar that stretches the whole length instead of the one pictured here. I have a poop board under the roost. Beneath that, I built removeable panels to create a brooder area. It has an access door for the human and a small door for chicks. The middle wall would have an access door for the nest boxes so I could be in out of the weather while I collect eggs. I had also planned an automatic feeder that could be filled from inside the coop and be accessed from the run. For right now, that is not what I did, but it is shown in the plan. I had also planned just a shelf to put milk crate nest boxes on, but I ended up doing something different for that as well. It's amazing how many changes you make as you go along!
I originally planned to do concrete post foundation, but instead went with skids on concrete blocks. Much less work and way cheaper and so far working just fine.
Once I had all the plans done, we thought we would wait until spring of 2021 to get the chicks. But then we looked around at everything going on, how hard it was to get meat and eggs, and decided to do it sooner. I researched about fall chicks and we decided to go for it. I ordered some chicks from My Pet Chicken to arrive the last week of September. With a deadline coming, it was time to get started!
It was off to Home Depot for the first of many, many (many, many) time. It was time to start building the foundation. As I said, we went with concrete blocks and skids for the foundation. I hadn't really built much more than Ikea furniture, so my dad came over to help me. We laid out the base using 2x6s and used joist hangers set 16" on center. All the lumber for the foundation was ground contact pressure treated. As you can see, I had a super cute helper!
Once we had the base made in the garage, a bunch of the neighbor guys came over to help carry it out to the site. It was heavy! Somehow, we were super blessed that it was level and square without having to dig the blocks or anything. Then a couple of the guys helped me screw down the plywood floor. Great tip: if you can get an impact driver, not just a drill, it goes so much better! (I had no idea what the difference between these two things were before this project, but in short, the impact driver uses more force when screwing things in so you don't get as tired as quickly.)

Then I decided to waterproof the floor to make the cleaning of the coop easier. I used an roofing paint. In the end, this turned out to be a waste because it got all chipped up the first day of framing. Oh well, you live, you learn.
A couple of weeks later, my father-in-law came down to frame the main part of the coop. It was off to Home Depot for another large haul. It was a good thing we borrowed the big trailer from my friend as it was pretty full!
Craig (my father-in-law) framed the coop using standard techniques. It was 2x4s set 16" on center. The whole building was sized to maximize dimensional lumber. So 3 sheets of plywood for the flooring, full panel siding. Less cuts, less waste.
After framing the walls, he then put LP Smartboard siding on. The height of the walls was determined by the height of the siding (8') less overhang over the base. It required 3 full panels for each side and 2 for each end.
Then he started on the roof. I wanted a metal roof with open eaves and a gable vent. Since the roof was so light, Craig set the rafters (2x6s) around 30 inches apart. He then put in purloins to attach the roof to and the ridge cap. There is about a 2 inch gap at the top that the cap covers so lots of space up high for moisture to escape. We also left the eaves open for cross ventilation.
I bought the small, but fully functioning windows at shedwindowsandmore.com. They were perfect for what I needed.
After he had framed the coop and the inner wall, he went back home and then it was up to me to start putting in the details. I made a Dutch door for the front.
I put a thin panel board on the back wall behind the roost to make it easier to clean. This also would protect the wiring that my dad was running for me. I also built the roost and the poop boards. The roost itself and the bottom boards of the poop board are all removable for easy cleaning.
I built the brooder panels. There are 3. The main one has a section that folds down so that I can add food, water, and clean without the chicks getting out. There is also a double chicken door. It has a large sized hen door so if there is a broody hen she can get in and out but still have her own space. When that door is down, it has a small chick size door so that if I am raising any hatched chicks without a broody hen, they can get in and out to play with the big girls, but also have a safe space to go. Then a little door closes over that if they all need to stay in.
The area under the poop board can be divided in 2 or left as one large area. My panel on the right just has the people access and no chick door. When I am not needing it as a brooder or infirmary or such, all the panels can be removed and stored in the shed section.

I also worked on framing the nesting boxes. There are 2 communal ones for now, I will see how it goes. They aren't finished yet since I just have a board over it so they won't get in until they are old enough to lay. But I did build the access doors.
The next step was painting. A friend loaned me their paint sprayer. It was my first time using one. Once I figured it out, it went pretty well. It did use a lot of paint though. I started with a base of Kilz to prime and seal it all (took about 3 gallons). Then I used leftover paint from building our house. I did one coat of what was probably leftover ceiling paint. Then I covered everything with the rest of the enamel paint that was used on our cabinets and trim. This was great as it is super easy to wipe down and clean.
After painting, it was time to start putting up the rest of the hardware cloth. The eaves were covered, the half wall, the screen door, everything. I used half inch hardware cloth and air powered staple gun with lots and lots of staples. In a couple of places where I messed up and needed to take it down, I had to resort to cutting the staple with the wire cutters, so I feel pretty confident that an animal won't break through it. The wire will give before the staple.
I also covered my failed flooring experiment with vinyl flooring. Home Depot had remnants sized 8'x6' for a reasonable price. Lucky for me, the cute ones were just as much as the ugly ones, so now it looks nice. We installed it by sliding the edges under the framing and then used special flooring adhesive tape to keep the seams and exposed edges down.
While I was doing all this, my dad was busy running wiring in the coop. I knew I wanted to have electricity out there. He put in an outlet in the brooder area that I can plug the heating plate into. There is also a light fixture in the coop section, a fixture in the shed portion, and exterior fixture. I also have an outlet in the shed portion and one outside. I put the main lights on a dimmer so that I can have just a little light at night if needed and not blinding bright if I'm doing chores after dark.
To run the wiring and to help make the coop predator proof, we rented a trencher. It says "EZ Trench," but let me tell you, they lie! It was a lot of work, but I got trenches dug all around the base of the coop, the outline of the run, and to the house for the wire. It is a foot deep and I buried hardware cloth all around and then made an apron. I then attached it to the base of the coop and covered it with trim.
We then started the base of the run. It is 4x6's on their side. We leveled it then attached the hardware cloth. Then the bottom board of the framing was attached, sandwiching the hardware cloth in between.
My hardware cloth was 3' wide, so we used some leftover 2x6s on their side every 3 feet to frame the run. A 2x4 was placed in-between for added support. The roof was then framed and roofed the same way as the coop. As you can see, the roofline is different from my drawings due to the slope of the land. To have the roofs intersect like my plan showed would have been difficult and would have made the roof of the run super high. As it is, it is about 7 feet at the peak.
Also due to height, the door to the run is on the end instead of the side. I put on the hardware cloth and covered the seams with a 2x4 screwed in. Since it is pretty cold here now and the wind is AWFUL here (regularly 20-40 mph days), I put clear shower curtains over 2/3 of the run to help block the wind. I put those on and then screwed the 2x4s back on to hold it in place. Then I put some scrap wood in between to help keep it from flapping so much.
On the inside, I covered the windows with hardware cloth frames so in the summer I can open the windows but still have it protected. The frames are on hinges so I can easily open the cover to put the window up or down.
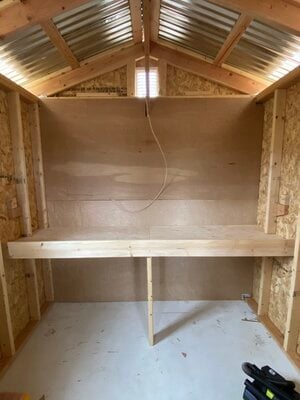
Now it is pretty much finished! I still will need to paint the exterior in the spring once it is warm enough. I will also have to finish up the nest boxes when they are closer to laying. But I have my storage area all done up, including a shop vac for easy cleaning. I love going out there and the chicks seem to like it too! Here is a little tour of the finished coop.
Front door with porch. I put solar lights so I wouldn't fall off in the dark.
Looking in from the front (before I put in the storage shelves).

Snuggle area
Storage area with shop vac and cleaning supplies.
Coop area
To be completed nesting boxes.
First night in the coop. I'm using a product called Sani-Care Horse Bedding for the bedding. It is dust free, very absorbent and has no odor. It sifts almost as easily as the Sweet PZD that I use on the poop board.
The run was completed a few weeks after the coop. Once the run was done, I installed the Ador Chicken Door. Here is Goldie our Green Queen Easter Egger checking it out.
Inside the run. I am planning on adding some roosts and a dust bath area. We have a plug in heated waterer since it is getting down into the 20s at night here.
Update-
We have had the coop a couple of years now and have added to our flock and made some improvements. Inside, I added two more roosts since we have almost 30 chickens now. I also added a lower level nesting box and put dividers in the others.
In this photo you can see the additional bars. You can also see the built in brooder area in action. These baby chicks integrated without any issues and slept there until they were big enough to go up higher. You can also see the vinyl tablecloth I use to keep poop off the wall. I switch them out seasonally. At less than $4/piece from Walmart, I’ve found they work well to make cleaning easier and make it more fun!
Here is the new nesting boxes.
Outside, I made some PVC pipe feeders. With these I only have to fill them about every week to 10 days depending on how much they are getting from free ranging.
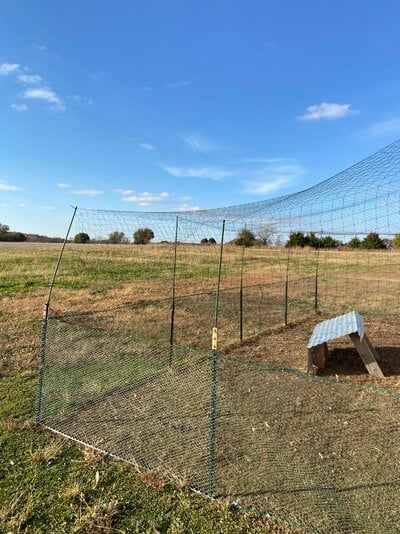
We also had some problems with hawks. I lost about 3 hens and so we built a run area outside with netting over it. It has been helpful for times when hawk activity is high or before the birds are full grown. We also have a rooster now which has helped quite a bit. It’s not pretty, but it was quick and fairly inexpensive. It is just T posts, plastic poultry wire, and a hawk net from Amazon held up with garden stakes. These are pictures from when we first installed it, but over a year later it is still working well.
My project this summer was a to build a better waterer. I was using a 5 gallon bucket but was having to refill often. We were going on vacation and I didn’t want my chicken sitter to have to worry about it in the heat. So I used the idea from Carolina Coops to build a water bar attached to a 55 gallon water barrel we had.
To build it I bought the water barrel fixtures, nipples, and pump off of Amazon. At Home Depot I got the hoses and PVC parts. It took me about a day to do since I am slow. I have been very happy with it. It doesn’t leak, however the pressure is enough that when the chickens active the nipples, extra water comes out so there are some small muddy areas right under them. But I’m willing to put up with that. I only have to fill it once a month or so. The pump has also kept any algae from growing that I can see. This winter I will drop a stock tank heater down in it and hope it stays ice free!

I still haven’t painted, but that’s on the plan for this fall!