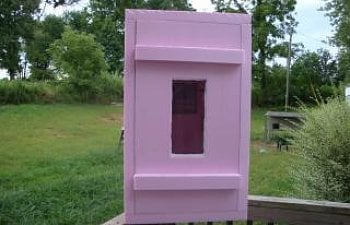
My Pink Bator
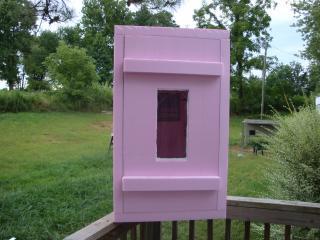
This is my first shot at making a incuabator
and byc page
")
Parts list
1- Sheet 4'x8' of 2" insualation foam (from HD)
1- Bottle of polyurethane glue (elmers ultimate glue)
1- Piece of plexiglass for the window (Mine is 7"x15")
1- 8' extension cord
1- Small tube of silicone
1- Thermostat (fishtank heater or lower hotwater)I used a fishtank
1- Light fixture
6- Small machine screws 3" long
6- Nuts and washers for the screws
1- Small fan (radio shack one that takes 120v AC not 12v DC unless ya want a inverter
3- Feet of wire
Overall Size
40" tall and 23 3/4" wide and deep
How its Made
Be sure to make all cuts square
- Take the foam and cut 2 pieces 36" x 23 3/4" (Sides)
- Cut 2 pieces 36" x 19 3/4" (Door & Back)
- Cut 2 pieces 23 3/4" x 23 3/4" (Top & Bottom)
- Cut 2 pieces 36" x 1" (Side Door Seals)
- Cut 2 pieces 21 3/4" x 1" (Top and Bottom Door Seals)
- Take a bottom piece and stand both sides up and put the back in place make sure everything fits
- Take apart and apply glue on the bottom of 1 side and stand in place
- Apply glue to the bottom and 1 side of the back and install in place
- Apply glue to the bottom of the other side and the other end of the back and install the side
- Apply glue to the tops of the sides and back and install the top
- Make sure everything is square and set something on top to hold everything together
- Apply a clamp to the sides at the back
- * The glue expands as it drys*
- Allow time to dry (I let mine set over night)
- Make mark inside all 4 corners where the door would sit 2" deep
- Glue all the door seals in and allow glue to dry
- Lay the plexiglass what ever size you have (Mine is 7" x 15") and place where ever you want the window
- Mark around the window and then scribe another mark 1/4" inside the outline
- Cut out the inside mark for the window
- Take a razor blade and cut the outside line what ever depth as the plexiglass you have
- Take the razor blade and cut from the inside of the window to remove enough foam creating a shelf for the window to set in
- Test fit and remove window
- Apply small bead of silicone around the shelf and install window pressing window into the silicone
- Allow to dry
This should give you the box for the incuabator
The door just sits in place and makes a good seal
I added some scrap pieces of foam to the outside of the door to have something to grab onto
I added some scrap pieces of foam to the outside of the door to have something to grab onto
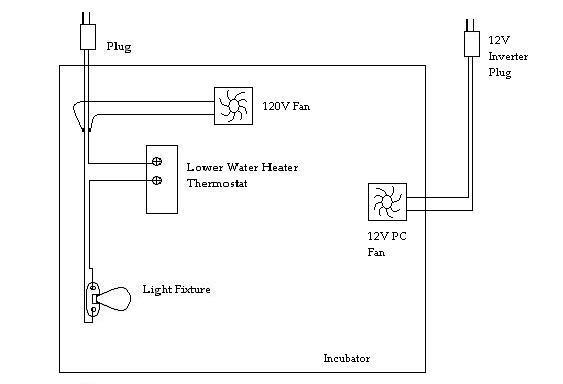
- Mount the light fixture to the middle of the top with the 2 screws nuts and washers
- I mounted the fan to the back left hand side of the bator blowing down be sure to leave a gap for the fan to draw in air
- I mounted the fishtank heater thermostat in the back of the top piece becouse it hangs down some
- Take the extension cord and cut off the female end
- Wire in the thermostat light and the fan
Thing I would change
- Use a hotwater thermostat
- Add another fan to the bottom blowing up
- Make racks inside for egg turners to sit on
I plan on making all these changes after these eggs are done hatched
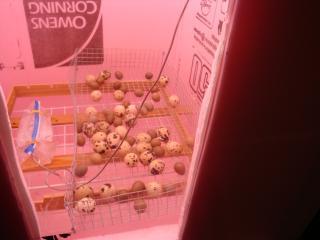
Here it is on its first time out with quail eggs