Something About St. Walt
I'll try to keep this short and simple. I have 4 chickens (as of now, hehe). 1 bantam cochin, 2 red stars, and 1 Silver laced wyandotte. I live in a duplex, the neighbors are about 2 feet away (mehhh). I am LEGAL () to have chickens in my neighborhood, no roos, and only 6 ladies at most.
I am a college student so I'm on a limited budget. That's what I said when I started this. $400 later, I am REALLY on a limited budget. My chickens ended up costing me about $100 a chick. You girls better lay golden eggs.
I tossed around ideas and plans for about two months (couldn't build until we were in our new place). I went crazy with google sketchup ( know that program like a pro now) and my first "coop" plan is WAY different then we ended up with. I did so much research on BYC (THANKS!) and kept revising and revising.
Here's what I needed/slash teeter-totter-of-the-hand/wanted:
1) Cheap (FAT chance.) I never wanted to believe the people that said DOUBLE what you think you'll pay. Unfortunately, and SO unfortunately, They are SO RIGHT.
2) Functional. I'll be off to school every morning and I don't want to be dinging around
3) Safe
4) Look decent
So, I gathered as much as I could from the local Restore but somethings we just needed to buy at home depot because our girls weren't being taken care of the best where they were staying until we could get them back after the move.......(pause)...
Here's the pics:

Here's somewhat of the plan. We changed some minor things, but it gives you the general.
Here's what we got first from Resource. (2) 8x6 fence panels, sheet of OSB, and two doors.
Here we are building the door jambs. One door is 6 feet tall, one door is 5.5 feet tall to create a sloped roof.
Attaching the door jambs to the panels.
Finally standing up.
Here you can see the slope.
Here's the doors cut in half then attached.
The inside.
Come to find out the doors are rotting, so we couldn't put in a full window. So we improvised with the pastic cover that goes on a big cheap picture frame.
Here's the popdoor.
Leveling the coop. It was really unstable until towards the end of construction
2x6 to attach the roof joists to.
Putting the roosts in and the roof supports.
Starting to build the run. Used pressure treated lumber for anything that touched the ground. Use another $10 door from Resource.
Here you can see how there's a storage area below and the coop area above.
Run structure built.
Here's the inside. The places where the tape is was going to be our windows, but we could only do the one on the left because of structure.
After their first night!
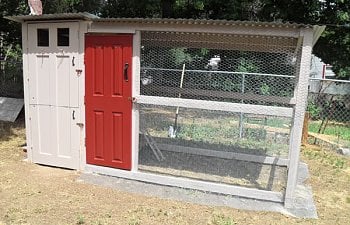
Yes, that's right. I HAVE A RED DOOR! YAYYYYY!!!!!!!! I love it, thanks to my wonderful BF who painted it for me!
Girls in their new home. I did a hardware cloth apron around the whole coop (Boy was that pain) and here you can see their pop door trim is also red.
My wonderful red door! You can also see how we're doing the locks for the coop...
Girls on their roost the first night. You can tell they think they are way high up. Really careful to turn around.
I'll try to remember the cost of everything...I'm reading off my receipts so some coding I can't tell what it is...some things we'll have that for a long time and for other projects")
I'll try to keep this short and simple. I have 4 chickens (as of now, hehe). 1 bantam cochin, 2 red stars, and 1 Silver laced wyandotte. I live in a duplex, the neighbors are about 2 feet away (mehhh). I am LEGAL () to have chickens in my neighborhood, no roos, and only 6 ladies at most.
I am a college student so I'm on a limited budget. That's what I said when I started this. $400 later, I am REALLY on a limited budget. My chickens ended up costing me about $100 a chick. You girls better lay golden eggs.
I tossed around ideas and plans for about two months (couldn't build until we were in our new place). I went crazy with google sketchup ( know that program like a pro now) and my first "coop" plan is WAY different then we ended up with. I did so much research on BYC (THANKS!) and kept revising and revising.
Here's what I needed/slash teeter-totter-of-the-hand/wanted:
1) Cheap (FAT chance.) I never wanted to believe the people that said DOUBLE what you think you'll pay. Unfortunately, and SO unfortunately, They are SO RIGHT.
2) Functional. I'll be off to school every morning and I don't want to be dinging around
3) Safe
4) Look decent
So, I gathered as much as I could from the local Restore but somethings we just needed to buy at home depot because our girls weren't being taken care of the best where they were staying until we could get them back after the move.......(pause)...
Here's the pics:

Here's somewhat of the plan. We changed some minor things, but it gives you the general.

Here's what we got first from Resource. (2) 8x6 fence panels, sheet of OSB, and two doors.

Here we are building the door jambs. One door is 6 feet tall, one door is 5.5 feet tall to create a sloped roof.


Attaching the door jambs to the panels.

Finally standing up.

Here you can see the slope.

Here's the doors cut in half then attached.

The inside.

Come to find out the doors are rotting, so we couldn't put in a full window. So we improvised with the pastic cover that goes on a big cheap picture frame.

Here's the popdoor.

Leveling the coop. It was really unstable until towards the end of construction

2x6 to attach the roof joists to.

Putting the roosts in and the roof supports.

Starting to build the run. Used pressure treated lumber for anything that touched the ground. Use another $10 door from Resource.

Here you can see how there's a storage area below and the coop area above.

Run structure built.

Here's the inside. The places where the tape is was going to be our windows, but we could only do the one on the left because of structure.

After their first night!

Yes, that's right. I HAVE A RED DOOR! YAYYYYY!!!!!!!! I love it, thanks to my wonderful BF who painted it for me!

Girls in their new home. I did a hardware cloth apron around the whole coop (Boy was that pain) and here you can see their pop door trim is also red.

My wonderful red door! You can also see how we're doing the locks for the coop...

Girls on their roost the first night. You can tell they think they are way high up. Really careful to turn around.
I'll try to remember the cost of everything...I'm reading off my receipts so some coding I can't tell what it is...some things we'll have that for a long time and for other projects
Home Depot---------------------
2x4x8 PT $2.97
2x4x8 $1.98
Staples for hammering wire $3.24
2 1/2" screws $5.94
Liquid nails $2.34
Oops Paint red $5.00
(2) 2x4x8 $3.96
(2) 1x2x8 $1.54
(2) 2x2x8 $2.96
(5) 2x3x8 $9.35
(5) Supr strip ? $9.95
2" screws $5.94
1" x30YD ? $2.97
Silicone $3.89
2 Paint brush set $4.97
Paint roller $5.07
1" foam brush $0.57
Caulk gun $1.97
Paint tray $1.97
Plastic cap roof nails $6.68
$73.76Totaled
Included 50' extension cord, other misc stuff $19.64 Another trip
Another trip $15.08 Misc stuff
Another trip Included (2) 2x4x8, (2) 2x6x8, (7) 2x4x8 Pressure treated, (6) 2x4 Joist Hangers, Shovel$62.21
Another trip (OUCH) (7) Metal Corrugated roofing panels, (5) locks, (1) barrel lock, New paint roller + tray, other misc stuff $107.10
Resource-----------------
Included (2) doors, (2) cedar 6x8 fence panels, (8) hinges, (~60) hinge screws, and 6'8"x4' OSB board, 5 door handles$76.18.
Another $10 door for run plus other misc hardware$16.01
Misc hardware$1.49
ACE Hardware -----------------------
Oops paint: 2 gallons beige high gloss paint, 1 qt white$13.34
Free-ish---------
Somethings I got for free or their cost wasn't really significant:
My PVC Pipe feeder
My waterer was made for me, although it doesn't work
Free Delivery of the two fence panels
Free Help from the resource guy, Nick, stuck by me designing, redesigning, such a HUGE help!
Borrowed Circular saw and power drill from my boss.
------------------------------------------------------------------------------------------------------------------------------------------------------------------------------------------------------------
TOTALED ABOUT $385
----------------------------------------------------------------------
Only have had the coop a few days now, but some things I would change or tips...
TIPS
- Find your local restore/resource. Make friends with the guys/gals there. The one guy gave me HUGE discounts on already discounted stuff. I walked out with a lot of stuff for free there as long as I brought cupcakes
- The slower you can gather your materials, the better. Rushing the last minute makes you spend more money then you had to.
- If you find something you know you'll need at a good price, GET IT. Don't wait, because somebody else will take it! Somebody mangaged to snag my roofing at the Restore before I decided I wanted it.
- Trust your instincts. It took me a while to come up with my the last design but I new what I wanted and if we we're going to be putting so much work into something, I wanted it to be what I wanted.
- It doesn't have to be perfect. The chickens don't care. Just make yourself happy, and move on.
- Definetly go with the OOPS paint
- I sort of wish I would have done panel contstruction like I was originally planning, that way when we move (since we are renting) I could have easily taking it apart. But I don't think that's too practical with chicken coops.
- More windows, but it's not easy with my design.
- Lighter poop board. It's going to be heavy since it's plywood thats about 28"x1.5'
- My waterer. I'm off to the store today to check out the nipple waterers...
THANKS FOR LOOKING!! Any questions, don't hesitate to ask.
4theloveofhens
")