- Nov 27, 2013
- 33
- 15
- 24
Hello everyone! I live in Buffalo, NY and I own two porcelain d'uccles. Over this long winter, I decided it would be a good idea to replace the pen I made almost 3 years ago. It was made from 2x4s, and there was no thought process on how it would even go together. As you can see in the picture, I also used chicken wire (hindsight 20/20, obviously a bad idea.). Needless to say, the wire was bending out of shape and I hadn't attached it well to the wood, so it was all falling apart. Over the summer to make it work, we had just been putting a blanket over the gap in the wire. To make matters worse, I hadn't stained it at all and it was starting to look a little gross. As my dad said, it made our backyard look pretty redneck. The other big problem I had with the run was, we had nowhere to store it and the thing was just massive.
Original run in all its glory

What it looks like now with unwanted guest

Needless to say, I needed something better and safer for my chickies. So I actually made plans this time and decided to build a pen that would collapse for easy storage and moving. When I get a chance, I will made these plans look a bit better so that anyone who wants can use them. Basically, I used pine pieces, hardware cloth, and lots of hinges to make this work. I think that overall, it was a great success.
The plans

Basically, I painted/stained all the wood first before beginning any work. Next, I made all of the rectangular frames that I would need. The pieces of wood were all held together by screws, but I imagine a strong wood glue would also work. Although by using screws, I can more easily replace rotted or broken wood without throwing out or breaking good pieces.
Picture of some of the frames

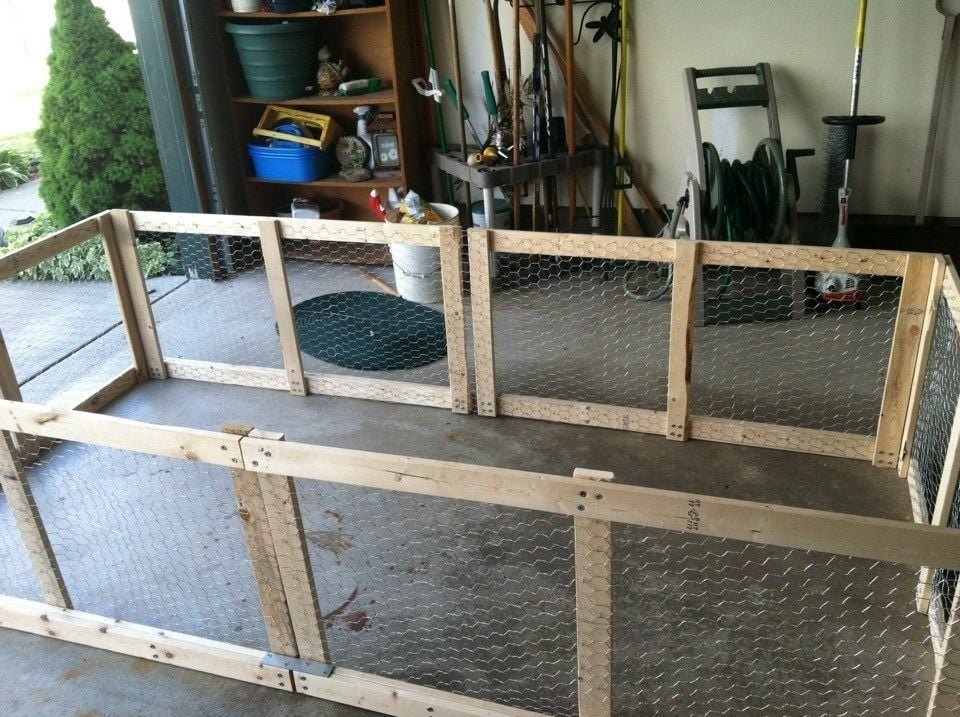
After completing all of the frames, I then attached the wire. Aside from painting, this was definitely the most time consuming portion. The wire had to be cut all the time and then stapled, and then trimmed in order to make a good fit. I also had to actually buy another 25ft roll as well to cover the entire thing.
Pictures of the frames after attaching wire


After attaching all the wire, it was time to attach the hinges. All of the frame pieces have 2 hinges on either side. Some are on the interior of the pen, while others are on the exterior. This gives it the ability to fold together nicely. Both the run itself and the lid fold up for easy storage. The door also has two hinges on the exterior of the run. The door has a nice latch as well. Once all the pieces were connected by hinges, I added two latches to the front of the pen. Ideally, there would have been two on both sides, but I didn't account for some extra length on the run and the lid actually ended up being a few inches short. I fixed it by attaching another piece of wood to one end of the lid, but as a result, it doesn't quite lay even with the length of the pen and latches on that side wouldn't have worked. The lid is heavy enough however, that I'm not really worried about it sliding out of place anyways. The latches are really just there to keep it even.
Pictures of the entire finished product


Finished product without lid

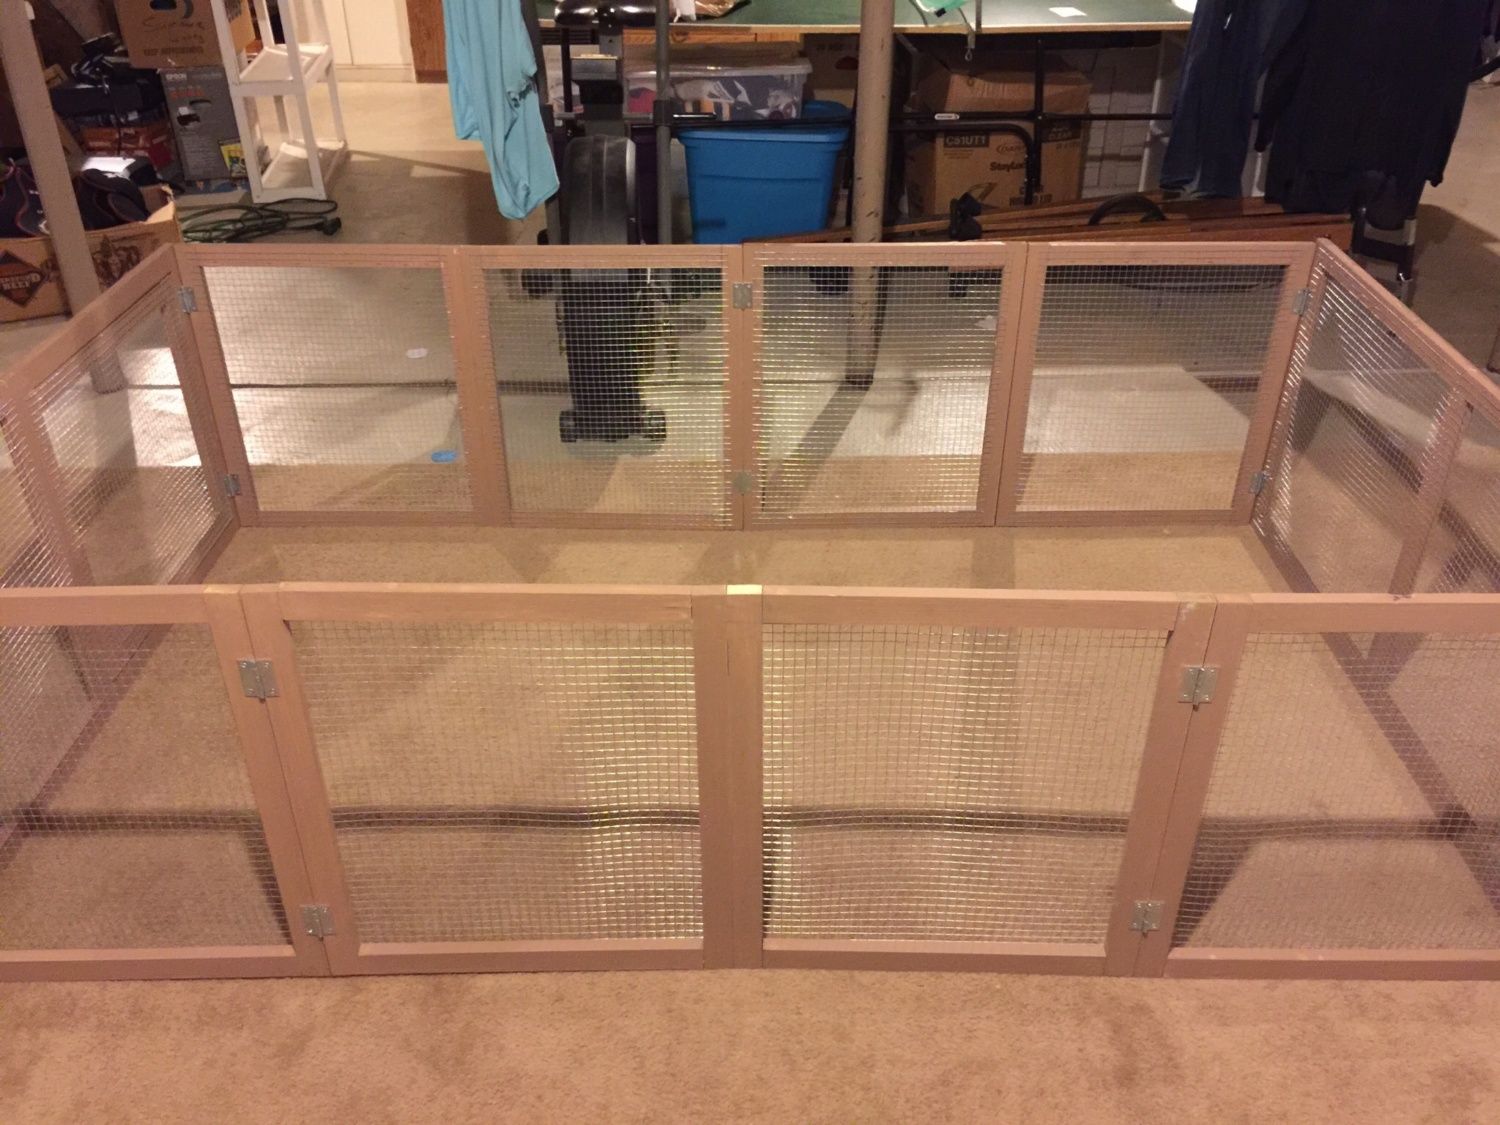
How portions of the lid can fold up

Check out that door!

And how it all folds up for easy storage

Time Analysis:
Approximately 7 hours to paint/stain
Approximately 3-4 hours to create the frames
Approximately 8-10 hours for all of the wire
Approximately 1 hour to sand down the door and get it even
Approximately 4-5 hours to attach all the hinges and latches.
Cost Analysis:
Approximately 80-100 bucks for the wood
Approximately 25-30 bucks for hinges
Approximately 10 bucks for latches
Approximately 8 bucks for screws
Approximately 3 bucks for staples
Approximately 40-50 bucks for wire
Paint/Stain was free since I had it from staining coop last summer
Picture of the coop for good measure

Things I would do differently next time:
Use outdoor latches and hinges. I expect to be oiling them up a bit over the summer.
Would try to maybe use cheaper wood, I spent more than I should have.
Make sure to give enough space for door next time. Had to sand it so it wouldn't stick.
Remember to account for extra .75 inches on either side of the length which caused the lid to be a little short.
I hope you all enjoyed this little guide. And I hope you all enjoy the pen! I feel a lot better about my hens safety now.
Also, if you live in Buffalo, I will be getting rid of my old pen for free if anyone is interested. The frame is still in good condition, could just use a stain. All you'd have to really do is paint it and replace the wire and you got yourself a nice free pen.
Original run in all its glory
What it looks like now with unwanted guest
Needless to say, I needed something better and safer for my chickies. So I actually made plans this time and decided to build a pen that would collapse for easy storage and moving. When I get a chance, I will made these plans look a bit better so that anyone who wants can use them. Basically, I used pine pieces, hardware cloth, and lots of hinges to make this work. I think that overall, it was a great success.
The plans
Basically, I painted/stained all the wood first before beginning any work. Next, I made all of the rectangular frames that I would need. The pieces of wood were all held together by screws, but I imagine a strong wood glue would also work. Although by using screws, I can more easily replace rotted or broken wood without throwing out or breaking good pieces.
Picture of some of the frames
After completing all of the frames, I then attached the wire. Aside from painting, this was definitely the most time consuming portion. The wire had to be cut all the time and then stapled, and then trimmed in order to make a good fit. I also had to actually buy another 25ft roll as well to cover the entire thing.
Pictures of the frames after attaching wire
After attaching all the wire, it was time to attach the hinges. All of the frame pieces have 2 hinges on either side. Some are on the interior of the pen, while others are on the exterior. This gives it the ability to fold together nicely. Both the run itself and the lid fold up for easy storage. The door also has two hinges on the exterior of the run. The door has a nice latch as well. Once all the pieces were connected by hinges, I added two latches to the front of the pen. Ideally, there would have been two on both sides, but I didn't account for some extra length on the run and the lid actually ended up being a few inches short. I fixed it by attaching another piece of wood to one end of the lid, but as a result, it doesn't quite lay even with the length of the pen and latches on that side wouldn't have worked. The lid is heavy enough however, that I'm not really worried about it sliding out of place anyways. The latches are really just there to keep it even.
Pictures of the entire finished product
Finished product without lid
How portions of the lid can fold up
Check out that door!
And how it all folds up for easy storage
Time Analysis:
Approximately 7 hours to paint/stain
Approximately 3-4 hours to create the frames
Approximately 8-10 hours for all of the wire
Approximately 1 hour to sand down the door and get it even
Approximately 4-5 hours to attach all the hinges and latches.
Cost Analysis:
Approximately 80-100 bucks for the wood
Approximately 25-30 bucks for hinges
Approximately 10 bucks for latches
Approximately 8 bucks for screws
Approximately 3 bucks for staples
Approximately 40-50 bucks for wire
Paint/Stain was free since I had it from staining coop last summer
Picture of the coop for good measure
Things I would do differently next time:
Use outdoor latches and hinges. I expect to be oiling them up a bit over the summer.
Would try to maybe use cheaper wood, I spent more than I should have.
Make sure to give enough space for door next time. Had to sand it so it wouldn't stick.
Remember to account for extra .75 inches on either side of the length which caused the lid to be a little short.
I hope you all enjoyed this little guide. And I hope you all enjoy the pen! I feel a lot better about my hens safety now.
Also, if you live in Buffalo, I will be getting rid of my old pen for free if anyone is interested. The frame is still in good condition, could just use a stain. All you'd have to really do is paint it and replace the wire and you got yourself a nice free pen.
Last edited:

