My Solar Powered Coop

rootes

In the Brooder
5 Years
Sep 23, 2014
53
14
41
Amherst Township, Ohio
I'm new to all this.
Originally I was going to start with chickens in the Spring of 2015.
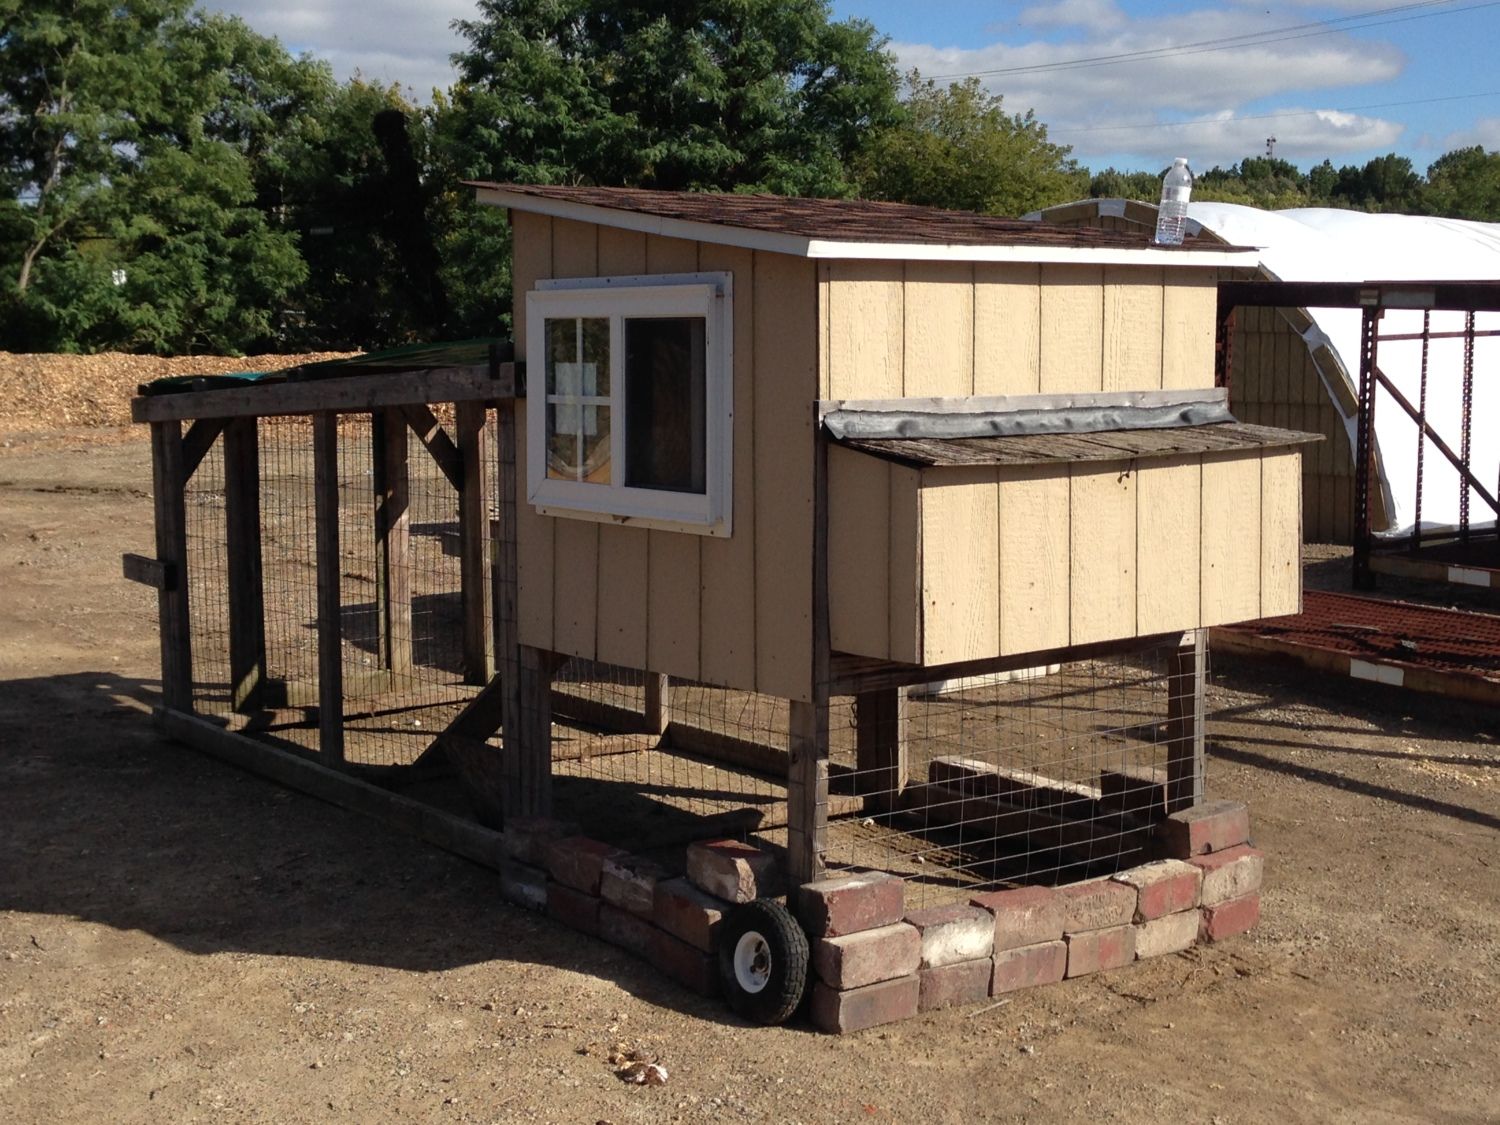
Then a local man hurt his back and I ended up with a very nice chicken tractor and four very healthy laying hens for only $75.


Since the property where the chickens are kept has no power, and I had some room left in my budget, I decided to do solar power for the lights and heat.

I'm going to try to show each set of components in separate postings. Then I'll do a tally of the expenses. I'm sure there are people who will want to know what it all cost. I started out knowing nothing about solar and I still don't really know that much more now. I don't sell anything and don't claim to be any kind of expert. As I make additions and revisions, I'll add to this thread. Don't be surprised if I look silly from time to time. Your patience is appreciated.


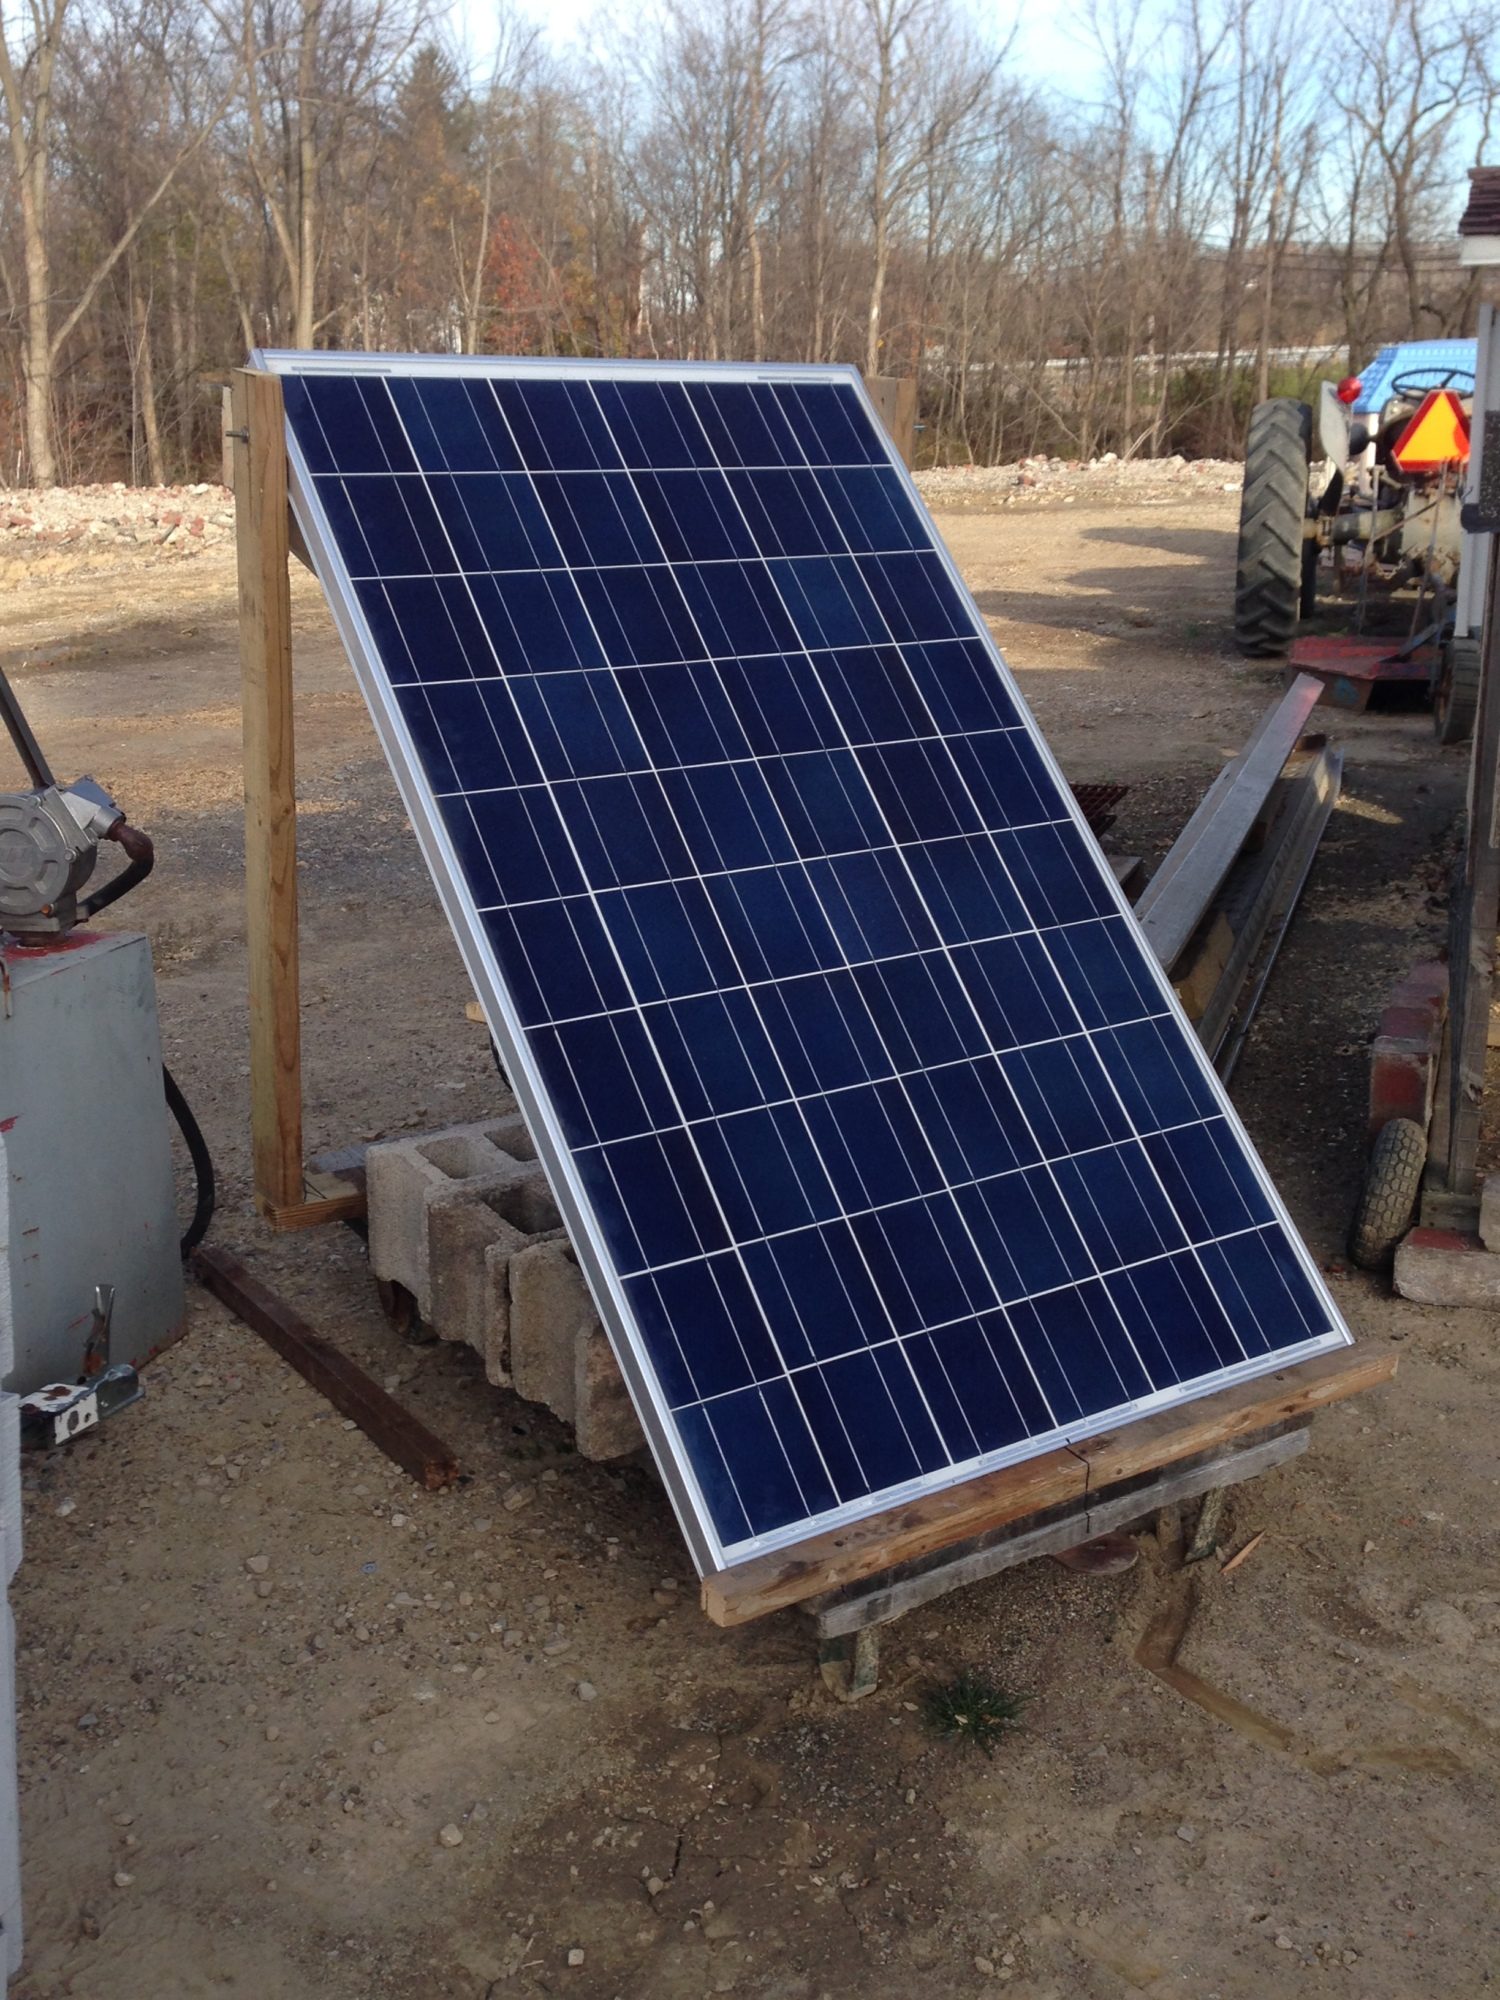
The panel itself is a 230 watt UL approved standard solar panel. It has a 25 year life. It's about 3' x 5' with a light aluminum frame and attached connectors.


I put the panel on an older industrial pallet on wheels. I figured the tractor is portable, so the solar panel should be able to follow the chickens where ever they may roam.

Simple mounting with treated lumber makes the panel completely adjustable should the angle facing the sun need to be adjusted in different seasons.

The white deep super (honey bee box) is where the batteries are. I had two deep-cycle marine batteries in storage and both are inside the white box. Between the panel and the batteries is a small regulator that makes sure the panel does not overload the batteries. It will stop the current from the panel going to the batteries once they are fully charged.

The panel, cable, and charge controller: $220.
The pallet and misc wood: $25
The used honey bee box and cover: $15
Two used deep cycle marine batteries: $120
Misc wire, screws, cable, block: $20


$400 invested for the solar panel and power storage.

It is simple, but very sturdy. It's heavy enough to withstand the wind and very easy to move. Just pick up one end and it will wheel across the yard.

I have it sitting a few feet from the coop as distance is an issue with DC current.
 
Last edited:
The first thing I wanted was lights.
It was November in Ohio and the days were getting very short very fast.
Egg laying was slowing down, big surprise.


The first picture is right after I installed the lights.
The second picture is later that evening when it was dark outside.


There are three, 5W lights. They are 12V and standard size bases.
I used three porcelain "keyless" fixtures that were in a box in my shop.


Because I used 12v volt bulbs, no inverter is needed. If these were 120v AC bulbs, the DC power would have had to go through an inverter to make it AC.


This is the control box mounted on the door of the chicken tractor. The box is a dry box, has a lockable door and the chickens can't get to any of the components.

The white block on the right is the timer for the lights. You can see that it is on. The timer turns on the lights in the early morning for a couple of hours, then turns them off while the sun is out. At 4 in the afternoon, it comes back on and turns off at 9pm. This way, the hens get a good solid 14 hours of light. The timer is 12v, DC powered also. It can turn on and off 18 different times a day if necessary. It is surprisingly easy to program.

5watt light bulbs: $30
Timer Control: $7
Dry box: $20 (used)
Current tap bars: $13
Misc. wire, clips and connectors: $10


The lights on a timer added another $80 to the cost.
 
Last edited:
The next thing was heat to keep the water from freezing.


I purchased two pig feed pans from TSC. On the bottom of the inside pan, I adhered a 12V, 25W, DC heat pad with leads. This pad is typically used on a motor cycle oil pan to heat the oil and prevent engine damage from cold starts. The pad is glued on with a gasket sealer that can withstand heat.


Not knowing how much heat would be needed, I decided to add another pad. It is 12V but only 3 watts.

I ran the leads and then put this pan inside the other pan and used four small sheet metal screws to hold them together. This way there is airspace between the two pans to act as insulation. The top pan will conduct the heat to the waterer placed inside the pan.


I don't know how many amps each heat pad draws, and until I find out, the best thing would be to put them on a timer so I would have the most flexibility in determining how much to heat the water.


So, in my dry box I put another timer. Right now I have it set to turn on for an hour, eight times a day. The heat and the lights will not be on at the same time just in case they would cause too much drain on the batteries.

Timer for the Heated Pans: $7
Pig Feeding Pans" $8
Misc. Wire, gasket adhesive, clips: $10
25W heat pad: $17
3W Heat Pad: $10


This version of my heated water ran me $49
 
Last edited:
While making the heated pan, I had another idea.
Since I had ordered two of the 3watt heat pads, I decided to adhere one directly to a plastic waterer that will hang on its regular hook. This might be better because the pan accumulates bedding and dirt the girls kick into it. With the waterer up like it should be, the girls would have better access to water and it might eliminate some fights.


The adhesive is the same gasket adhesive used on the pan heater. Then the heat pad was covered with heat resistant tape. I ran the lead up and it has a rubber disconnect to the power cable. The disconnect is actually for lights for a trailer. Easy on, and easy off, rubber coated and sturdy so the waterer can be easily removed for refilling.

Because the weather is kind of mild this week, I have this waterer attached to the timer. The heat pad is 12V, DC so there is, again, no need for an inverter.

Plastic Waterer: $7
Heat Pad: $10
Misc. Wire, wire cover and clips: $5
Trailer light connector: $4


This version of a water warmer cost me another $26
 
very clever. Are you worried about the birds pecking the heat pad and shorting it out?
Very intriguing!
Thanks,
Karen
 
So Far, all my costs are as follows:

Power Set UP:
The panel, cable, and charge controller: $220.
The pallet and misc wood: $25
The used honey bee box and cover: $15
Two used deep cycle marine batteries: $120
Misc wire, screws, cable, concrete block: $20


Lights on a Timer:
5watt light bulbs: $30
Timer Control: $7
Dry box: $20 (used)
Current tap bars: $13
Misc. wire, clips and connectors: $10


Pan Heater on a Timer:
Timer for the Heated Pans: $7
Pig Feeding Pans" $8
Misc. Wire, gasket adhesive, clips: $10
25W heat pad: $17
3W Heat Pad: $10


Plastic Waterer on a Timer:
Plastic Waterer: $7
Heat Pad: $10
Misc. Wire, wire cover and clips: $5
Trailer light connector: $4


For a total so far of $555


The plan now is to watch it all work, fix bugs, do some more research and see how it goes. It seems to me that the basics are all here. But, knowing nothing about solar power, this is all a learning curve. I'm just lucky to have gotten the chickens and the coop at such a low price so I had the funds to invest in the solar.

The next planned addition is an exterior light either on a motion sensor or a timer. There are lots of predators on the property and a light would be of some help.

After that an automatic door on a timer is a goal.

I hope you find some of this useful. Comments and questions are always welcome and I'll just tell you what I know, or more likely, what I DON'T know!

I'm located in Amherst Township, Ohio. We are just an hour west of Cleveland and fairly close to Lake Erie. Our weather is generally slush falling out of the sky in the Winter and more weirdness the other seasons of the year.

Take Care,

Tim

 
Last edited:
Karen,

Being that the whole system is 12volt, Direct Current, I'm not worried about the girls pecking at things just yet.
I am trying to cover up as much as possible from the start.

I'm sure they will show me what else I need to do.
At least they can't be hurt by the current.
The chickens are safe.

This is a learn-as-you-go kind of project.
I'm expecting all kinds of things to happen that I never anticipated!

Take Care,

Tim
 
Last edited:
Thanks for the info. I have been considering using a battery for lights but didn't think about heat.I am anxious to see how it works in the cold.
 
Just before Thanksgiving we had a cold blast come through.
We did not get the snow that the East Side of Cleveland got, and thank heaven we did not get what Buffalo got.


But it was COLD!

I was using the pan heater during that stretch and it was extremely effective.
The only drawback was stuff getting kicked into the water because it sits down inside the pans.
Other than that, it worked exactly as I thought it would.


Now I have the hanging waterer on the timer.
We shall see!


Take Care,

Tim
 
While making the heated pan, I had another idea.
Since I had ordered two of the 3watt heat pads, I decided to adhere one directly to a plastic waterer that will hang on its regular hook. This might be better because the pan accumulates bedding and dirt the girls kick into it. With the waterer up like it should be, the girls would have better access to water and it might eliminate some fights.


The adhesive is the same gasket adhesive used on the pan heater. Then the heat pad was covered with heat resistant tape. I ran the lead up and it has a rubber disconnect to the power cable. The disconnect is actually for lights for a trailer. Easy on, and easy off, rubber coated and sturdy so the waterer can be easily removed for refilling.

Because the weather is kind of mild this week, I have this waterer attached to the timer. The heat pad is 12V, DC so there is, again, no need for an inverter.

Plastic Waterer: $7
Heat Pad: $10
Misc. Wire, wire cover and clips: $5
Trailer light connector: $4


This version of a water warmer cost me another $26
I would be kind of tempted to cover that heating pad with either some really thin sheet metal, or maybe something like vinyl even.

But other than that, AWESOME COOP!! I'm going to have to save up and have you drive up here to do all of that set up for me.
 
Last edited:

New posts New threads Active threads

Back
Top Bottom