Pixelsaurus
Songster
- Apr 24, 2020
- 43
- 55
- 109
Part 3 of my Coop DeVille project….squirrels, day spa, roost and poop board V 5.0, ventilation and Zen....

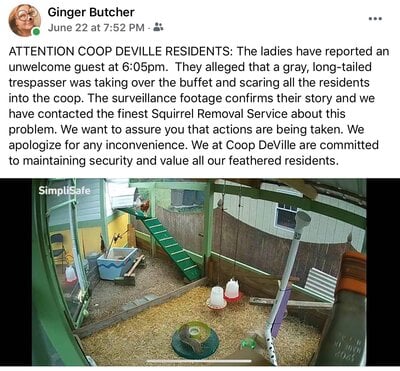
June 22. Squirrels! And this was the FB post - a fun notice to the Coop DeVille residents. So all is fine and dandy in the run until the squirrels. They got through the bird netting and not only eating the chicken feed, but also just scaring the girls back into the coop in the morning. It is time for a more permanent solution to the area between the run roof and coop.

June 23-25. I got a 25 ft roll of chicken wire ($20). It took me a few days but I was able to get the wire mounted overhead between the run roof and coop. I used floral wire to “stitch” together the panels of wire. It made a strong seem that held the wire up tight so I didn’t need to add more wood. The covered worked perfectly. The squirrels can’t get in. That said, it doesn’t stop them from climbing all over the run and scaring the chickens. Nor does it stop them from getting in the run during the day when the girls are out ranging and the door is kept open. My Plan B is to feed the squirrels on the other side of the yard and so far, it has been working.

June 25-28. Life is good. All rainbows and eggs here at Coop DeVille

July 3-5. There were definitely some issues with roost and poop board V 4.0. The vinyl plank wasn’t wide enough to catch all the poop and the wall mounts created a gap between the wall and the board. Thus, poop was not only missing the board, but hitting the wall. Plus, the shelf brackets had openings on the top -- designed to be mounted to a shelf but under the roosts they just collected poop. Also, while the scraping of the board worked ok, I found myself pulling the vinyl shelf out and washing it with the garden hose.

I took the holiday weekend to upgrade to roost and poop board V 5.0 – and I think this is the final design. I read about using PDZ like kitty litter. So I designed a poop board with a lip and shaped to fit underneath the bay windows. We got some melamine boards at the local ReStore for just $2 a sheet and used some old plywood from the garage. It was a complicated job of angle cuts, so once again my amazing DH and his mad carpentry skills made it happen. I designed it so it just sits on top 2x4 mounts on the wall so I can remove it for cleaning if needed.

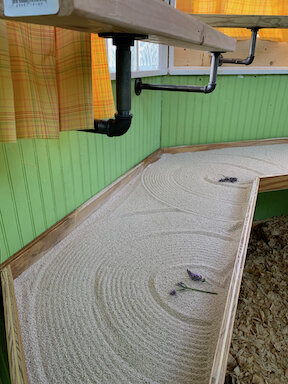
Once it was all done and the PDZ in place, it just begged for a little Zen garden rake and some twigs of lavender from the garden. I also upgraded the roosts using faux gas pipe I found online. It cost $80 but it is much cheaper than real gas pipe. I was able to mount all the roosts, a curtain rod along the top front windows, and have some left over pieces for another project. Plus another $10 for 2x4s it looks great! The pipes are also easier to clean than those shelf brackets.

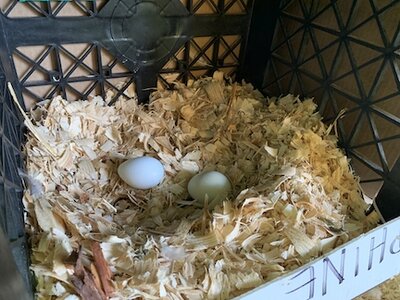
July 6. Girls on the roost and eggs!

July 11. Time for Beauty Shots A friend gave me a cool “Fresh Eggs” sign and some fabric that was the perfect length for the next boxes. I rearranged the milk crates so they were the same height (one is wider), created “pans” in the bottom out of coroplast, covered with cardboard boxes for privacy, then topped off with another old IKEA shelf board. The large mirror is from my childhood home – we don’t have a place to hang it and I never wanted to donate it – so here it finds a home. A couple 5 gallon buckets, a black one with a lid ($5) for poop and an orange one ($4) for fresh bedding by the nest boxes. I also got a kitty litter scoop and 2 bins (for PDZ) from IKEA ($15).

The girls are enjoying the nest boxes - I added a photo in a frame I found at the thrift store.

Girls are enjoying an afternoon at the Spa and the "funny" mirrors I picked up at the thrift store. They just love mirrors!
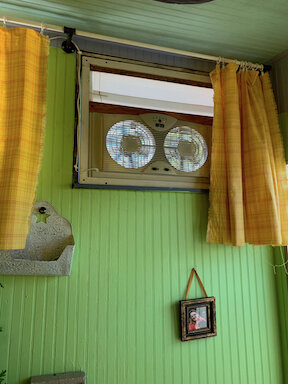
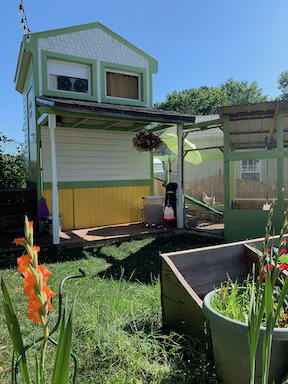
July 12. Window fan! After a few restless nights thinking a raccoon or something was going to crawl through the louvers, I decided on a window fan. It would solve both the ventilation and the security issue. Ok, I did buy a new unit at Target for $39 (with digital thermostat), but it was worth it. As I write this we are having our 22nd day above 90 degrees. The coop has been holding at about 80-85 degrees at the hottest times of the day.
I am happy with progress so far. There are still a few essentials that need work – specifically a coop door. Right now I just use a brick and a piece of wood. Luckily the run is pretty tight, so a creature would have to breech the yard fence (not too hard but a fair deterrent), the run, and then the door. Other things include a larger feeder, waterer, and a solution for the pop-out windows to secure them in the open position – both to keep predators from opening the windows and keep stable during a rain or wind storm.
To Be Continued….
For more see my Coop DeVille Part 1 post and Coop DeVille Part 2 posts
June 22. Squirrels! And this was the FB post - a fun notice to the Coop DeVille residents. So all is fine and dandy in the run until the squirrels. They got through the bird netting and not only eating the chicken feed, but also just scaring the girls back into the coop in the morning. It is time for a more permanent solution to the area between the run roof and coop.
June 23-25. I got a 25 ft roll of chicken wire ($20). It took me a few days but I was able to get the wire mounted overhead between the run roof and coop. I used floral wire to “stitch” together the panels of wire. It made a strong seem that held the wire up tight so I didn’t need to add more wood. The covered worked perfectly. The squirrels can’t get in. That said, it doesn’t stop them from climbing all over the run and scaring the chickens. Nor does it stop them from getting in the run during the day when the girls are out ranging and the door is kept open. My Plan B is to feed the squirrels on the other side of the yard and so far, it has been working.
June 25-28. Life is good. All rainbows and eggs here at Coop DeVille
July 3-5. There were definitely some issues with roost and poop board V 4.0. The vinyl plank wasn’t wide enough to catch all the poop and the wall mounts created a gap between the wall and the board. Thus, poop was not only missing the board, but hitting the wall. Plus, the shelf brackets had openings on the top -- designed to be mounted to a shelf but under the roosts they just collected poop. Also, while the scraping of the board worked ok, I found myself pulling the vinyl shelf out and washing it with the garden hose.
I took the holiday weekend to upgrade to roost and poop board V 5.0 – and I think this is the final design. I read about using PDZ like kitty litter. So I designed a poop board with a lip and shaped to fit underneath the bay windows. We got some melamine boards at the local ReStore for just $2 a sheet and used some old plywood from the garage. It was a complicated job of angle cuts, so once again my amazing DH and his mad carpentry skills made it happen. I designed it so it just sits on top 2x4 mounts on the wall so I can remove it for cleaning if needed.

Once it was all done and the PDZ in place, it just begged for a little Zen garden rake and some twigs of lavender from the garden. I also upgraded the roosts using faux gas pipe I found online. It cost $80 but it is much cheaper than real gas pipe. I was able to mount all the roosts, a curtain rod along the top front windows, and have some left over pieces for another project. Plus another $10 for 2x4s it looks great! The pipes are also easier to clean than those shelf brackets.

July 6. Girls on the roost and eggs!
July 11. Time for Beauty Shots A friend gave me a cool “Fresh Eggs” sign and some fabric that was the perfect length for the next boxes. I rearranged the milk crates so they were the same height (one is wider), created “pans” in the bottom out of coroplast, covered with cardboard boxes for privacy, then topped off with another old IKEA shelf board. The large mirror is from my childhood home – we don’t have a place to hang it and I never wanted to donate it – so here it finds a home. A couple 5 gallon buckets, a black one with a lid ($5) for poop and an orange one ($4) for fresh bedding by the nest boxes. I also got a kitty litter scoop and 2 bins (for PDZ) from IKEA ($15).
The girls are enjoying the nest boxes - I added a photo in a frame I found at the thrift store.
Girls are enjoying an afternoon at the Spa and the "funny" mirrors I picked up at the thrift store. They just love mirrors!


July 12. Window fan! After a few restless nights thinking a raccoon or something was going to crawl through the louvers, I decided on a window fan. It would solve both the ventilation and the security issue. Ok, I did buy a new unit at Target for $39 (with digital thermostat), but it was worth it. As I write this we are having our 22nd day above 90 degrees. The coop has been holding at about 80-85 degrees at the hottest times of the day.
I am happy with progress so far. There are still a few essentials that need work – specifically a coop door. Right now I just use a brick and a piece of wood. Luckily the run is pretty tight, so a creature would have to breech the yard fence (not too hard but a fair deterrent), the run, and then the door. Other things include a larger feeder, waterer, and a solution for the pop-out windows to secure them in the open position – both to keep predators from opening the windows and keep stable during a rain or wind storm.
To Be Continued….
For more see my Coop DeVille Part 1 post and Coop DeVille Part 2 posts
Attachments
Last edited:



 Did you build that coop your self?


