On May 15th, 2022 my husband and I were taking apart pallet racks we had collected from our local garden center. They put them out by the road for free. We had decided to get some to make raised garden beds. As I was standing there looking at the last rack to be disassembled, I told my husband "you know you could make a coop out of that" he did not agree, but 10 minutes later he asked how I would go about that, I explained and he actually agreed! Once we finished taking apart the first rack he just asked, "so what are we doing with the other one, garden boxes or coop?" Coop. The answer is always coop lol
I was having severe need for baby chickens. Our niece had some and it was making my want worse. Our current coop house our 5 adults and could not fit any more birds. We planned to make a larger 10x14 coop to move the big girls into by fall, but it was still several months away. So any potential new babies we got would need a temporary house of their own, enter the pallet coop.
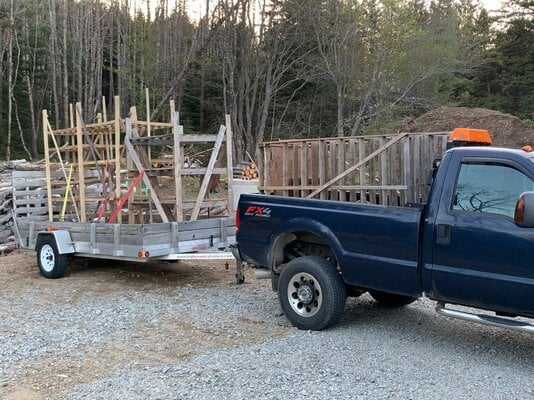
Hubby removing the middle pallets to create a walk-in coop. He might roll his eyes at me a lot, but he always ends up making my dreams a reality.

The initial structure in place. This was the end of assembly day 1. It was late Sunday afternoon and we still had to get supper and cleaned up.. and I still had chicks to source! There aren't and plans for this coop, it was a DIY, make it up on the spot as we put it together.
There were 2 farms I had in mind for getting some chicks from, I messaged both of them as soon as we went inside the house, one of them got back to me right away, they had several chicks available. They were an hours drive away, I told her we would be there by 6pm. Hubby was super excited as you can imagine lol
The face of a man really excited to drive an hour away to get baby chicks that we just decided to get no less than 2 hours before
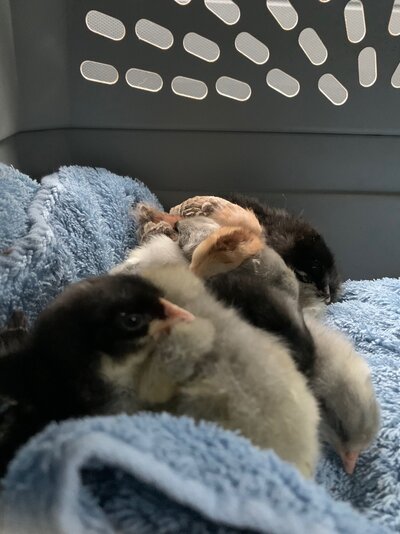
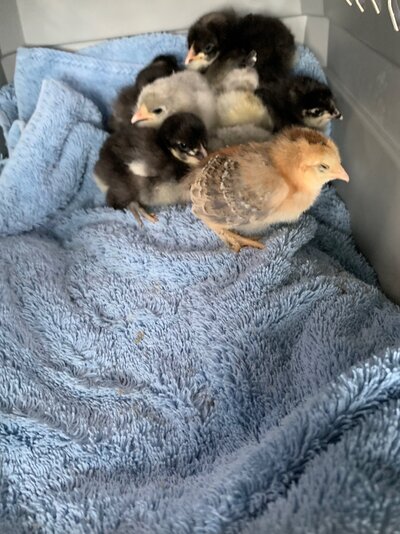
We ended up getting 10 chicks. 2 lavender orpingtons, 2 lavender cuckoo orpingtons, 3 black orpingtons, 2 jersey giant/malines x and 1 bantam easter egger.
Home happy and ion their brooder!

We continued collecting more pallet racks so we could board in the coop. And I'd had an idea to expand the coop by placing a second rack beside it and attaching them together. Hubby felt this was easy enough and the pallets were free so why not!
On my day off I had taken some pallets apart to start boarding in the first rack.
The second weekend we worked on the coop we got the second rack in place next to the first and I started boarding it in. It was starting to come together. It was very roughly assembled but it was strong and sturdy. The best part is, everything was basically made to fit so so far, no measuring or cutting, just putting it in place and screwing it together. This coop gores against everything hubby would normally build. It's really pushing him beyond his comfort zone. He doesn't like slapping things together, not measuring or having a structure plumb and perfect. I just kept telling him it would be ok, that he can make the next coop perfect lol
The third weekend we worked at this it became a real coop. We got the rest of it boarded in, the door made, the floor down, the rest of the hardware mesh over the vents, and some tar paper on it.

The roost bar will go all the way across from one side to the other, resting on the center support piece.
The best part about this coop is it literally only cost us $16.57. We had to buy the latch and hinges for the door. The pallets were all free, we had the tar paper left over from building the house and we even reused old screws we had collected in buckets. It's not a fancy coop but it will do the job. I'm certain it has plenty of ventilation the floor is secure and it will protect them from predators and weather. Besides this a temporary situation until we get the new coop built.
We put the little pop door inside the people door, it still needs some sort of secure latch. The front is tar papered. The babies love roosting on the old bed bunk ladder, I have tried this ladder with each batch of chicks and this batch is the first to really use it.
They have a little roost that they use, I finally unplugged the heat lamp this weekend (Canada Day weekend July 1) but left it hanging just in case. I’ll probably remove it next weekend. Their feeder is hanging off a hook in the ceiling, I tried raising it but our bantam couldn’t reach it so I left it down low. I had a waterer sitting in cement blocks next to the feeder but removed that this weekend as well. Now they have a nipple waterer in their run.
Their run is only made from deer netting, yes I know it only keeps them in and offers zero protection from predators. But since we are building the new coop and run later this summer we didn’t want to construct an expensive run for this coop.
JULY 9, 2022
The birds got their big bird roost today! We left the little one up just so they have options.
I was having severe need for baby chickens. Our niece had some and it was making my want worse. Our current coop house our 5 adults and could not fit any more birds. We planned to make a larger 10x14 coop to move the big girls into by fall, but it was still several months away. So any potential new babies we got would need a temporary house of their own, enter the pallet coop.
Hubby removing the middle pallets to create a walk-in coop. He might roll his eyes at me a lot, but he always ends up making my dreams a reality.
The initial structure in place. This was the end of assembly day 1. It was late Sunday afternoon and we still had to get supper and cleaned up.. and I still had chicks to source! There aren't and plans for this coop, it was a DIY, make it up on the spot as we put it together.
There were 2 farms I had in mind for getting some chicks from, I messaged both of them as soon as we went inside the house, one of them got back to me right away, they had several chicks available. They were an hours drive away, I told her we would be there by 6pm. Hubby was super excited as you can imagine lol
The face of a man really excited to drive an hour away to get baby chicks that we just decided to get no less than 2 hours before
We ended up getting 10 chicks. 2 lavender orpingtons, 2 lavender cuckoo orpingtons, 3 black orpingtons, 2 jersey giant/malines x and 1 bantam easter egger.
Home happy and ion their brooder!
We continued collecting more pallet racks so we could board in the coop. And I'd had an idea to expand the coop by placing a second rack beside it and attaching them together. Hubby felt this was easy enough and the pallets were free so why not!
On my day off I had taken some pallets apart to start boarding in the first rack.
The second weekend we worked on the coop we got the second rack in place next to the first and I started boarding it in. It was starting to come together. It was very roughly assembled but it was strong and sturdy. The best part is, everything was basically made to fit so so far, no measuring or cutting, just putting it in place and screwing it together. This coop gores against everything hubby would normally build. It's really pushing him beyond his comfort zone. He doesn't like slapping things together, not measuring or having a structure plumb and perfect. I just kept telling him it would be ok, that he can make the next coop perfect lol
The third weekend we worked at this it became a real coop. We got the rest of it boarded in, the door made, the floor down, the rest of the hardware mesh over the vents, and some tar paper on it.
The roost bar will go all the way across from one side to the other, resting on the center support piece.
The best part about this coop is it literally only cost us $16.57. We had to buy the latch and hinges for the door. The pallets were all free, we had the tar paper left over from building the house and we even reused old screws we had collected in buckets. It's not a fancy coop but it will do the job. I'm certain it has plenty of ventilation the floor is secure and it will protect them from predators and weather. Besides this a temporary situation until we get the new coop built.
We put the little pop door inside the people door, it still needs some sort of secure latch. The front is tar papered. The babies love roosting on the old bed bunk ladder, I have tried this ladder with each batch of chicks and this batch is the first to really use it.
They have a little roost that they use, I finally unplugged the heat lamp this weekend (Canada Day weekend July 1) but left it hanging just in case. I’ll probably remove it next weekend. Their feeder is hanging off a hook in the ceiling, I tried raising it but our bantam couldn’t reach it so I left it down low. I had a waterer sitting in cement blocks next to the feeder but removed that this weekend as well. Now they have a nipple waterer in their run.
Their run is only made from deer netting, yes I know it only keeps them in and offers zero protection from predators. But since we are building the new coop and run later this summer we didn’t want to construct an expensive run for this coop.
JULY 9, 2022
The birds got their big bird roost today! We left the little one up just so they have options.