Onion's Project Thread - Follow Along With Building and Quail!

Squeeing_Onion

Chirping
Jun 17, 2023
44
58
64
I've got individual question threads that help me figure what to do, and wanted a project thread that consolidated what i have done. So, as such, i will be updating this little blogging diary along my journey into the world of caring for Quail. 🥰

Now, get a beverage and snacks if needed, sit back, and be prepared for lots of text because I'm an author, and just can't help myself.

~*~
I first got interested in raising quail about five or six years ago, when a friend brought us quail eggs. Until then, I had no idea you could raise them at home let alone that there were Quail species without the cute little bobbles on their head.

I got as far as finding out that they could projectile poop, and stopped researching 😂 My background in bird keeping comes from a totally different area, rescue parrots. While living on a teeny patch of lawn in a shockingly noisy and busy tiny town of 300, i said no to any species of birds that would make me have to clean poop off the walls, and i had been thinking of housing the Quail indoors.

IMG_20230127_164533373.jpg


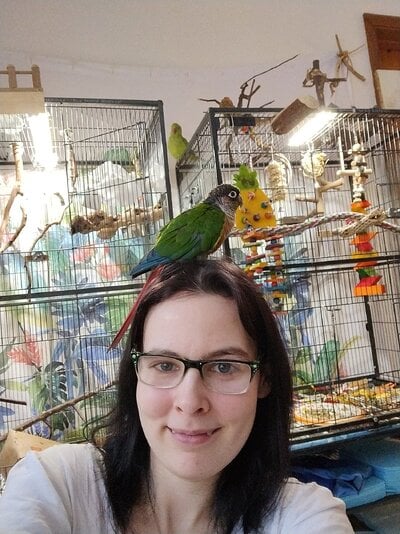
This is me with Bongo (Green Cheek Conure) and Echo (Indian Ringneck). I've been living with and rehabilitating parrots since about 2016 when i brought home my first rescue bird, a Sun Conure named Chicken.

Now.... Now we live on thirty acres at the family homestead, and it's zoned agricultural! This suburbs lady is ready to become a farmer. The land here is currently choked by invasive flowers and grasses from a few decades of being uncared for, but there is still a lot of native flora. It used to have horses and farming done on it more than thirty years ago. My great grandparents (who lived here before we did) never sprayed, so it's pretty much as as organic as you can get!

One of my goals with raising quail is to compost their manure for dressing garden beds. Aye from food for us, i want to plant and cultivate many native species to restore the grasslands here. We get a LOT of wildlife on our property, and many call it home. It's basically a little oasis of nature in a developed area.

I think of it as a sanctuary, both for my family and for the wildlife.

IMG_20230624_125833535_HDR.jpg

That pile of wood is my leftover scrap, from an old railing we salvaged from a restaurant when they redid their patio. So their scrap got reduced into less scrap 😂 i cut off all the rails (i started by trying to remove the nails to save as much stuff as possible... And got quickly exhausted and dizzy, so i said sorry and just cut a few inches of wood to save time and energy)

IMG_20230624_133433041.jpg

A true carpenter would probably be in a lot of pain watching me work. I am in love with visual math. Which means occasionally i might pull out the measuring tape but usually i just use proportional relevancy to make cuts. In other words...

The railings are this tall because that's how long the wood scrap i salvaged ended up being when i cut them free with the circle saw. Conveniently, after lining them all up, i only had three that weren't the same length within a millimeter.

Next, i got the frame assembled. Ish. This involved me hauling all the building-worthy wood i could find around the farm tho one place and then spending like three days reassembling everything without making any cuts.

My goal for this first build was not to spend anything except what I absolutely had to, so i really wanted to make sure i could visualize what i could create with the materials i had. With that in mind, and knowing i want to provide the quail a full walk in aviary someday, i set out to make something i could put inside said aviary run or separate and use for another purpose.

Screenshot_20230624-134447-923.png

The small i sent my friend, sorry i forgot to take and save photos while doing this part 😅 woops! Anyhow... Originally, i wanted to do a longer frame, but things and stuff meant that didn't work, so i went from the above first draft to eventually, the same design but shorter. I cut a board too short on accident and didn't have one to make up for it, woopsie.

IMG_20230616_233815362.jpg


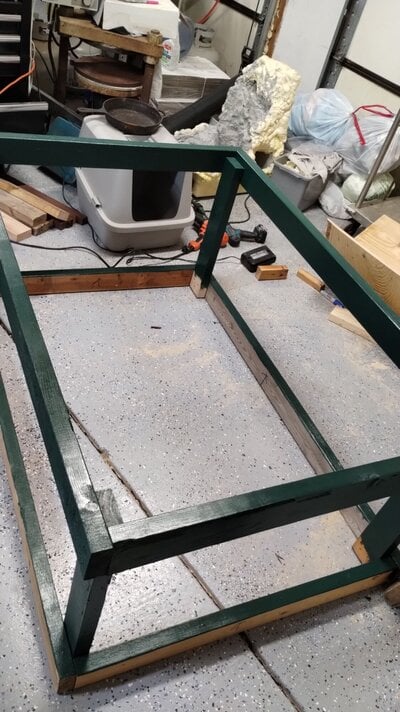
The bottom frame is all screwed together and done. In this picture, I've just finished cutting all the top frame pieces and laying them out in order.

I made sure i left space at the top so i would be able to fit a lid frame neatly at the top, one you HAVE to lift up so a predator (or dumb human) can't twist it and pop hinges. I don't trust my carpentry skills to make something strong because honestly, i am amazing at breaking things and not accounting for grain weakness, so I'm relying on lots of screws and physics.

There are five screws in each corner-- two on the frame's corners then three in each end of the uprights to stay them. I offset the corners (except that one board in the front bottom that got cut wrong lmao, so it fits match the top alignment in that corner) on every side so that the weak spots are staggered instead of aligned as pairs.

Snapchat-1262144927.jpg


See that plywood with a reinforced frame behind everything? (It used to be a table top lol!) I used that to square the frames around. Originally i was intending to put a floor on the whole coop, but winter needs made me change my mind from for and sand, to doing deep litter. But building the frame around it let me get things screwed down right at the corners with perfect 90 degree angles. Woot!

It also served to keep my frame from warping after assembly as everything settled. Once i built the two frames and screwed in the corner uprights, i put the plywood on as a lid. It's waaaaay too heavy for me to safely use as the actual lid (i worry about it falling on quail trying to escape or on heads/fingers) or i would, and save myself some work later, hnnn!

Snapchat-1797328299.jpg


I so badly wished to also some hardware cloth on and call that done, but i know it wouldn't work. The lid sitting in like that would allow water between the seams on a regular basis, and while this build is meant to be temporary, i do want it to be able to last at least two years of our harsh weather.

So... Next is painting, the cloth, reinforcement, and a roof, then more painting! And even more hardware cloth! And digging, and... And... Okay but here's where I'm at now 😂

Snapchat-1885772733.jpg


Two coats of paint on this side, once that's dry i need to flip it and get the rest of the wood painted.

In the meantime.... I've got the start of my incubator going!

Like the coop/pen, this was made with what i had on hand.
IMG_20230621_191100839.jpg

It's so small. It's ridiculously small. 😂

I have only *had* to buy a hygrometer, and i choose to get a tiny speed adjustable fan and the lamp socket that had a dimmer switch. I didn't feel like relearning how to wire things to rig the heat lamp and a computer fan, but i did consider those.

I couldn't talk myself into driving to a gas station to buy a bigger box, so i stuck with this little one i found in our storage (i have health issues that make leaving the house a very tiring challenge, so it has to be reeeeeeeeeeeeeeeeally with it). I think it's just the right size, honestly, as i can easily store this unit and i don't have plans to hatch very many quail.

Inside is about 7" x 8" x 8" ish. The raised for will make it a touch shorter.

IMG_20230621_191140867.jpg

It has two thermometers -- one glass, one digital. I always try to have both analog and digital versions of temp and hygrometer, someone recommended it to me in the aquarium keeping hobby years ago because they can fall in different ways and having two (or more!) can save the fish (or hopefully, my Quail!).

It's hard to see because it is mostly clear, but there is a plastic tray for water between the two wooden sticks. The sticks were unused paint stirers i repurposed.

The tube on the right back corner is for aging water without having to open the incubator. In a future design i think adding a drain option may be nice, or maybe if just give me one more thing to have to clean.

Resting overver the wooden rails, i will make a removable hardware cloth tray. I will be folding it to create a rim so that eggs cannot roll off of it. Over that, will go a piece of window screen ziptied on or shelf liner (any recommendations?) To protect the chicks feet at hatching, be more comfy... and to look nice. Because I'm silly and i like things looking nice 😂

IMG_20230621_191112834.jpg


Eventually i will glue that glass pane down but the tape works for now. In hindsight i wish i had put the bulb socket through the back, and may change that depending on how things look over the tray is inside and i put some empty eggs in to test fit.

I'll also get a little cork for the tube... I do not want gnats crawling into the incubator! :mad:(((( I have a literal jungle of houseplants so that is a very real concern.

The fan in thinking will go above or at the back, I went know until I've got it and test how powerful it is and how soft i can slow it down to.

And lastly for today, here's where i am planning to put the first coop!

IMG_20230624_125829430_HDR.jpg


At the end of the green carpet, underneath the White Pines. This area is a raised hill right behind the house on the way to our polebarn, so we already have to shovel this path in winter, it's not too far for me to reliably be able to get to every day even when dizzy, and most importantly, this area is fully shaded exactly during the hottest period of the day and is already cooling off by the time sunset touches below the trees again. There is almost always a constant breeze as well, which further helps cool this area off.

My mom and i saw a wild turkey making use of the natural feature to cool off on a hot day, poor baby was overheated and parched and alone. He let me bring a bowl of fresh water out to about fifteen, twenty feet away (i brought it as close as i could, until the turkey began to turn to be ready to move, and that's when i stopped), and left it out. He came and drank almost immediately (ever cautious, as a turkey should be), and hung out for about an hour or two until it began to chill off, before flying off to find his buddies.

So anyhow, yep, I'm probably making a lot of mistakes and i know there's easier ways to build, but it's coming together and working out so far!
 

Attachments

  • Snapchat-715621185.jpg
    Snapchat-715621185.jpg
    394.7 KB · Views: 6
  • IMG_20230127_164533373.jpg
    IMG_20230127_164533373.jpg
    677.1 KB · Views: 5
IMG_20230624_191602339.jpg


One more coat of paint on the parts i just painted the first coat, and the main frame is done!

Very happy with that. I envisioned getting a lot farther than this in two weeks (i wanted to surprise my mom by having the coop ready to go when she came home from a business trip), but I'm pleased to have the painting done. This means i can move it outside while we work in the garage and reclaim the area i took up 😂

Next up is hardware cloth when that arrives, then once that is secured on the sides i can begin bringing the roof frame and lid.

I'm a little torn on how to do a lid -- I've read so many conflicting quail run height mins and maxes. From ground to top the frame is 21" tall -- I've heard since people say no higher than twelve inches, while others say no higher than 24. (Or build it seven feet high 😂)

I've thought about putting a fabric false roof inside, or putting foam at the top (which i worry about freezing in winter if it available any humidity... Which it will), or masking loose netted lids so it has some give it they hit it. Still branding that one.

But woo! I made a thing!
 
View attachment 3554635

One more coat of paint on the parts i just painted the first coat, and the main frame is done!

Very happy with that. I envisioned getting a lot farther than this in two weeks (i wanted to surprise my mom by having the coop ready to go when she came home from a business trip), but I'm pleased to have the painting done. This means i can move it outside while we work in the garage and reclaim the area i took up 😂

Next up is hardware cloth when that arrives, then once that is secured on the sides i can begin bringing the roof frame and lid.

I'm a little torn on how to do a lid -- I've read so many conflicting quail run height mins and maxes. From ground to top the frame is 21" tall -- I've heard since people say no higher than twelve inches, while others say no higher than 24. (Or build it seven feet high 😂)

I've thought about putting a fabric false roof inside, or putting foam at the top (which i worry about freezing in winter if it available any humidity... Which it will), or masking loose netted lids so it has some give it they hit it. Still branding that one.

But woo! I made a thing!
Wow its coming along nice!! Do you know if you plan on raising old world quail (coturnix and buttons) or if you plan on raising New world quail? (Blue scaled, Gambles, Valley, Mearns, bobwhites)
 
Wow its coming along nice!! Do you know if you plan on raising old world quail (coturnix and buttons) or if you plan on raising New world quail? (Blue scaled, Gambles, Valley, Mearns, bobwhites)
Originally (aka: before i knew anything), i had my heart set on the California Quail. Thern i learned they aren't really egg layers, so for what i wanted to get out of keeping quail, i had to pick a different breed.

So, I will start with Coturnix quail! I'm interested in eggs and feathers, so they were an easy choice.

I think all of them are adorable. If i do well with Coturrnix, someday I'd perhaps try hatching some buttons and others for fun. I have to be careful bot to increase my workload too much, especially if it's not gaining me anything productive and functional (aside from the priceless therapy of working with critters, of course 😂)
 
IMG_20230625_093534628_HDR.jpg
IMG_20230625_093521519_HDR.jpg


Yaaaaaaa'll it's so tiny beneath the massive trees 😂 i mean honestly it's very small to begin with, hence temporary, but dang if it didn't look so much bigger in the garage!

I moved it outside even though i have more to build because we're about to need the garage space. My mom should be home either today or tomorrow, and i wanted to make sure she had space to unload the van. With the paint on and cured, I'm not worried about the rain now. I have a nice concrete slab area i can continue building outdoors.

This will also let my mom see exactly where I'm looking to build. And got me to decide i really do indeed want to do my digging here after starting at it for several days in place. I've already moved it a few times to get it in a nice level spot that is also easily visible from the windows of the house, and when you first step outside. Ease of being able to check on the quail very quickly is super important to me, so high visibility is a must.

I'll be going outside at least two to three times a day of course tho check on them directly, but i like the idea of being able to glance it the kitchen window as I'm doing things indoors and see them.

For the eventual large aviary, I'm thinking of building it in this same area or down in the valley behind the house. I'll be living downstairs once we finish the basement apartment, so eventually, my "front door" will open right up to that lovely bowl of grassy field. I think I'll know where to build it after another winter -- I'll be playing attention to where drifts like to pile up. I saw plenty of snow this last winter, but i wasn't looking with an eye for future buildings 😂

That fence in the picture is in the process of being taken down; it used to be a dog run when my great grandparents raised English Mastiffs and later kept guard dogs over the years. Once it's out, it'll make a huge open space for doing a large aviary! My only concern is it would lose the shade of the pine trees. There's just not many great places here to build a structure and keep it in shade, but with enough space, i figure I'll be able to just build them adequate shelters and guides that make up for it.

Almost all the trees were planted next to trails we use as roads on the farm tho get around to building entrances >.>

Alternatively, i convince my mom it's a good idea to build that covered walkway she's dreamed about between the polebarn and garage, and then we convert it into a massive, long aviary.... 😂
 
So as with any project, is taking longer than i thought it would.

But here's what's been done!

So, i dragged the painted frame back to the garage. It's outside now for the rest of its life, so this time i just set up next to the garage where i could easily run extension cords from and grab told as i needed them.

Snapchat-1909128978.jpg

I used 1/4th hardware cloth that was galvanized AFTER welding. While this enclosure is meant to house quail for only a year or two, i still want it weather resistant and be able to be used after the quail very upgraded to a large ground aviary.

I decided to do staples thinking i could be clever on saving some money on washers and screws, and save me the work of drilling out pilot holes to attach screen with.

I ended up having to hammer every. Single. Staple. It was so worth it, and honestly, i rather enjoyed it one i got started. It feels really good to build something useful.

I wasn't a pro at aiming the staples perfectly, so i did two alternating rows to help prevent any shifting of the hardware cloth.

Next, i flipped it over and got the roof uprights cut.

Snapchat-737930396.jpg

I don't know why i keep thinking "the roof is next!"
The plywood i was going to use proved to be easy shorter than i thought it was, so I'm keeping my eyes out for some to salvage. The recycle center by us gets building supplies in and they've been awesome in helping me find things to use. I even found a chicken waterer there!

For the uprights... I did this super cheater's last method and i think for this tiny build it's fine, but i doubt it'd do well on a larger or more complicated project; After attaching the four posts to the frame, I just measured the height i wanted for the highest and lowest points of the roof, then tied a string between the points tight, traced the angles with marker, then cut them all with the circle saw.

I then considered unscrewing them to stain them properly. I had also thought about staining them before i even cut them, but i was tired and feeling lazy and the strain i am using doesn't actually protect the wood really, it just looks pretty...

Snapchat-1472783418.jpg

Yeah I didn't do that. 😂 So got these all stained... Then it rained unexpectedly a few hours later. It's an indoor stain advertising water and soap cleanup that you shouldn't apply with a bristle brush according to the can, so i expected the worst.

Miraculously, despite doing *everything* wrong for this stain application, it somehow took and stayed and didn't bleed everywhere like i expected it to upon getting wet again.

It's also given me more time to find a roof for the silly thing now that i know the one i first set aside won't fit.

So it got painted colors that will blend in to the landscape nicely and won't hurt my or the quails' eyes. Yay! Then it came time for digging.

I gathered up all the tools -- rake, shovel, another different kind of rake, and the old bricks that have been in the front yard for over twenty years waiting for a purpose.

Snapchat-1237502390.jpg

Bonus, i didn't even notice until i had harmed everything over and dug the first half of the pit, but that's a freshly made wasp nest up top. I store our wheelbarrow leaving against our wall, so it must have made a nice dry spot for them.
Snapchat-947071171.jpg

Cute little guy. I eventually yeeted it off into the grasses. Someone is gonna be thrilled about an easy insect snack.

Diggy diggy hole!
Snapchat-576914943.jpg

I ended up moving the entire dig spot about a foot to the left because i found a tree root, and i didn't want to force a need to cut through it when i could just move over a bit. I was honestly shocked i didn't find more, so that made me feel very good about the location i picked out. The great white pines are so peaceful to stand beneath.

Once i had it duh enough to test fit, we hauled the enclosure over.

Snapchat-1799236880.jpg

I could still lift the coop easily by myself until i screwed the uprights on, so this time i asked a friend to help me haul it back over to the final location. We test fit it, then pulled it back off so i could finish digging and lay all the bricks down.

Once i got enough bricks, i got the roll of 1/4th hardware cloth back out.

Snapchat-843463841.jpg


I went with two 6' lengths of 2' wide hardware cloth to do the bottom of the enclosure.

Snapchat-619588989.jpg

Laid them out on the ground, weighted them with bricks, and lined them up to stitch together.

Snapchat-830256974.jpg


I started with a fancy lil' blanket stitch with the wire before i realized A) it was going to take f o r e v e r to get done, and B) i was gonna run out of wire like halfway through and i didn't want to go cut more and still risk running short.

So i just wrapped a zig zag instead and honestly, i think that'll be just fine. I'm a little worried on if the wire i used will rust or not, as i used the wire that came with the roll (they use it to wrap the roll up tight and hold it coiled), and woke i think it's galvanized in not really certain. In any case... I'm going pretty over kill i think here anyhow, and this should still his for the time i need it to.

I really wanted a bottom on my coop because we have groundhogs and snakes all over the property. Even if it's overboard, I'll sleep better knowing i did it.
Snapchat-28583209.jpg

I *almost* made it too narrow. I had exactly enough room on the long sides to staple the hardware cloth (again using the stainless steel 1/2 inch staples) to the base boards. Plenty of excess on the short side i was too tired to trim down for pettiness and said I'd fix later. Now it's staying forever and I'll grumble a little about it every time i walk on this side of the coop.

Now all of that dirt i just spent the day shoveling out had to go back in.
Snapchat-440977549.jpg

Much faster shoveling it back in! The substrate was honestly very compacted, which made digging the shallow pit difficult (for me, anyways. If you don't fight dizziness and sudden muscle fatigue, this probably would have been an hour of solid labor or less).
Snapchat-258495050.jpg

*Stomp stomp stomp*
Squished all the sandy substrate into the brick foundation rest and packed it all in the loose edges from my digging. After this picture i tossed some needles around to start restoring the ground back to a less disturbed state.

And that's where we be for now!

Next is putting a skirt of hardware cloth around the coop to prevent digging or prying open the less secure edge of the bottom bucket screen thingy.

A multi-lid cover (so i can open it one section at a time instead of lifting the entire thing open and letting quail get out easily), a roof to keep rain and snow off, an insulated enclosure, and i might mount a screen net inside the pen just before the lid so they got that instead of the hardware cloth when they flush. Head anyone got good advice for how to mount it in a way that's secure, but still easy to remove so you can reach eggs?

For the incubator, nothing new has been done, but i did add my thermostat i finally found to the quail supply collection, and
 

New posts New threads Active threads

Back
Top Bottom