LilMissChick
Songster
Well, it’s really happening
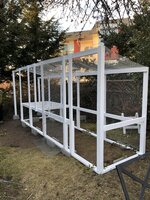
We have started the coop. Who knew painting would take so long?
The ground was much more sloped than we thought it was so we had to bring in soil to get it started and make the area.
more level.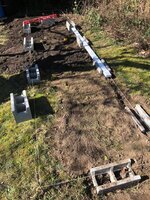
We decided at that point to use cinder blocks as well to help with leveling the coop.
My Fiancé started hammering things together as I painted. Getting it to this point.
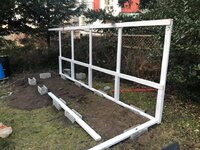
Then I chose a colour for the actual enclosed coop section of the structure:
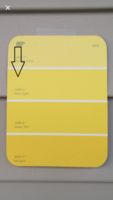
Neon Light. It’s a lovely true yellow and I think with the white and yellow under the Apple trees the back yard will look super cheerful.
Over the last two weeks, and even with both of us getting the flu we have been working on the coop. We made some design changes. Once I was standing in the upright space and looking at how big the coop vs the run was going to be, I decided the coop should be 6’x4’ instead of 8’x4’ to make the tallest part of the run 10’x4’ so there is more room for perches, swings, feeders and fun things etc. they will still have another 6’x4’ under the coop as well for dust bathing and hanging treats too. Making the total length they can walk in the run 16’ long.
Ow that the coop size was fully decidedat we put up the floor boards for the raised coop:
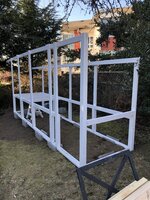
Then we started talking about ventilation as we had made the interior of the coop lay out to be 8’x4’ in the original plan, we needed to redraw the lay out and figure out how to keep the coop well ventilated, but not drafty while fitting in best boxes, roosts, pop door, windows etc. So, what we decided to do was to have open rafters under the roof, and have the coop ceiling completely covered under the rafters with hardware cloth. That way the entire roofed part of the coop will be ventilated, while still being fully covered, and it will also be predators proof. We started putting up the hardware cloth, as that needs to go in before the roof rafters/cross beams, plywood and roof.
To be easy to clean under the coop, we have started building well secured, fitted screens that can be fully removed. And we changed our choice of roofing. Originally we were going to buy Ondura corrugated roofing panels. They look really sharp, don’t need plywood underneath of them, and are easy to install, however I read some poor reviews so we decided to go with steel roofing instead. (As an aside,anywhere you see gaps in the ceiling hardware cloth, those gaps will be covered by rafters that the hardware cloth will be nailed to).
My fiancé put up with quite a bit of dithering over colour today, thankfully he is patient and I chose a lovely shade of a deep wine colour for the roof and it will be here in a few days.
We also decided to extend hardare cloth out from the run instead of digging it underground. We are going to put more soil on top of it and then seed it with grass so that it will be hidden.
As well we made a fun purchase purchase of two antique, turn of the century windows to put on the coop, and got our
brooder box all ready to go for Easter chicks!
I was going to wait to post all the pictures when we were done but I just had to start sharing now
Now to choose what three chicken breeds to start with as it appears my options are pretty limitless (couldn’t find a scots dumpy though )
)
And to continue painting and making this a pretty, happy, hen house!
Cheers,
LilMissChick


We have started the coop. Who knew painting would take so long?
The ground was much more sloped than we thought it was so we had to bring in soil to get it started and make the area.
more level.

We decided at that point to use cinder blocks as well to help with leveling the coop.
My Fiancé started hammering things together as I painted. Getting it to this point.

Then I chose a colour for the actual enclosed coop section of the structure:

Neon Light. It’s a lovely true yellow and I think with the white and yellow under the Apple trees the back yard will look super cheerful.
Over the last two weeks, and even with both of us getting the flu we have been working on the coop. We made some design changes. Once I was standing in the upright space and looking at how big the coop vs the run was going to be, I decided the coop should be 6’x4’ instead of 8’x4’ to make the tallest part of the run 10’x4’ so there is more room for perches, swings, feeders and fun things etc. they will still have another 6’x4’ under the coop as well for dust bathing and hanging treats too. Making the total length they can walk in the run 16’ long.
Ow that the coop size was fully decidedat we put up the floor boards for the raised coop:

Then we started talking about ventilation as we had made the interior of the coop lay out to be 8’x4’ in the original plan, we needed to redraw the lay out and figure out how to keep the coop well ventilated, but not drafty while fitting in best boxes, roosts, pop door, windows etc. So, what we decided to do was to have open rafters under the roof, and have the coop ceiling completely covered under the rafters with hardware cloth. That way the entire roofed part of the coop will be ventilated, while still being fully covered, and it will also be predators proof. We started putting up the hardware cloth, as that needs to go in before the roof rafters/cross beams, plywood and roof.

To be easy to clean under the coop, we have started building well secured, fitted screens that can be fully removed. And we changed our choice of roofing. Originally we were going to buy Ondura corrugated roofing panels. They look really sharp, don’t need plywood underneath of them, and are easy to install, however I read some poor reviews so we decided to go with steel roofing instead. (As an aside,anywhere you see gaps in the ceiling hardware cloth, those gaps will be covered by rafters that the hardware cloth will be nailed to).
My fiancé put up with quite a bit of dithering over colour today, thankfully he is patient
 and I chose a lovely shade of a deep wine colour for the roof and it will be here in a few days.
 We also decided to extend hardare cloth out from the run instead of digging it underground. We are going to put more soil on top of it and then seed it with grass so that it will be hidden.
As well we made a fun purchase purchase of two antique, turn of the century windows to put on the coop, and got our
brooder box all ready to go for Easter chicks!
I was going to wait to post all the pictures when we were done but I just had to start sharing now

Now to choose what three chicken breeds to start with as it appears my options are pretty limitless (couldn’t find a scots dumpy though
 )
)And to continue painting and making this a pretty, happy, hen house!
Cheers,
LilMissChick


