Electric Fence Basics

Pics

Howard E

Crowing
5 Years
Feb 18, 2016
2,881
4,062
296
Missouri
For those considering the installation of an electric fence, or not sure of how they work, consider this to be a basic tutorial.
e fence parts.jpg Fencer.jpg

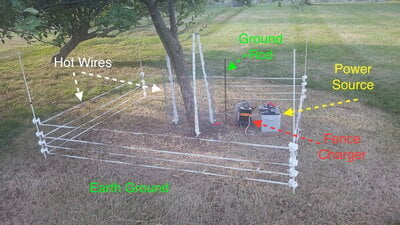
So all electric fence setups will be similar to this on, differing only in scale......meaning where you put your hot wires and how large of an area you encompass. But all consist of 4 basic components. 1. Fence Charger 2. power source 3. Ground Rod 4. Hot wire runs

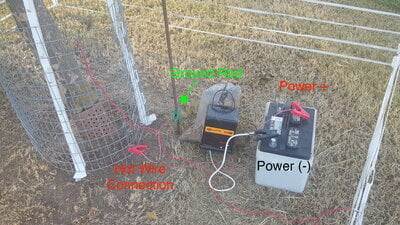
The fence charger powers up or activates the hot wires.....generally with as large of 5,000 to as many as 15,000 volts. This is a high voltage, low amperage shock, which is both highly painful and relatively harmless, which makes it both safe and effective. The way the fencer works is about once every second, this high voltage pulse is sent down the hot wires. The fencer is also connected to the earth ground.....literally the soil you stand upon. So the two conductors are the hot wires and soil. So when an animal standing on the soil comes into contact with the hot wires, the juice flows through them to ground, which they feel as a violent, painful shock. Painful enough they will go into avoidance mode so it doesn't happen again. So the fence becomes a boundary they are reluctant to cross, so they leave it alone.

This is an enlarged layout of the fence charger hookup.... Fencer.jpg

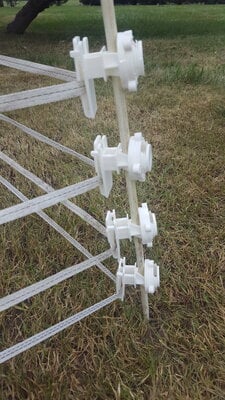
And lastly, the hot wires must be kept isolated.......meaning insulated......from the earth ground, so are supported by some type of insulators.
White Insulators.jpg
This one is new to me.....but consists of only a plain fiberglass rod, which is driven into the soil deep enough to support the fence (about 6 to 10 inches). Then two piece insulators are attached to it. With this setup, user is free to position the insulators where they want them......from nearly touching the deck to as far as needed. They can be placed as close as 2 inches apart.

This particular fence was built to prevent coons from raiding an apple tree. One day, tree had nearly 2 bushel of apples on it. Next morning.....top had been shredded and only a peck or two remained. Coons did that. Fence went up and as per game cameras, perimeter was probed all night, but the fence held. Traffic the next two nights has fallen off greatly.

Same could be done with a coop or run to keep varmints at arm's length......up to and including a larger area (yard), surrounding the coop or ranging area.
 
Last edited:
For those considering the installation of an electric fence, or not sure of how they work, consider this to be a basic tutorial.

View attachment 2252055View attachment 2252056

So all electric fence setups will be similar to this on, differing only in scale......meaning where you put your hot wires and how large of an area you encompass. But all consist of 4 basic components. 1. Fence Charger 2. power source 3. Ground Rod 4. Hot wire runs

The fence charger powers up or activates the hot wires.....generally with as large of 5,000 to as many as 15,000 volts. This is a high voltage, low amperage shock, which is both highly painful and relatively harmless, which makes it both safe and effective. The way the fencer works is about once every second, this high voltage pulse is sent down the hot wires. The fencer is also connected to the earth ground.....literally the soil you stand upon. So the two conductors are the hot wires and soil. So when an animal standing on the soil comes into contact with the hot wires, the juice flows through them to ground, which they feel as a violent, painful shock. Painful enough they will go into avoidance mode so it doesn't happen again. So the fence becomes a boundary they are reluctant to cross, so they leave it alone.

This is an enlarged layout of the fence charger hookup....View attachment 2252056

And lastly, the hot wires must be kept isolated.......meaning insulated......from the earth ground, so are supported by some type of insulators.
View attachment 2252057
This one is new to me.....but consists of only a plain fiberglass rod, which is driven into the soil deep enough to support the fence (about 6 to 10 inches). Then two piece insulators are attached to it. With this setup, user is free to position the insulators where they want them......from nearly touching the deck to as far as needed. They can be placed as close as 2 inches apart.

This particular fence was built to prevent coons from raiding an apple tree. One day, tree had nearly 2 bushel of apples on it. Next morning.....top had been shredded and only a peck or two remained. Coons did that. Fence went up and as per game cameras, perimeter was probed all night, but the fence held. Traffic the next two nights has fallen off greatly.

Same could be done with a coop or run to keep varmints at arm's length......up to and including a larger area (yard), surrounding the coop or ranging area.
Such a helpful post. Thank you for the explanation!
 
For those considering the installation of an electric fence, or not sure of how they work, consider this to be a basic tutorial.

View attachment 2252055View attachment 2252056

So all electric fence setups will be similar to this on, differing only in scale......meaning where you put your hot wires and how large of an area you encompass. But all consist of 4 basic components. 1. Fence Charger 2. power source 3. Ground Rod 4. Hot wire runs

The fence charger powers up or activates the hot wires.....generally with as large of 5,000 to as many as 15,000 volts. This is a high voltage, low amperage shock, which is both highly painful and relatively harmless, which makes it both safe and effective. The way the fencer works is about once every second, this high voltage pulse is sent down the hot wires. The fencer is also connected to the earth ground.....literally the soil you stand upon. So the two conductors are the hot wires and soil. So when an animal standing on the soil comes into contact with the hot wires, the juice flows through them to ground, which they feel as a violent, painful shock. Painful enough they will go into avoidance mode so it doesn't happen again. So the fence becomes a boundary they are reluctant to cross, so they leave it alone.

This is an enlarged layout of the fence charger hookup....View attachment 2252056

And lastly, the hot wires must be kept isolated.......meaning insulated......from the earth ground, so are supported by some type of insulators.
View attachment 2252057
This one is new to me.....but consists of only a plain fiberglass rod, which is driven into the soil deep enough to support the fence (about 6 to 10 inches). Then two piece insulators are attached to it. With this setup, user is free to position the insulators where they want them......from nearly touching the deck to as far as needed. They can be placed as close as 2 inches apart.

This particular fence was built to prevent coons from raiding an apple tree. One day, tree had nearly 2 bushel of apples on it. Next morning.....top had been shredded and only a peck or two remained. Coons did that. Fence went up and as per game cameras, perimeter was probed all night, but the fence held. Traffic the next two nights has fallen off greatly.

Same could be done with a coop or run to keep varmints at arm's length......up to and including a larger area (yard), surrounding the coop or ranging area.
Okay, I"m confused...why is the red wire going to the half-circle of fencing around the tree and not connected to the white hot wires?
 
Sorry, it's connected to both. A woven wire inner fence, within a hot tape fence. The hot tape fence is connected to the inner wire with a short jumper.

Originally did the white tape fence only, but I've got nearly 2 months to go before apple harvest, and the white tape fence will be in the way for mowing, etc. So I added the inner wire (notice it sits up off the ground on the steps of the insulated posts.......a short, homemade form of a netting fence), but left the tape fence up to get the coons under control and out of the mood for apples.......at which point I'll take down the outer and retain the inner.
 
yes, that is the short jumper wire. I often use those to attach small temp fences like this to the main fence.......with the right handle, can also be used as a gate.

But don't get too bogged down on the fence within a fence. The point of the thread was to show the basic component parts of an E fence system.

But now that I think about it, using the small wire enclosure inside the tape is also illustrative. Imagine the white tape being a long run and surrounding a yard area, and imagine the short wire being a short run surrounding a coop, and both of them running off the same fence charger?
 
Also be aware that with these fences being in such close proximity to the soil.....only an inch or two.....it will be critical to keep the grass and weed growth down. For this, I will just use roundup under the wire.
 
Thanks for the tutorial, very informative.

I've had a fox problem lately, but I have extremely rocky soil ..... Gravel to refrigerator sized rocks, with pockets of actual soil, and pretty shallow (in places) bedrock. Assuming I could get a ground rod deep enough, would the rocks and dirt still complete the circuit ?

Or would I have to go with alternating ground / hot wires on the posts ?

Any other solutions that you are aware of ?
 
How do you attach the wire to the tape without an alligator clip?

The short jumper wire I used has small alligator clips (hardware or auto parts store) on both ends. I have it for something else, but used it for this too.

Where you get your E fence supplies, they also sell a black plastic insulating jacket that can be used with wire.....just run the wire through it...... then attach it on both ends. I often use a spring loaded gate handle for those.....which has the added benefit of working like a switch if you need one. Disconnect the handle and what is downstream of that then goes dead so you can work on it or something else without fear of getting zapped.
 

New posts New threads Active threads

Back
Top Bottom