Sacri
Chirping
We finally have our coop mostly done and worked out a few kinks. We have 14 chickens so our coop is fairly large and we did make the coop and run high enough that we can walk in for ease of clean-up.
Our coop is 7x8 and our run is 16x7. We used pressure treated wood for everything in the coop.
To make the base we used 2 x 6s and plywood. To ensure nothing could get in from underneath we attached wire fabric to the underside. To help the floor last longer we put down a laminate.


We leveled the ground we were putting our base on then put them on pavers so the wood was not in contact with the ground.

To make each wall we actually built them each individually then "raised" them onto the base. We made one wall 8x8 and one 8x6 with the other two being 7ft in width and raising from six feet to eight feet.


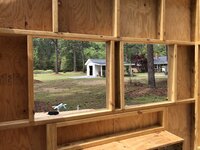
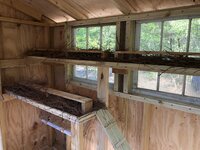
(You can see we have some "extra" floor in the back. We are building a little storage closet back there to store supplies. I used reclaimed windows and we cut a door down to the size we wanted so our exact measurements may not work for another coop. What we did try to be sure of was that each wall had adequate support. One part of our design I was especially happy with was the support for the nesting boxes. I built them to slide into the framed out area so they rest in the 2x4s on the top and bottom and the side pieces bump up against the horizontal 2x4s. the nesting space is 1x1x1. I added a lip in the front and back to keep nesting material in the boxes.

We then surrounded the structure with plywood.


For the windows we attached wire fabric on the inside. we covered this with wood trim to help secure it in place.


To keep the windows latched I just used a piece of wood and a cabinet screw. We also added a handle so we can pull it open easily.
The nesting boxes got a sloped roof to deter roosting and two support legs for added support.

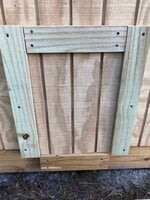
We created a door on the outside of the coop to collect eggs from the nesting boxes. Two hinges, two hooks and a handle was all it took.

We have two windows on the front, two windows on the back, the door to the run on one side with a vent up top and a door with windows on the other side, also with a vent. The vents are simply dryer vents that we cut holes for and secured. (You can see one of these vents in the pictures for the run.)

I latch the door closed the same way I latched the windows. This door was a repurposed door we cut down to the size we wanted.
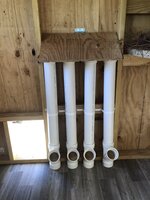
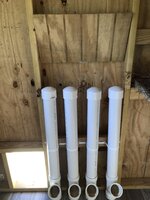
Now for the fun part! We created tubes to hold food to feed the chickens. We can usually get away with filling these once a week. I put a sloped hatch over them to stop roosting. to add food we just have to lift! The caps are removed and food poured in. (when the chickens got bigger we did block off the bottom half of the opening to help keep the food in.)


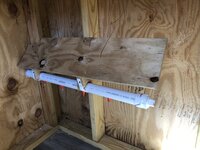
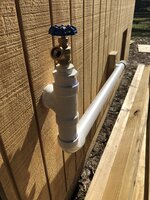
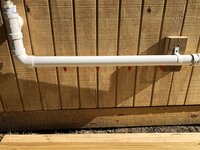
The watering system is a "water tower" we built. It is just 2x4s and a 5 gallon bucket. We drilled a hole in the bottom of the bucket and attached a hose. That is attached to a faucet head at the coop. There is an outside and inside watering tube....


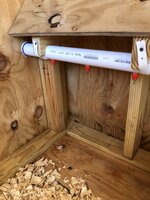
We attached nipples to the piping. To handle dripping we got a plastic tub and cut out a side, leaving a lip to catch water. I ran tubing over the edge so the chickens wouldn't hurt themselves on it. We put a drain in the bottom with a drainage pipe that goes outside. We can usually get away with filling the bucket every few days (more on hot days, less on cooler weeks). You can see in the photos how we attached the piping.
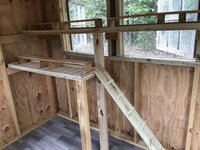
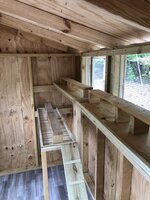
We built boxes under the roosting bars to catch their messes at night. I did end up moving the ladder because the one pictured was too steep and didn't give enough access to the roosts, if a chicken sat on the end of the roost no one else could get on. (I show the new placement in the last picture. This seems to give them ample access).


With the water tub and boxes under the roost bars and the food dispensers the main floor of the coop is surprisingly clean. We add food and water, collectively, about three times a week. This keeps our work to a minimum and we are thrilled with this!!
For the run we used 6x6s for the base. The front wall is 8ft high to match the coop and the back wall is 6ft high to match there. We framed the wall out in 2ft intervals then ran wire fabric over it. We built the walls on the ground and then raised them. As you can see in the pictures, we temporarily braced the walls then removed the braces. To attach the wire we used poultry net staples 3/4". We still need to put a roof on it but here it is so far...


I hope this was helpful and you got some great ideas! Feel free to ask questions and happy building!
Our coop is 7x8 and our run is 16x7. We used pressure treated wood for everything in the coop.
To make the base we used 2 x 6s and plywood. To ensure nothing could get in from underneath we attached wire fabric to the underside. To help the floor last longer we put down a laminate.
We leveled the ground we were putting our base on then put them on pavers so the wood was not in contact with the ground.
To make each wall we actually built them each individually then "raised" them onto the base. We made one wall 8x8 and one 8x6 with the other two being 7ft in width and raising from six feet to eight feet.
(You can see we have some "extra" floor in the back. We are building a little storage closet back there to store supplies. I used reclaimed windows and we cut a door down to the size we wanted so our exact measurements may not work for another coop. What we did try to be sure of was that each wall had adequate support. One part of our design I was especially happy with was the support for the nesting boxes. I built them to slide into the framed out area so they rest in the 2x4s on the top and bottom and the side pieces bump up against the horizontal 2x4s. the nesting space is 1x1x1. I added a lip in the front and back to keep nesting material in the boxes.
We then surrounded the structure with plywood.
For the windows we attached wire fabric on the inside. we covered this with wood trim to help secure it in place.
To keep the windows latched I just used a piece of wood and a cabinet screw. We also added a handle so we can pull it open easily.
The nesting boxes got a sloped roof to deter roosting and two support legs for added support.
We created a door on the outside of the coop to collect eggs from the nesting boxes. Two hinges, two hooks and a handle was all it took.
We have two windows on the front, two windows on the back, the door to the run on one side with a vent up top and a door with windows on the other side, also with a vent. The vents are simply dryer vents that we cut holes for and secured. (You can see one of these vents in the pictures for the run.)
I latch the door closed the same way I latched the windows. This door was a repurposed door we cut down to the size we wanted.
Now for the fun part! We created tubes to hold food to feed the chickens. We can usually get away with filling these once a week. I put a sloped hatch over them to stop roosting. to add food we just have to lift! The caps are removed and food poured in. (when the chickens got bigger we did block off the bottom half of the opening to help keep the food in.)
The watering system is a "water tower" we built. It is just 2x4s and a 5 gallon bucket. We drilled a hole in the bottom of the bucket and attached a hose. That is attached to a faucet head at the coop. There is an outside and inside watering tube....
We attached nipples to the piping. To handle dripping we got a plastic tub and cut out a side, leaving a lip to catch water. I ran tubing over the edge so the chickens wouldn't hurt themselves on it. We put a drain in the bottom with a drainage pipe that goes outside. We can usually get away with filling the bucket every few days (more on hot days, less on cooler weeks). You can see in the photos how we attached the piping.
We built boxes under the roosting bars to catch their messes at night. I did end up moving the ladder because the one pictured was too steep and didn't give enough access to the roosts, if a chicken sat on the end of the roost no one else could get on. (I show the new placement in the last picture. This seems to give them ample access).
With the water tub and boxes under the roost bars and the food dispensers the main floor of the coop is surprisingly clean. We add food and water, collectively, about three times a week. This keeps our work to a minimum and we are thrilled with this!!
For the run we used 6x6s for the base. The front wall is 8ft high to match the coop and the back wall is 6ft high to match there. We framed the wall out in 2ft intervals then ran wire fabric over it. We built the walls on the ground and then raised them. As you can see in the pictures, we temporarily braced the walls then removed the braces. To attach the wire we used poultry net staples 3/4". We still need to put a roof on it but here it is so far...
I hope this was helpful and you got some great ideas! Feel free to ask questions and happy building!
Attachments
-
 IMG_0240.JPG675.8 KB · Views: 19
 -
 IMG_0283.JPG441.9 KB · Views: 16
 -
 IMG_0284.JPG427.3 KB · Views: 18
 -
 IMG_0286.JPG475.2 KB · Views: 15
 -
 IMG_0287.JPG801.1 KB · Views: 14
 -
 IMG_0288.JPG1,016.6 KB · Views: 16
 -
 IMG_0289.JPG523.7 KB · Views: 16
 -
 IMG_0296.JPG787.8 KB · Views: 16
 -
 IMG_0285.JPG627.6 KB · Views: 17
 -
 IMG_0287.JPG801.1 KB · Views: 18
 -
 IMG_0288.JPG1,016.6 KB · Views: 16
 -
 IMG_0302.JPG644.7 KB · Views: 19
 -
 IMG_0304.JPG546.6 KB · Views: 19
 -
 wWkt%MRxS9mbqCGfBoZlsw.jpg1 MB · Views: 20
 -
 MFFHcMupR0WAJ48GiAzkug.jpg1.1 MB · Views: 16


